6.4. Configuring Cloud Storage Services
This section contains our advice on creating buckets and accounts for cloud storage. The Cyber Triage application does not do this for you. Make sure whatever you do complies with your organization’s policies.
After you complete these steps, refer to Configure Cloud Storage Profiles to add the users and bucket information into the Cyber Triage application.
6.4.1. Basic Cloud Services Workflow With Cyber Triage
Cyber Triage can use cloud storage to store data before it is imported into the main application for analysis. The basic process is:
Configure a single bucket with at least two types of accounts that can access it. Those details are below.
- When the Cyber Triage Collector is run on a live system, it upload the data to the configured bucket.
The file is first saved locally, so ensure you have enough disk space.
The data is broken up into chunks (often < 2GB) before uploading.
Each file has a unique name based on the host name and timestamp. So, multiple hosts can upload into the same bucket without getting a collision.
You can then analyze them with Cyber Triage using the “Cyber Triage File” import feature. This feature allows you to directly read from the cloud storage bucket.
6.4.2. Configuration Overview
Cyber Triage supports uploading and downloading collections to S3-compatible (AWS, Backblaze, etc.) and Microsoft Azure cloud storage services. In order to improve security we recommend having at least three different accounts:
An administrator account that can create buckets, identities, etc. This account should be the most protected. You will never need to enter this account into Cyber Triage.
A Collector Upload account that should only have write permissions to the bucket/container that Cyber Triage uses. This account is the one that could be compromised by an attacker since it will be used on a potentially compromised computer.
A Manager account that can download files from the bucket and list the contents of the bucket. This is optional and will be used by the Cyber Triage application to process files that are in the bucket.
The rest of this section outlines how to use the administrator account and the service provider’s web console to create them.
6.4.3. Configuring AWS S3
Cyber Triage will work on other S3-compatible services, but we do not cover configuration here. This section is for AWS only.
6.4.3.1. Create a Bucket
You will need to create a bucket for the Collector to upload to. You can create a bucket in different regions if your business requires that.
From the AWS Console, choose “S3” and then select “Create Bucket”.
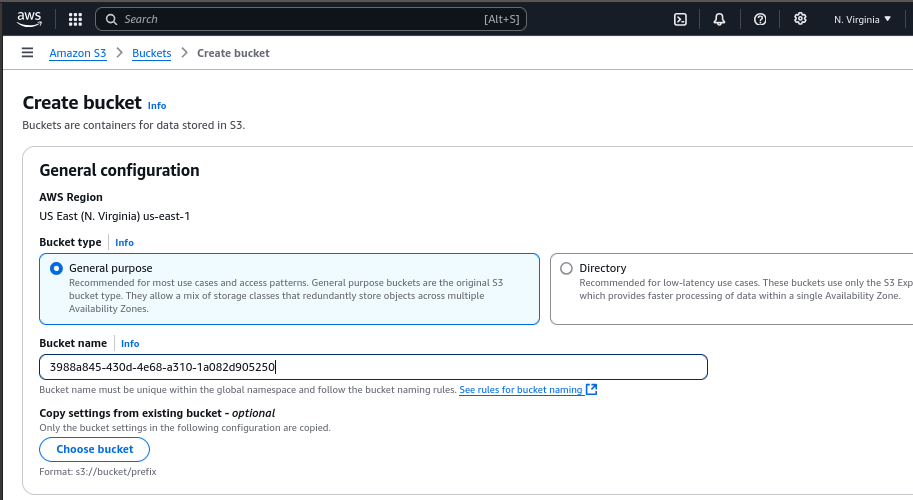
For most use cases you can stick with the default settings and simply pick the bucket name. Bucket names are global and the recommended practice is to use GUIDs to avoid collisions and prevent people from guessing them.
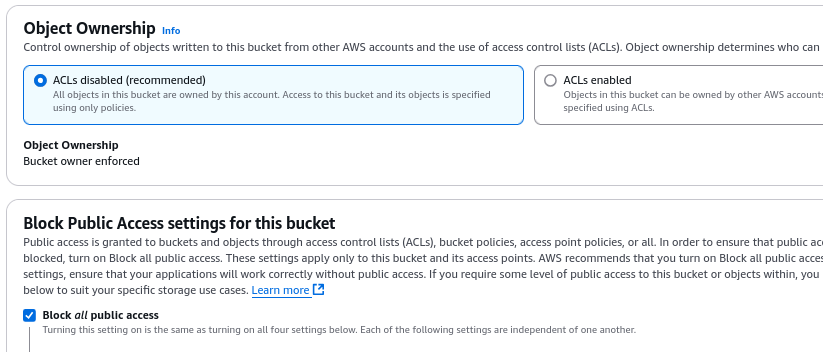
Ensure that public access to the bucket is disabled.
6.4.3.2. Create the Manager Account
This account is optional, but needed if you want Cyber Triage to be able to directly download files and process them. Review this section though because it’s the same process to create the required Upload account.
Users can span regions, so a user can have access to multiple buckets in multiple regions.
6.4.3.2.1. Create the Manager Policy
In the AWS Console, go to the “Identity and Access Management (IAM)” section.
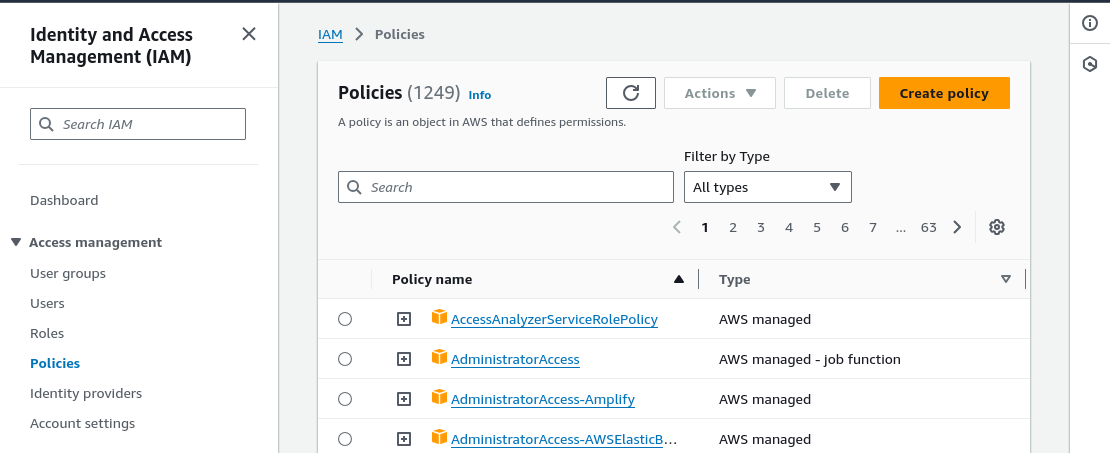
Press “Create Policy”.
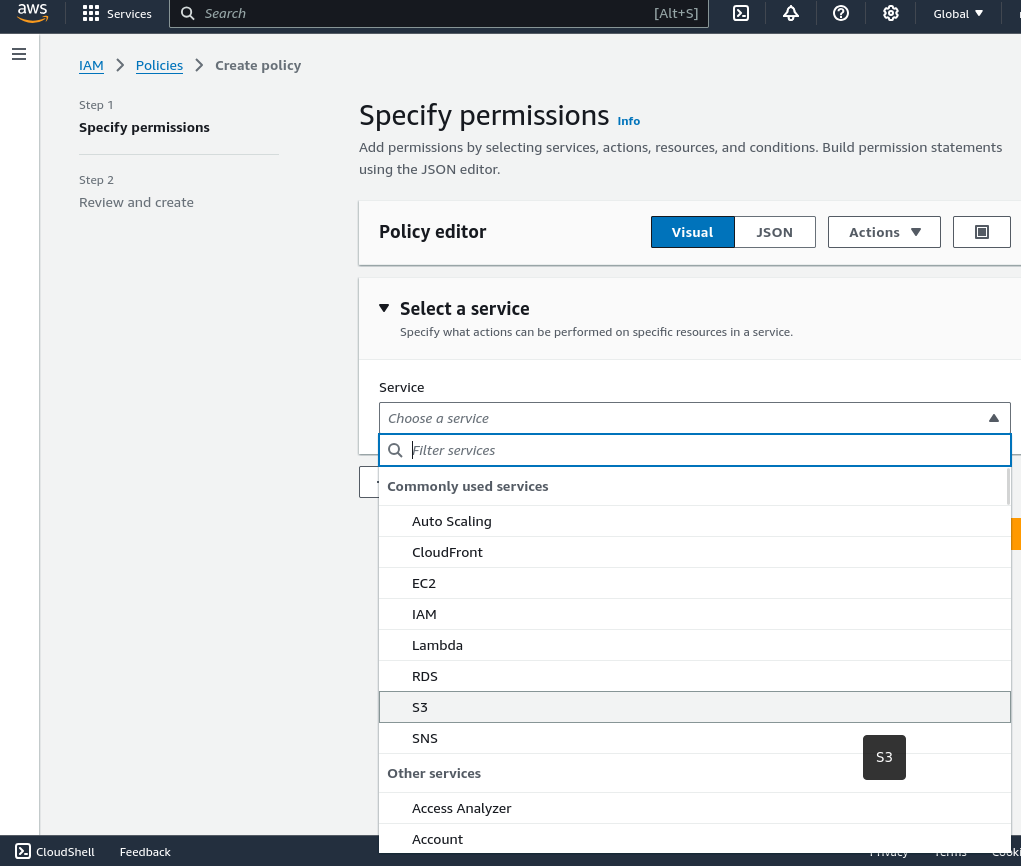
Choose the “S3” service
- Set what actions will be allowed. For the Manager role should have:
ListBucket
GetObject
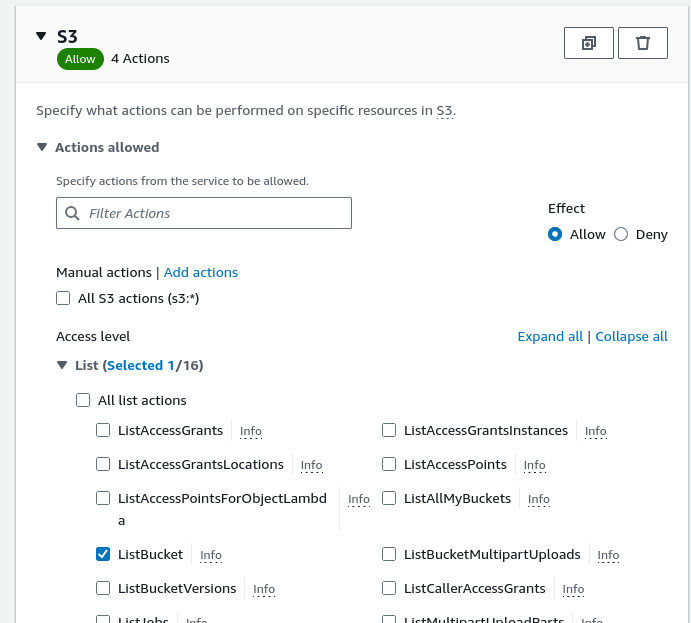
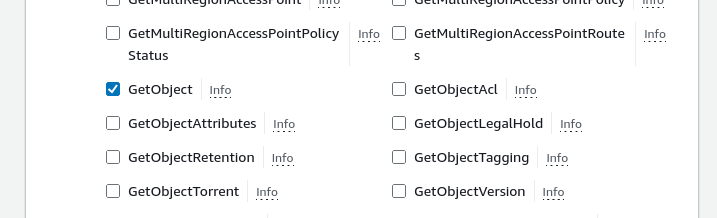
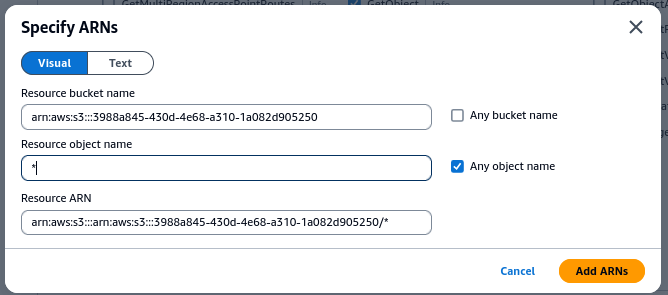
Limit the actions to the bucket that was previously created by going to Resources and choosing to “Add ARNs” for a bucket.
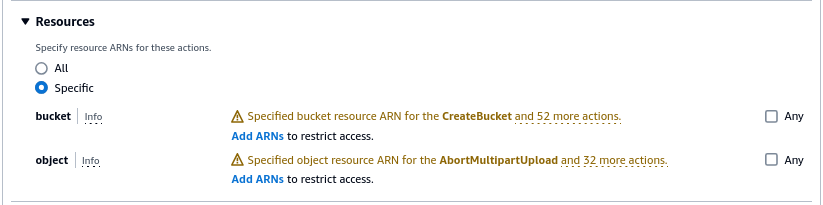
Add the bucket name
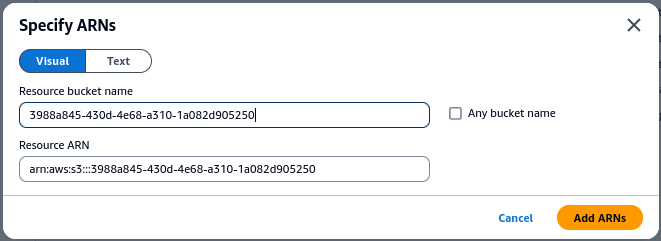
And then add a * to allow access to all objects in the bucket
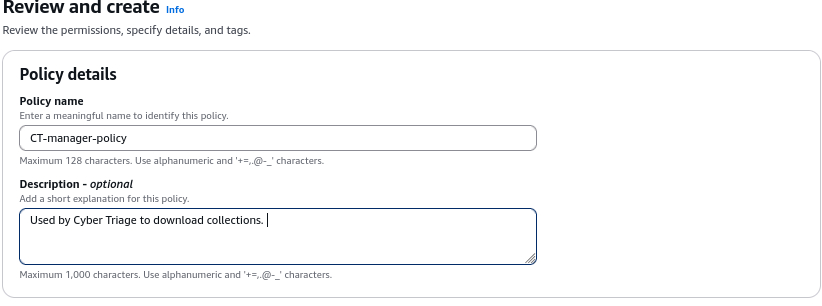
Lastly, assign the policy a name, such as “CT-manager-policy”.
As you add more buckets for use by Cyber Triage, you can add those buckets to the profile.
Alternatively, the following template can be used:
{
  "Version": "2012-10-17",
  "Statement": [
      {
          "Effect": "Allow",
          "Action": [
              "s3:GetObject",
              "s3:ListBucket"
          ],
          "Resource": [
              "arn:aws:s3:::<bucket name>/*",
              "arn:aws:s3:::<bucket name>"
          ]
      }
  ]
}
6.4.3.2.2. Create the Manager User
After the policy is created, we can make the manager user.
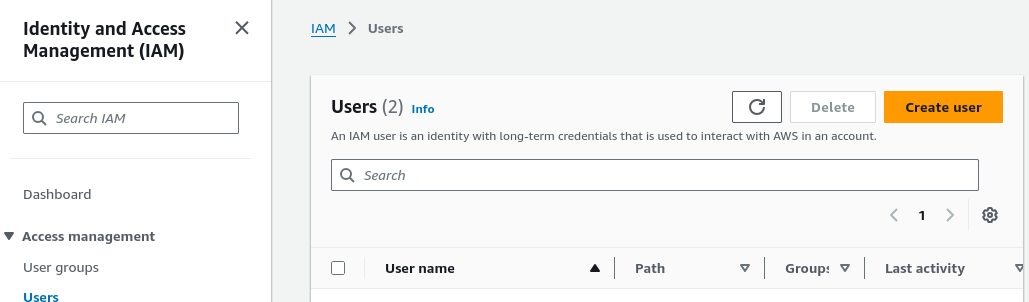
From the AWS Console, go to IAM and Users.
Choose to “Create User”
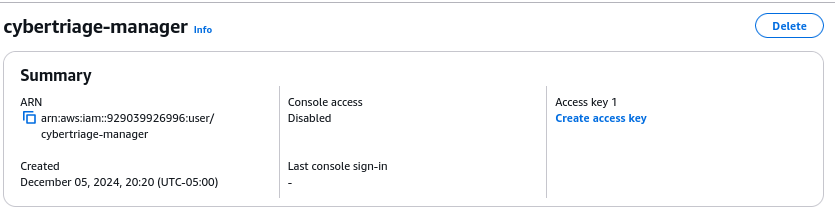
Assign a name, such as “cybertriage-manager”
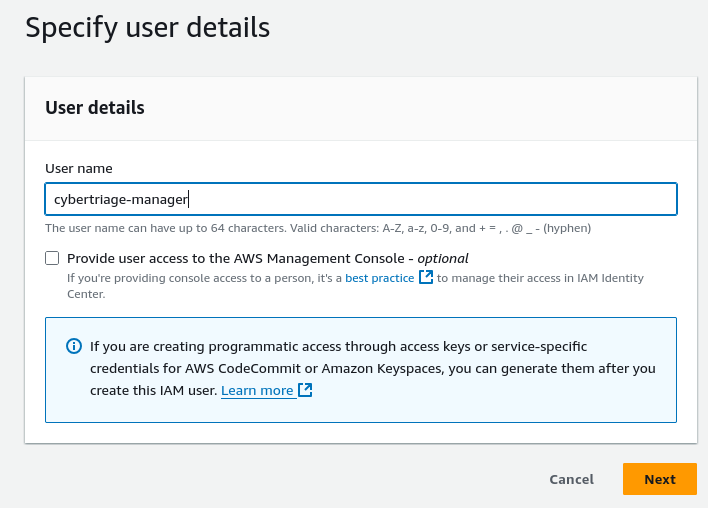
Attach the previously created policy to the user, by specifying “Attach policy directly” and searching for the policy by name.
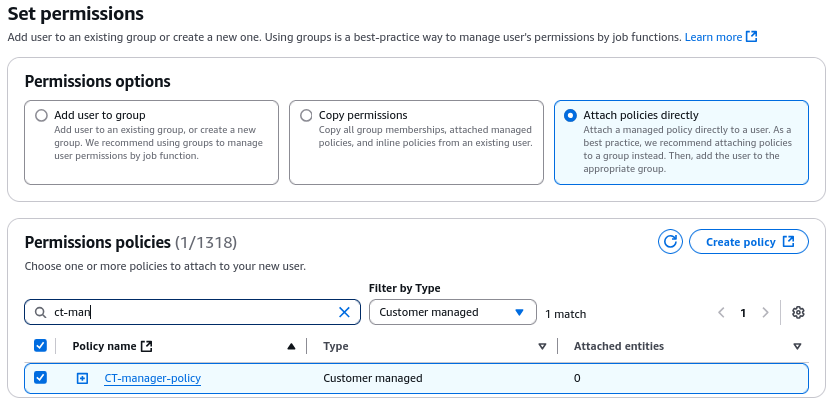
Press Next and the user will be created.
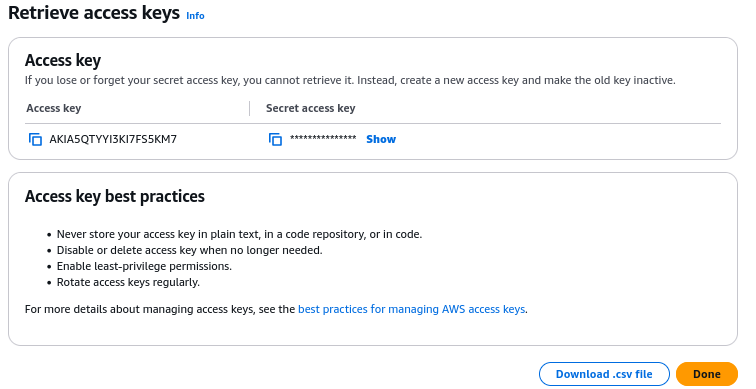
6.4.3.2.3. Create an Access Key for the Manager User
For Cyber Triage to use this account programmatically, an access key must be created.
From the Users section in IAM, select the user, such as “cybertriage-manager”.
Choose to “Create access key”
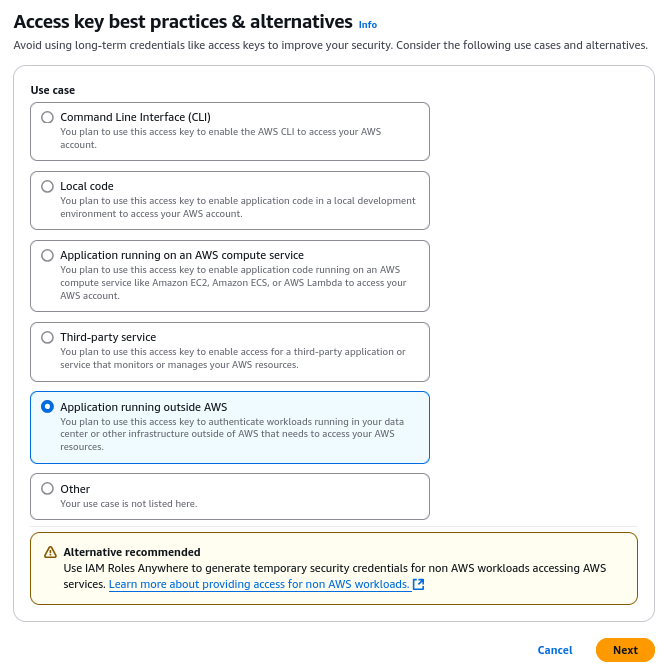
Choose “Application running outside AWS”
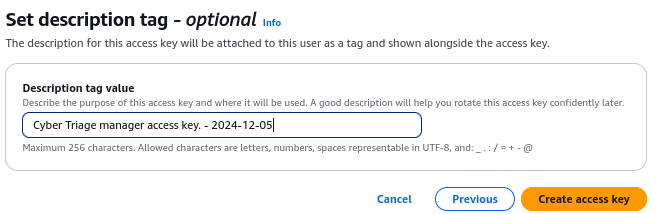
To make managing this easier, we suggest giving the key a name and putting in the date.
Once the key is created you will need to immediately save it because you cannot access it later. If you lose the secret you will have to create a new access key. A user can have up to two access keys at a time.
6.4.3.3. Create the Upload Account
To create the upload account, you’ll repeat the same steps as for the Manager, but use different settings for the policy.
Create an upload policy (see below)
Create an upload user that uses the upload policy and has access to only the single bucket.
Add an access key to the upload user
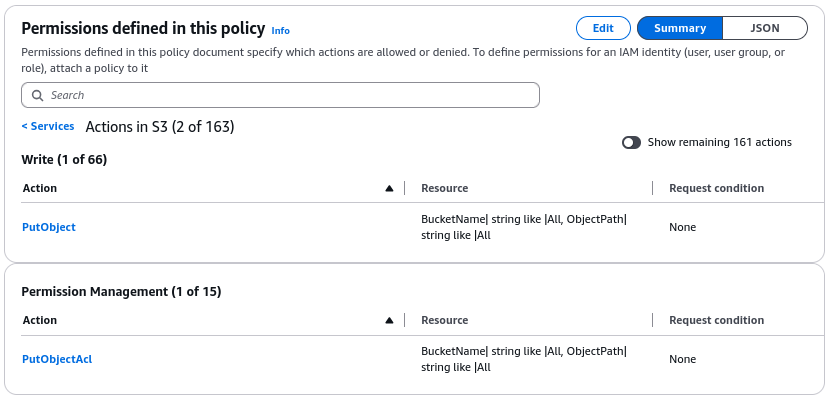
The upload policy needs only:
PutObject
PutObjectACL
Or use the following policy template:
{
  "Version": "2012-10-17",
  "Statement": [
      {
          "Effect": "Allow",
          "Action": [
              "s3:PutObject",
              "s3:PutObjectAcl"
          ],
          "Resource": [
              "arn:aws:s3:::<bucket name>/*",
              "arn:aws:s3:::<bucket name>"
          ]
      }
  ]
}
6.4.3.4. Secure the Upload Account
Because the upload account will be shared around when the Collector is deployed, there are some things that you can do to minimize the risk that someone accesses it and uploads excess data to your account.
Rotate the access keys regularly. Follow the steps above to periodically change the key, similar to changing a password.
Use a temporary Session Token. This creates a temporary user account that will be active for up to 36 hours. This requires some additional setup and not for beginners. It uses the AWS Command Line Tool.
6.4.4. Configuring Azure Blob Storage
Cyber Triage supports Microsoft Azure Blob Storage for storing and retrieving collections.
There are two options for providing Collector upload credentials:
Shared Access Signature (SAS) URL (recommended) — Scoped to a single container with specific permissions and a configurable expiry time. Easier to set up and more secure.
Account Access Key — Grants access to all containers within the storage account. Simpler but broader in scope; keys must be rotated promptly after collection.
Note
If your organization has Microsoft Entra ID Premium P1 or P2, a third option using custom role assignments is available to create a more narrowly scoped upload account. Full instructions for that approach are not covered here.
6.4.4.1. Create a Storage Account
You will need to create an Azure Storage Account as the top-level resource for blob storage.
Log on to the Azure Portal with your Microsoft administrator account.
Open Storage Accounts and click Create.
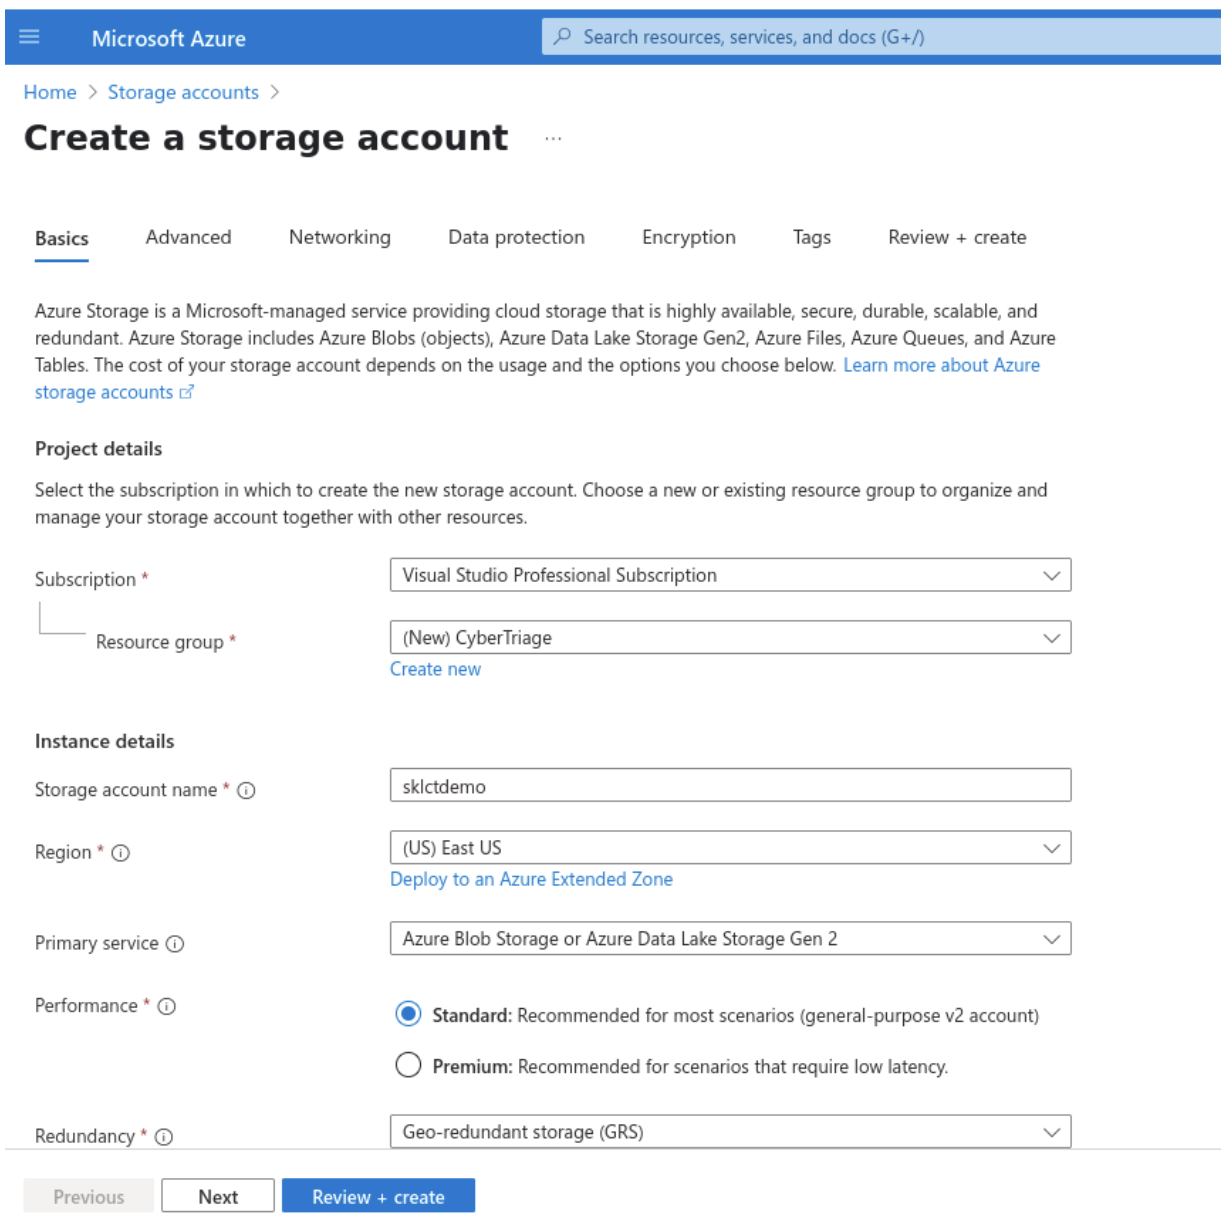
Enter values for:
Resource Group — We recommend creating a unique resource group for Cyber Triage collections.
Storage account name — Only lowercase letters and numbers are allowed.
Region
Primary Service — Azure Blob Storage is recommended.
Performance
Redundancy
Click Next. The options on the second page can be left at their defaults.
Click Create to finish.
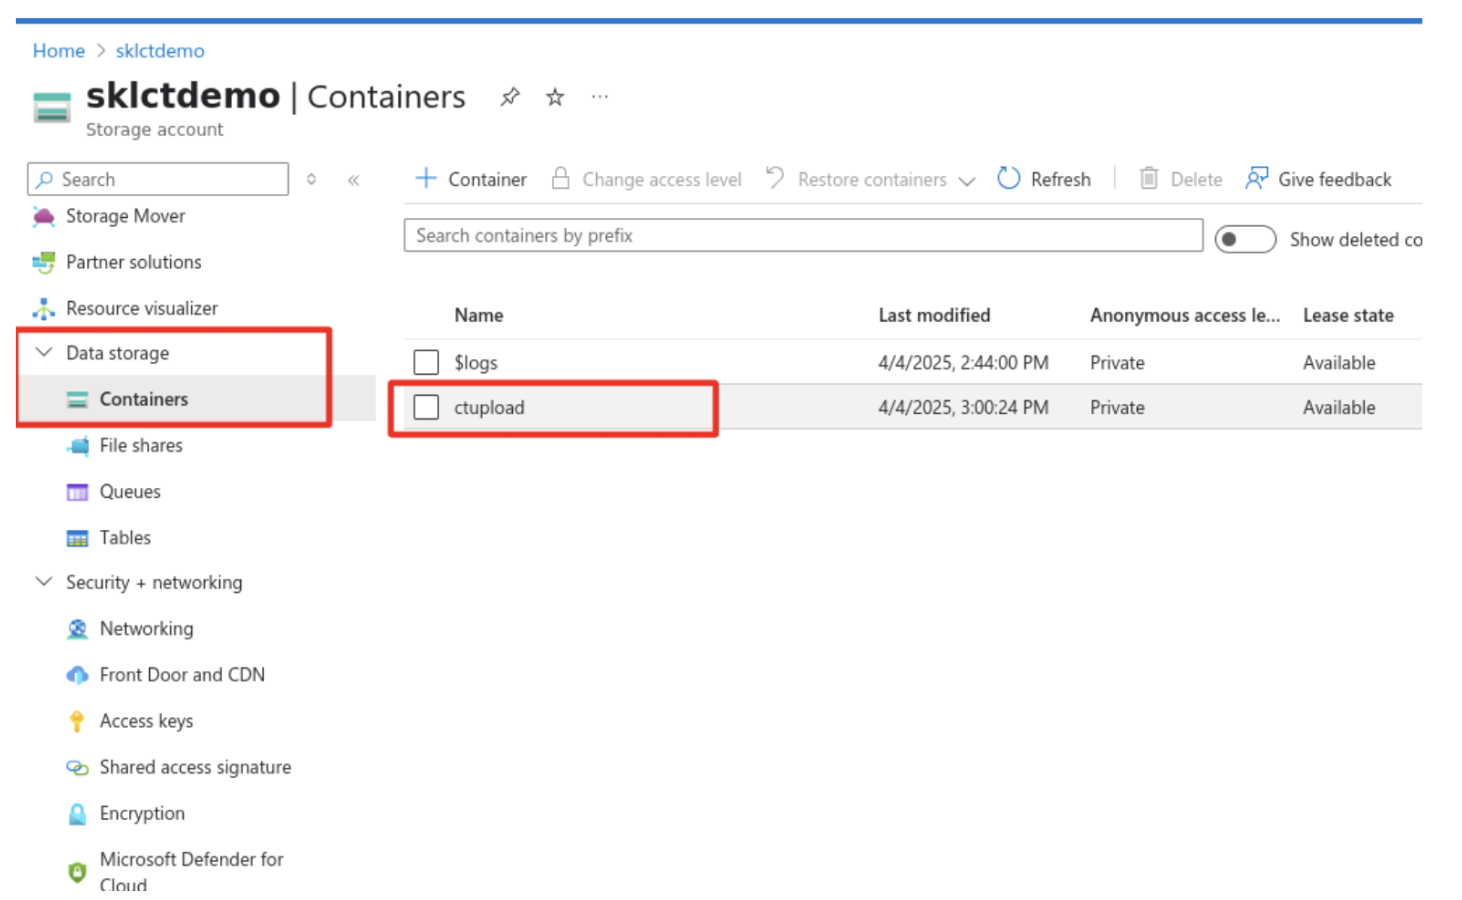
6.4.4.2. Create a Blob Container
Within the storage account, create a container where collections will be stored.
Navigate to the new Storage Account (click Go to resource).
Go to Data Storage → Containers.
Click + Container.
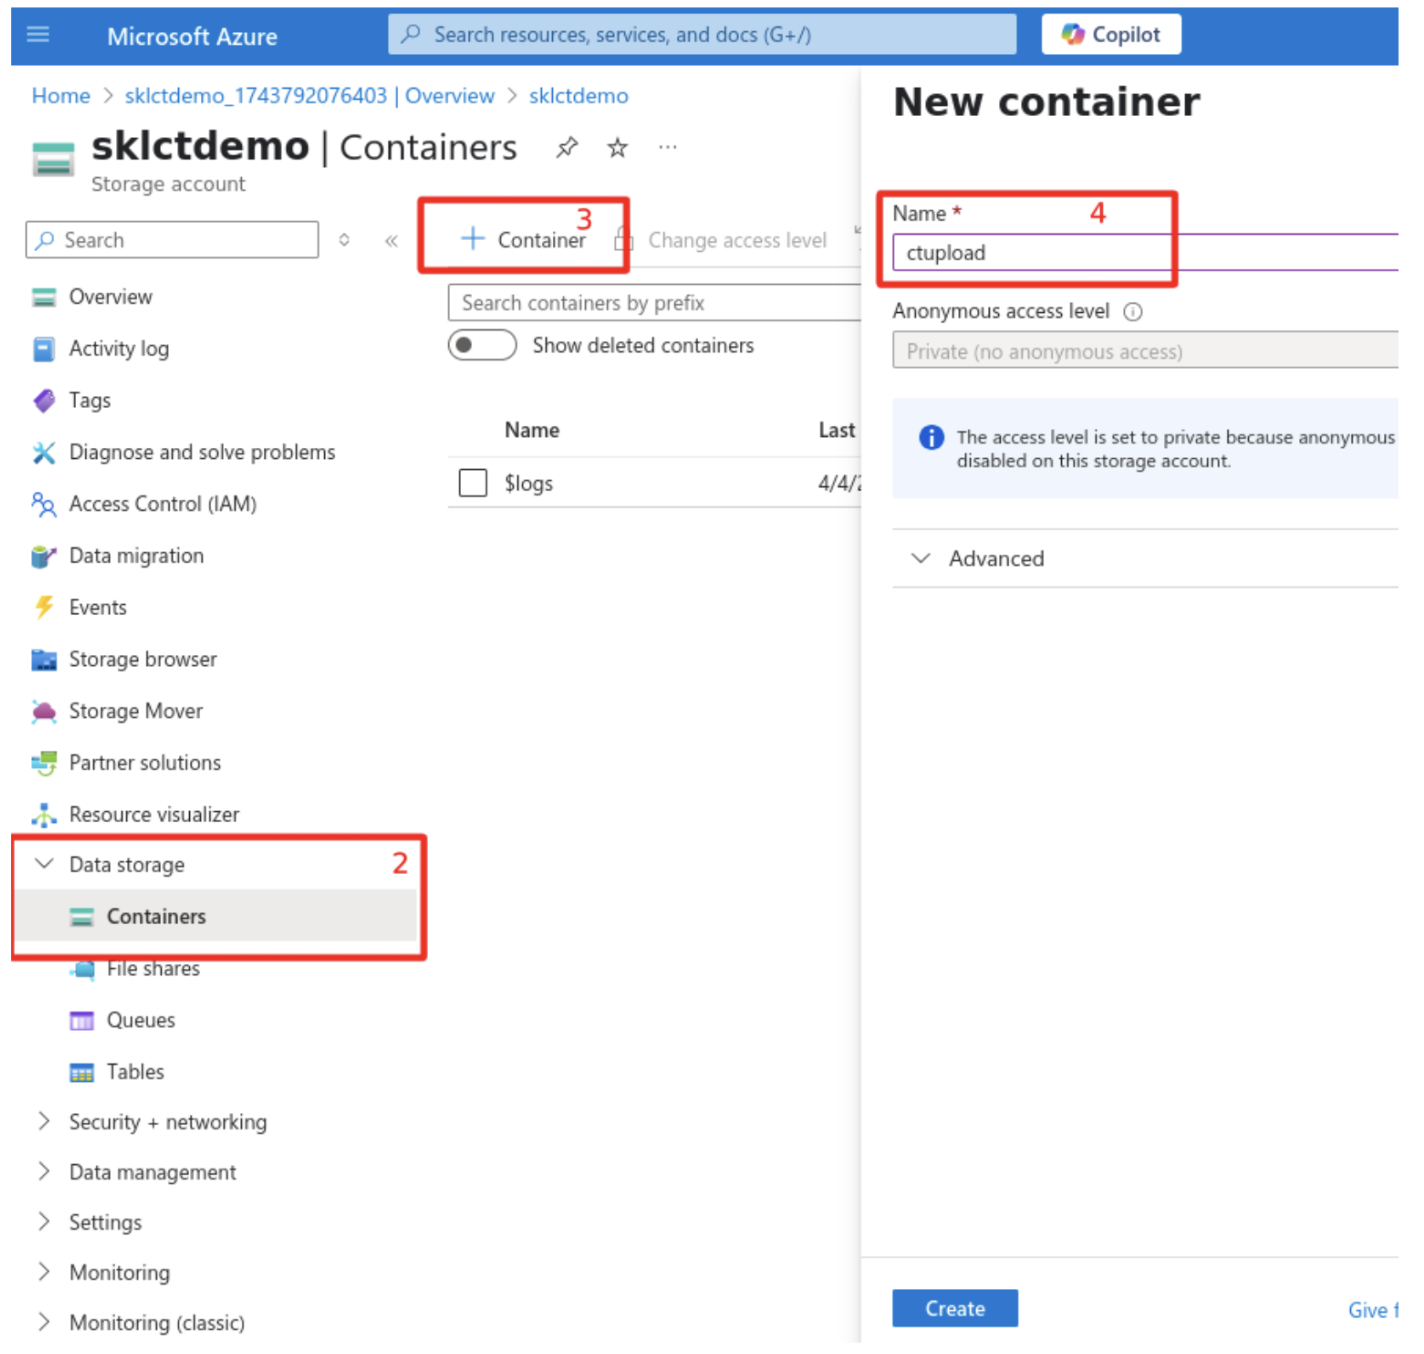
Enter a name for the container.
Leave Anonymous access level set to Private.
6.4.4.3. Create the Manager Account
The Manager account allows Cyber Triage to list and download collections from the container.
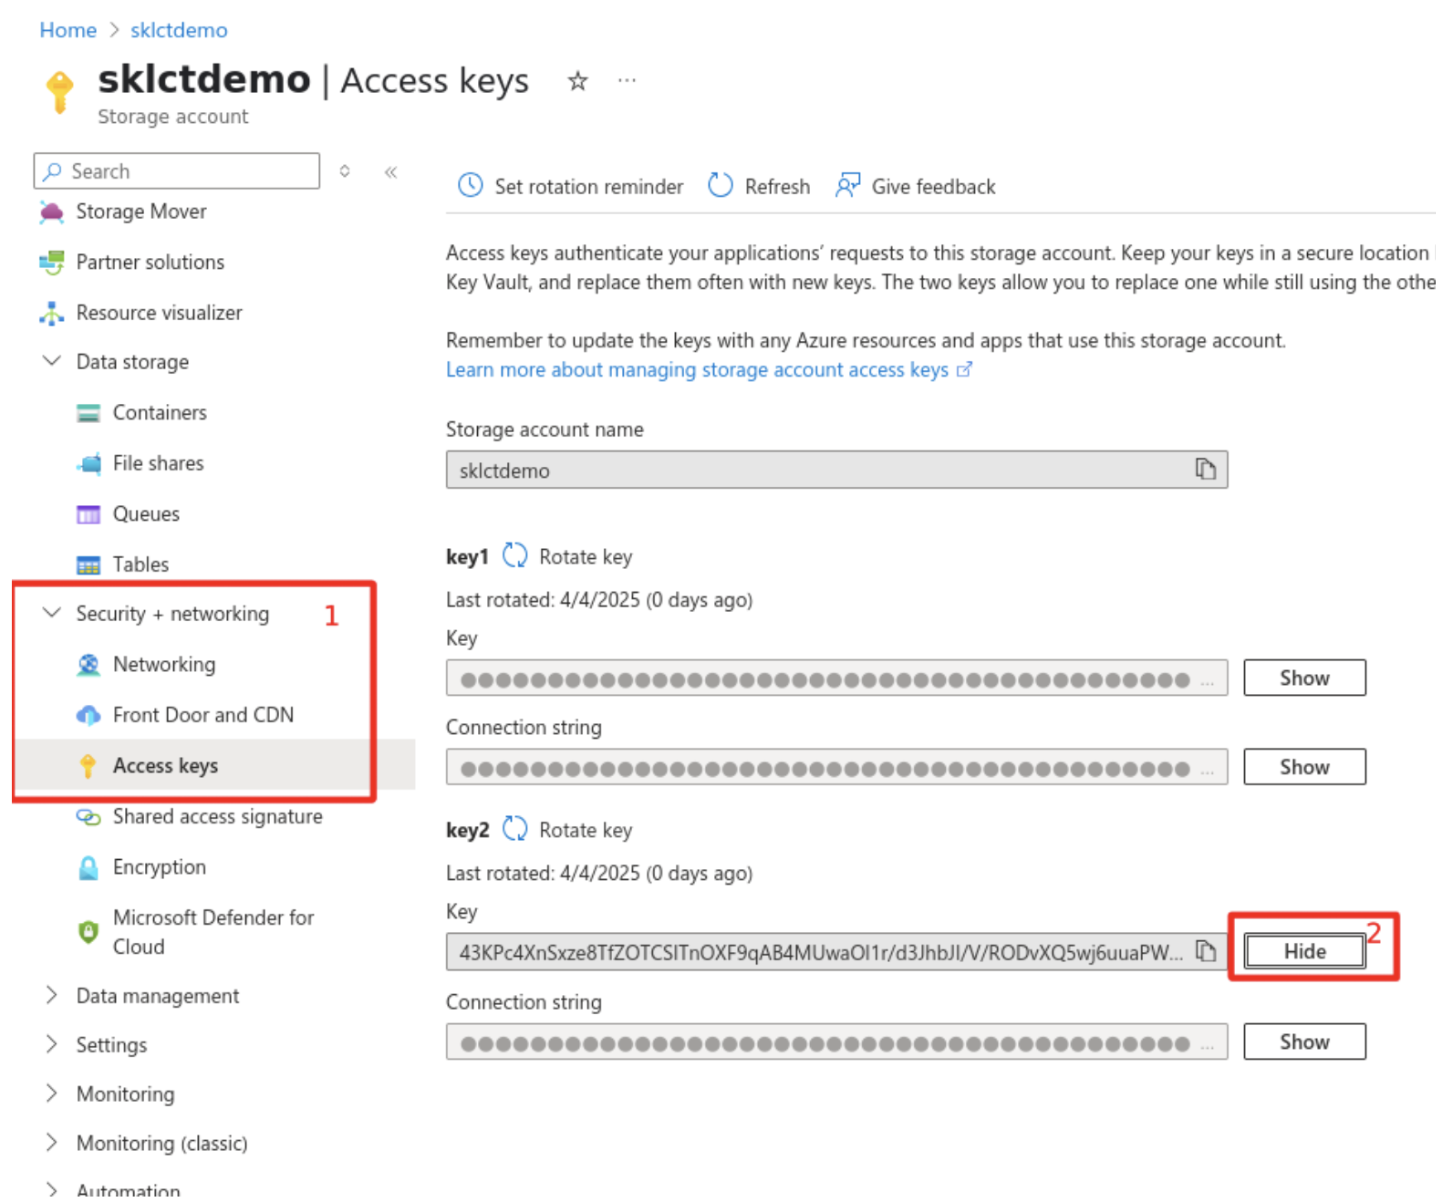
6.4.4.3.1. Create an Access Key for the Manager
In the Azure Portal, open your Storage Account.
Go to Security + networking → Access Keys.
Click Show next to key2 and copy the key value so that you can enter it into Cyber Triage.
6.4.4.4. Create the Upload Credentials
You have two options to creating credentials that can upload.
6.4.4.4.1. Option 1: Shared Access Signature (SAS) URL (Recommended)
A SAS URL grants time-limited, permission-scoped access to a single container. This is the preferred approach because it limits exposure if the credentials are compromised and has a built-in expiry.
In the Azure Portal, go to Data Storage → Containers and select your container.
Open Settings → Shared Access Tokens.
Configure the following:
Leave Signing key set to Key 1.
Set Permissions to Add and Write.
Set an appropriate expiry time frame.
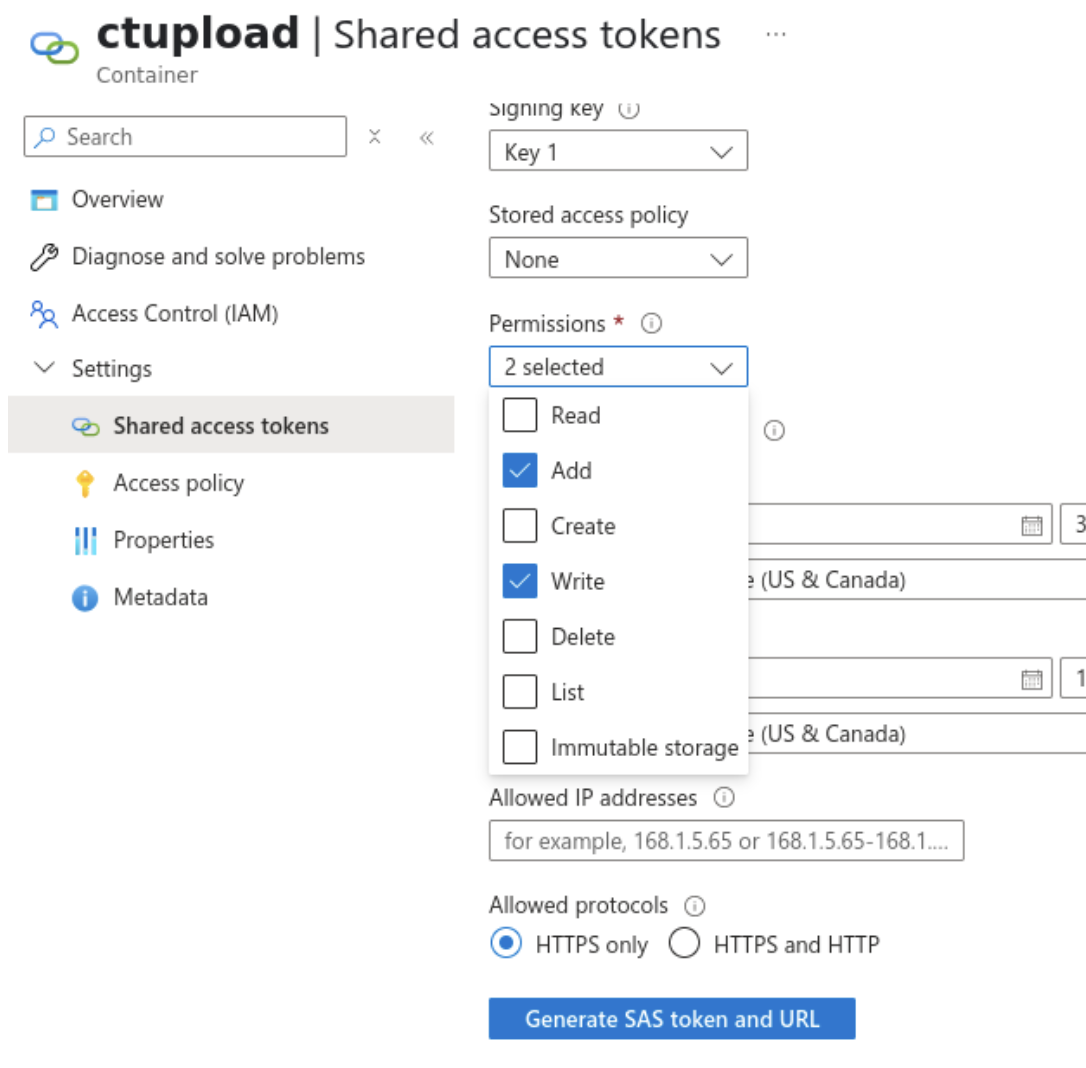
Click Generate SAS token and URL.
Copy the generated Blob SAS URL and paste it into Cyber Triage as the Collector Upload Credentials.
6.4.4.4.2. Option 2: Access Key
Access keys grant access to the entire storage account (all containers), not just the one used for Cyber Triage. If you use this approach, keys must be rotated as soon as collection is complete and the account should be monitored for unauthorized access.
Follow the same steps as for the Manager access key above, but use Key 1 instead.
In Cyber Triage, under Collector Upload Credentials, select Access Key and paste the key into the appropriate fields.
6.4.4.5. Secure the Upload Credentials
Because the upload credentials will be deployed with the Collector onto potentially compromised systems, take steps to minimize risk.
Use SAS URLs when possible. The built-in expiry means that even if the URL is leaked, access ends automatically at the configured time. Set the expiry to the shortest window that covers your collection campaign.
Rotate access keys regularly if using Option 2. Treat key rotation like a password change and rotate immediately after each collection campaign completes.