11. Advanced Configuration
Most environments do not need to make these changes, but they are available when needed.
11.1. Offline Environments
Cyber Triage can work in environments that are not connected to the Internet. This section contains some relevant features and settings.
11.1.1. Disable Internet Access
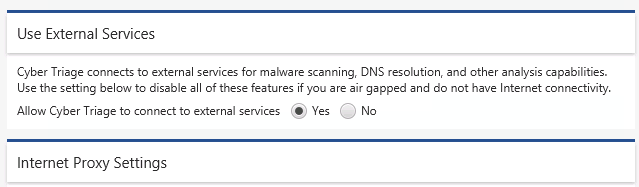
You can configure Cyber Triage to not connect to systems on the Internet and therefore not generate connection error messages. This setting is in the Options panel in the “System” / “Network” section.
11.1.2. Offline Malware Scanning
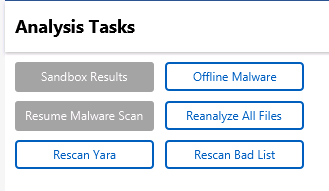
You can still use the Cyber Triage® Malware Scanning Service when you are on an air-gapped network.
After the collection has been fully analyzed, you can package up the file MD5 hashes into a text file.
Go to the “Summary” view on the host and choose “Analysis Jobs” on the left. Press the Offline Malware button.
Status
Choose to Export Hashes and pick a folder.
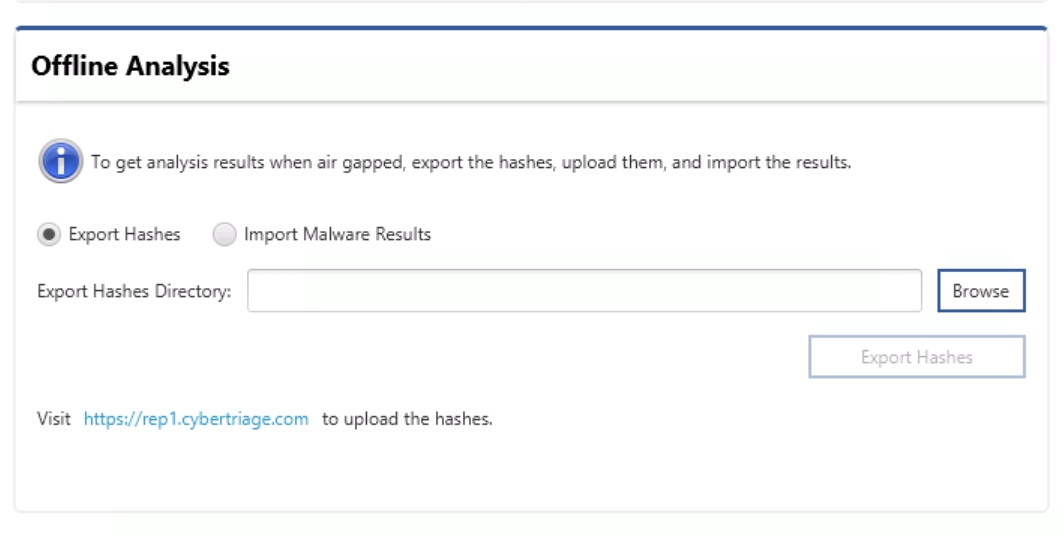
Offline Analysis
That will produce a JSON text file with the hashes and license information.
You can then copy that file to an Internet-connected computer and upload it to https://rep1.cybertriage.com.
Copy and paste the text file into that page.
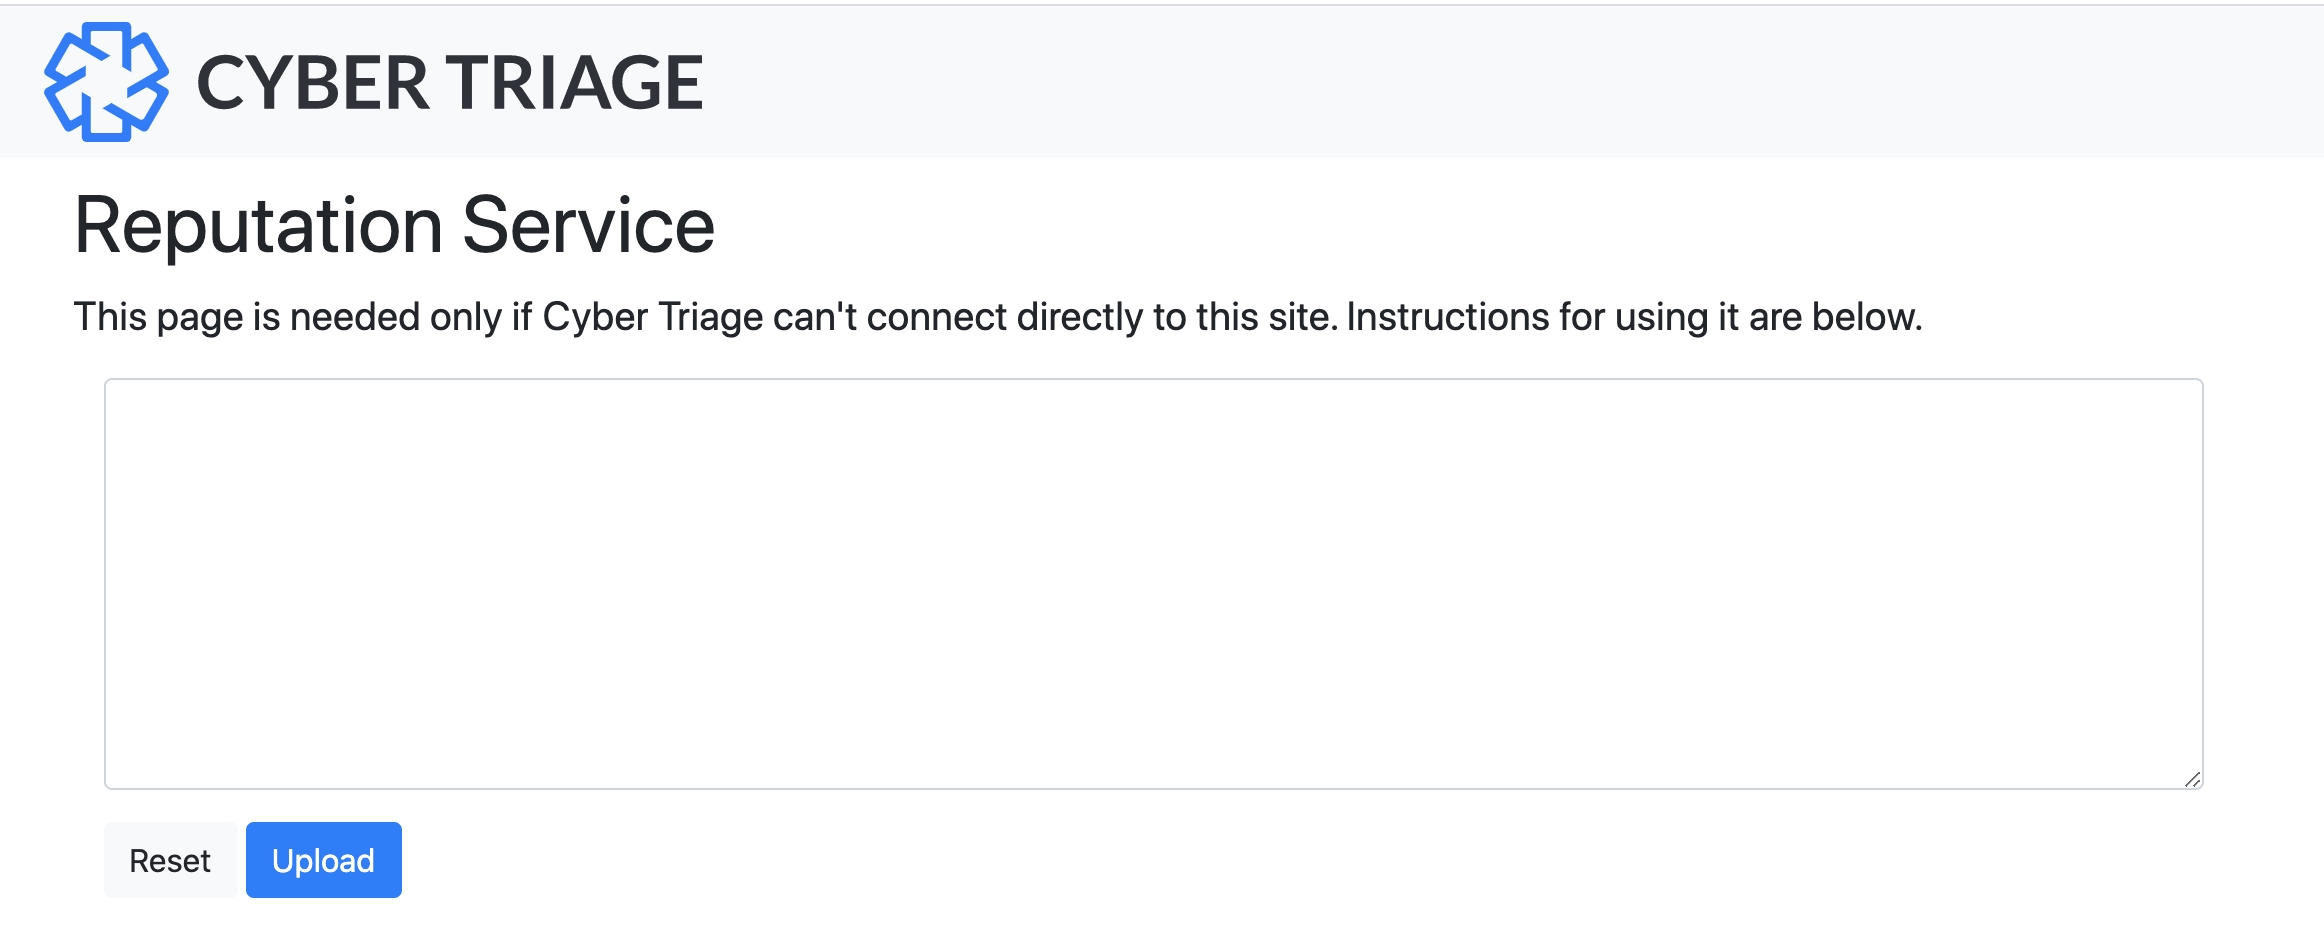
Reputation Service
It will download another JSON file that you can then copy back into Cyber Triage® and import using the same Offline Malware panel that you used to export the original set of hashes.
11.1.3. Local Copy of NSRL
Cyber Triage® will use its Online Malware Scanning Service by default to assign a threat score to files. The service uses the NIST NSRL to identify files that ship with known applications (such as Microsoft Windows). If you are not using the online service, you can configure a local copy of the NIST NSRL.
The steps to do this include:
Download the latest NSRL index. You will want the file named
NSRL-version-computer-Autopsy.zip.Unzip the file
Open the Cyber Triage® Options panel and choose “Automated Analysis” / “NSRL”.
Enable Use Local NSRL, and browse to where you unzipped the
.idxfile to.
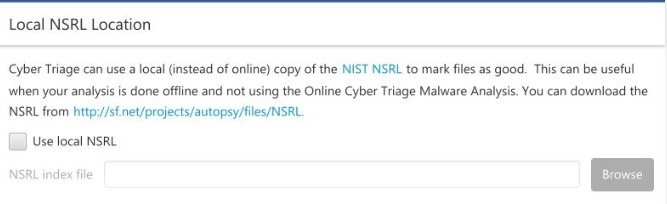
Options (Use Local NSRL)
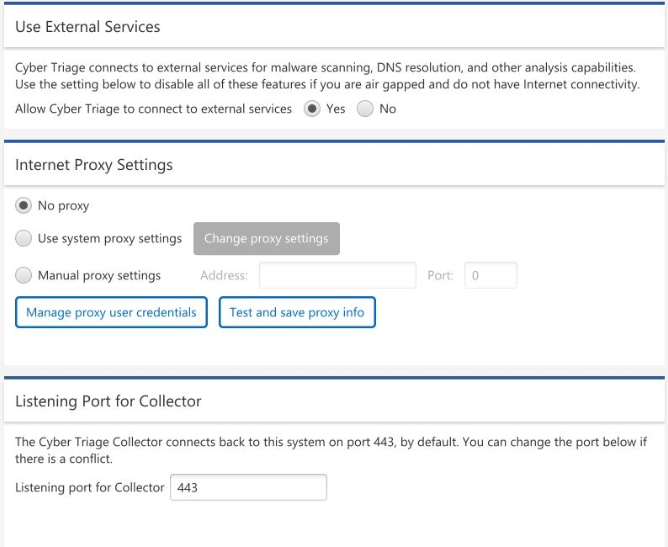
11.2. Configuring a Network Proxy
If you need to go through a corporate proxy to access the Internet, then Cyber Triage® will need to be configured to use it for malware scanning. You can configure it in the Options panel. Choose “System” / “Network” and then “Internet Proxy Settings”.
You can choose between using the operating system settings for the proxy or to manually enter a proxy. Make sure you press the “Test and save proxy info” button to test the connection. Depending on your environment, you may be prompted to accept an SSL certificate that your proxy uses.

SSL Certificate Information
11.3. Changing Port Number
Cyber Triage® will open TCP port 443 so that the Collector can send data to it over the network. If you have another application that is using that port, then you can configure Cyber Triage® to us a different one by going to the Options panel and choosing “System” / “Network”.
Options (Network Settings)
If you change the port number, you will need to explicitly specify this port number when you manually run the Collector.
11.4. Changing How DNS Queries Are Done
By default, Cyber Triage uses Google Public DNS (IP 8.8.8.8) to resolve host names and IP addresses. Some environments block all external DNS queries and therefore Cyber Triage cannot access the server.
In these situations, you can manually change Cyber Triage to use cybertriage.com for DNS resolution.
To do this: * Open the AppData\\Roaming\\cybertriage\\config\\v3\\config.yml file in the user folder that Cyber Triage runs as. * Find the line that has dnsProvider: "GOOGLE" and change it to dnsProvider: "CT".
11.5. Changing Where Data is Stored
Cyber Triage® uses a “data folder” to store databases, collected file contents, logs and other data. The default location is a ‘cybertriage’ folder in the user’s local AppData folder.
The folder can be quite large, especially as more data is added into Cyber Triage.
You can move this folder to a new location. Note that it is your responsibility to move the existing contents to the new location.
Standard Version:
Launch the Options panel and choose “System” / “Storage”.
In the “Data Folder” section, pick a new folder.
Shutdown Cyber Triage
Copy the contents of %LOCALAPPDATA%\cybertriage to the new location.
Restart Cyber Triage and verify you can open past cases.
Team Version:
Shut down Cyber Triage Team Server
Open up %appdata%\cybertriage\config\v3\config.yml in a text editor.
Change “contentDirectoryPath” to the new path (ex. C:\new\path\cybertriage)
Change “uploadFilePath” to the new path (ex. C:\new\path\cybertriage\files\CyberTriage\)
Save config.yml
Copy the contents of %LOCALAPPDATA%\cybertriage\ to the new location.
Start up Cyber Triage Team Server
11.6. Customizing Hayabusa Analysis
Cyber Triage integrates the open source Hayabusa (https://github.com/Yamato-Security/hayabusa) tool to analyze event logs. For most users, no configuration is required. But, there are some options:
You can disable one of the Hayabusa rules so that it does not score an event log entry. To do this, add the ‘Rule ID’ that you want to suppress to the ‘exclude_rules.txt’ file. You can find that file by going to Options / Automated Analysis / Hayabusa. This change will take effect for hosts added after that change.
- You can also add your own rules by placing .yml files into the ct_custom_rules folder in the same folder that is opened via the Options panel.
For details on how to create Hayabusa rules please refer to Hayabusa documentation (https://github.com/Yamato-Security/hayabusa-rules?tab=readme-ov-file#about-creating-rule-files).
Cyber Triage will only run Hayabusa rules with a rule status of “stable” or “test” as they are less false positive prone.
Cyber Triage will only apply scores to Hayabusa rules with a rule level of “critical” or “high” as they are less false positive prone.
Cyber Triage will create unscored events for Hayabusa rules with a rule level of “medium”. These events will have the rule details attached just like a scored event.
Cyber Triage does not currently support correlation rules at this time. All correlation rules in the Hayabusa rule repo are covered by custom Cyber Triage rules (password guessing/user enumeration)
NOTE: Cyber Triage does not blindly collect all event logs. It collects high value event logs which have full coverage of all Hayabusa rules. If you create a custom Hayabusa rule that targets a new event log you will need to create a custom Cyber Triage collection rule (Customize File Collection) to collect that event log before it can be processed by Cyber Triage.