2. Configuration (Standard and Team)
This section outlines how to configure all of the Cyber Triage settings, except for the Team infrastructure configuration, which is covered in Configuring a Team Environment.
2.1. Network Traffic (Ports and Hosts Used)
Many environments limit network traffic and therefore it is important to know how Cyber Triage communicates on a network to allow its traffic.
2.1.1. Listening Network Ports
The behavior of the Cyber Triage application is different depending on if it’s Standard, Team Server, or Team Client.
2.1.2. Standard: Listening Network Ports
The Standard and Standard Pro versions of the Cyber Triage application will open occasionally open network ports when collecting data from remote systems using the Live Automatic or Live Manual methods. Other methods of adding data do not require listening network ports.

The same data is shown here in table form.
Ports Opened on Cyber Triage Machine | ||
|---|---|---|
Protocol | Port(s) | Usage (Inbound from) |
TCP | 443 | The Collection Tool connects to Cyber Triage on this port. |
You can change this port in the Options panel. See Changing Port Number.
2.1.3. Team Server: Listening Network Ports
The Team server opens several ports for communication with clients and target systems. Not all ports are always listening. Port 443, by default, is configured to open only when certain types of collections are happening.
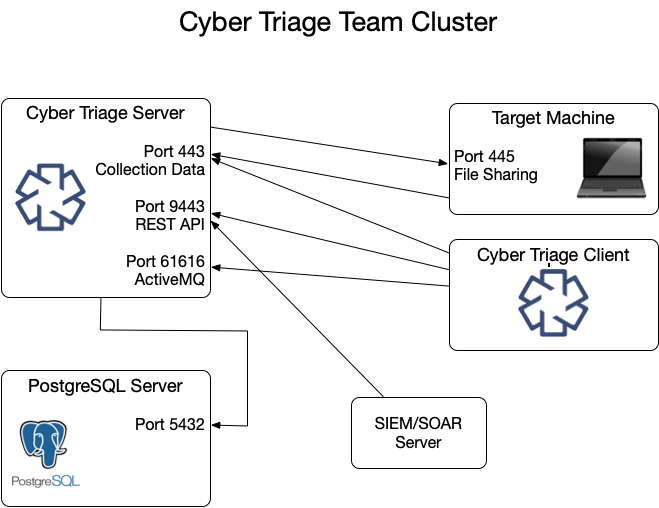
These ports are represented in various tables below.
Listening Ports on Cyber Triage Server | ||
|---|---|---|
Protocol | Port(s) | Usage (Inbound from) |
TCP | 443 | The Collection Tool and clients connect to the server over this port to upload data. |
TCP | 9443 | REST API clients use this to retrieve data and initiate collections. |
TCP | 61616 | ActiveMQ service that keeps clients updated by sending messages. |
You can change the 443 port in the Options panel. See Changing Port Number.
It is possible, but not typical, to change the REST API and Active MQ ports.
Open up
%appdata%\cybertriage\config\config.ymlon the Cyber Triage® Server machineEdit the port number for restApiPort or activeMQPort and save the file
Follow the same process to update the port on each of the Cyber Triage® client machines.
2.1.4. Team Client: Listening Network Ports
A Team Client will not have any listening ports. It will make connections only to the Team Server.
2.1.5. PostgreSQL Server: Listening Network Ports
The Cyber Triage Server will need to communicate with the PostgreSQL installation. If you installed PostgreSQL on a system other than the server, then you’ll need to make sure they can communicate.
Default PostgreSQL Port | ||
|---|---|---|
Protocol | Port(s) | Usage (Inbound from) |
TCP | 5432 | Default port PostgreSQL server listens on |
2.1.6. Live Automatic Target: Listening Ports (Standard and Team)
To use Live Automatic collection (Live Automatic (PsExec)), Windows endpoints must have file sharing enabled so that the collection tool can be copied over. This data is sent from the Cyber Triage application to the target system on the following port:
Ports Required on Target Machine for Live Automatic | ||
|---|---|---|
Protocol | Port(s) | Usage (Inbound from) |
TCP | 445 | PsExec uses file sharing to copy and launch the Collection Tool. |
2.1.7. External Hosts (Standard and Team)
Cyber Triage will reach out to some hosts to test network settings or upload file hashes and content. If you have a proxy, you may need to add exceptions for these hosts:
External Hosts Used by Cyber Triage | ||
|---|---|---|
Host Address | Port | Usage |
www2.cybertriage.com | 443 | Used to test proxy and SSL settings at startup. |
rep1.cybertriage.com | 443 | Used to perform malware hash queries and get latest threat intelligence. |
data.reversinglabs.com | 443 | Used to upload file content for malware scanning to ReversingLabs. |
8.8.8.8 | 443 | Google DNS - Used to resolve host names and detect dynamic DNS. |
private.tria.ge | 443 | Used to upload files to the Recorded Future Sandbox. |
2.2. Collection Settings
2.2.1. Configuring for Live Automatic Collections
Additional configuration is needed to use Live Automatic collection (Live Automatic (PsExec)). Namely
Configure PsExec
Ensure target is configured
2.2.1.1. Configure PsExec
If you are going to be pushing the collection tool to remote hosts, you will also need to configure PsExec. Extract the contents of the PSTools.zip file to a folder on your computer.
Open the Options panel from the opening Cyber Triage® window.
Navigate to the General tab.
Find the PsExec Settings area, choose the Browse button, and navigate to the folder that you extracted the contents into. Confirm that you read the PSTools End User License Agreement.
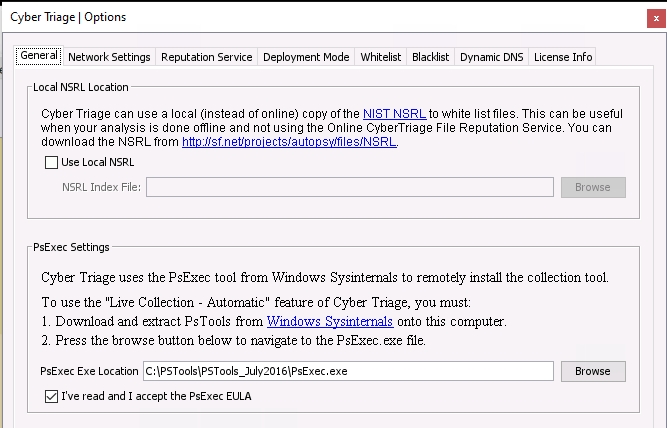
Configuring PsExec tool
2.2.1.2. Services Required on Target System
The target system for Live Automatic must have file sharing enabled so that PsExec can copy over the Collection Tool.
2.2.1.3. Enable Local Accounts
If you want to use a local account on the target system (instead of a domain account), then you’ll need to make a change from the default settings in order to use Live Automatic.
Run the
regedit.exeWindows program on the target computer.Navigate to the
HKEY_LOCAL_MACHINE\Software\Microsoft\Windows\CurrentVersion\Policies\Systemnode.Right click on the System node to add a REG_DWORD value with a name of
LocalAccountTokenFilterPolicy(no quotes) and a value of1.Either reboot the computer or restart the “Server” service (LanmanServer) and the “Workstation” service (LanmanWorkstation). Either of these will ensure the new policy is used.
2.2.2. Customize File Collection
You can collect additional files beyond what Cyber Triage already collects. This is useful when you want to make sure you get logs from a certain application or from indicators of a recent attack.
The following terms are used in this process
File Rule: A set of criteria that, when matched, will cause the file to be collected.
File Rule Set: A set of file rules. The file will be collected when any rule matches. You can organize rules in any way that makes sense for you.
2.2.2.1. Adding Custom File Collection Rules
To add a rule, go to the Options panel and chose “File Collection Rules”. Rules need to be in a set, so create a set if none exist or you want to organize the new rule differently than the others.
Create a new set with New Set. You need to give it a unique name and can optionally give it a description.
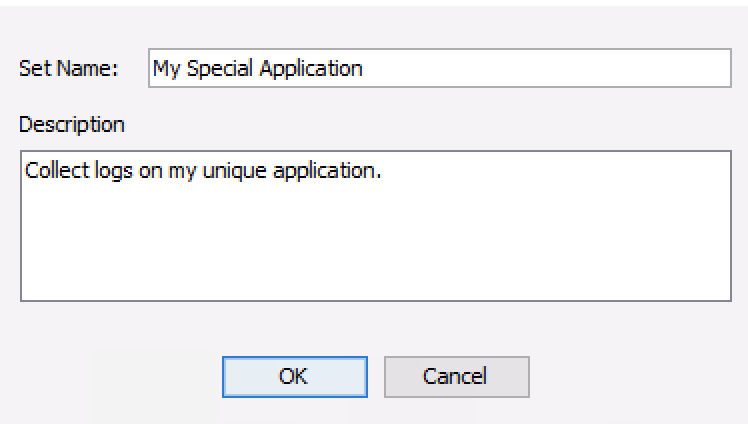
Add New File Set
Once the set is selected, you can add a rule to it with New Rule.
There are different types of rules, which have different performance impacts.
Exact Match: If the full path is specified (parent folder and file name), these are fast lookups since the Collection Tool knows where to look.
Fuzzy Match: If only part of the parent folder or file name are specified, then the rule will be applied to each file in the system. This requires the full file system scan to occur.
A rule has the following fields:
A unique display name
File Name: Can be full name, empty, or have wild cards. Details are below.
Parent Folder: Can be full name, empty, or have wild cards. Details are below.
Max File Size: Allows you to ignore files that are too big to collect.
Max File Age: Allows you to optionally ignore files that are old and likely not relevant to a recent attack. This field is number of days and is applied to the file’s creation date.
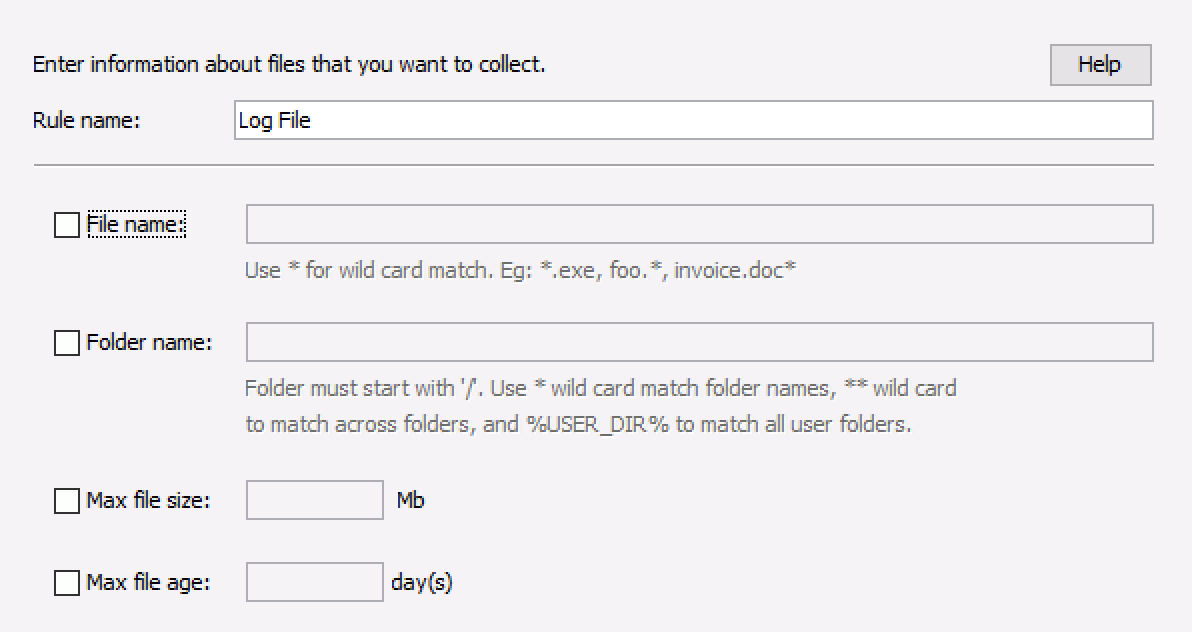
Add New File Rule
The following are more detailed requirements for file name:
This field is required if folder name is not specified
Comparison is case-insensitive.
Can not include any of the symbols that are not allowed in files: ‘:’, ‘>’, ‘<’, ‘:’, ‘”’, ‘/’, ‘', ‘?’
Can include one or more ‘*’ wild cards, which will match 0 or more of any character.
If no file name is given, all files in any directory matching the folder name will be collected (non-recursive).
The following are more detailed folder requirements:
This field is required if file name is not specified
Comparison is case-insensitive
Forward slash is used to separate folder names.
Can not include any of the symbols that are not allowed in files: ‘>’, ‘<’, ‘:’, ‘”’, ‘', ‘?’
Can start with %USER_DIR% to match the standard Windows user folders or any non-standard user folders extracted from the registry (if present).
If not using %USER_DIR% the path must start with a forward slash
Folder names should not end with a slash (unless using a single slash for the root folder)
- A ‘*’ wildcard that is not surrounded by forward slashes, will match 0 or more characters within a folder name.
/windows/system* will match /windows/system32
- A single ‘*’ wildcard surrounded by forward slashes will match any full folder name, but not recursively:
/Windows/*/notepad.exe will match /Windows/System32/notepad.exe
/Windows/*/notepad.exe will not match /Windows/System32/foo/notepad.exe
- A double ‘*’ wildcard surrounded by forward slashes will match any number of folder names:
/Windows/**/notepad.exe will match /Windows/System32/notepad.exe and /Windows/System32/foo/notepad.exe
If no folder name is given, all files with the specified file name will be collected.
Any wild card character will require the full file system scan. If you specify the full file name and the full folder path, then a targeted collection can be performed without the full file system scan.
Examples:
- To collect a specific log file (fast collection):
File Name: logfile.txt
Folder Name: /ProgramData/ApplicationName/Logs
- To collect all files in a specific folder newer than 60 days:
File Name: <Not specified>
Folder Name: /ProgramData/ApplicationName
Max File Age: 60
- To collect all executables in AppData:
File Name: *.exe
Folder Name: %USER_DIR%/AppData/**
2.2.2.2. Using Custom File Collection Rules
After you update or create rules, you may need to take additional steps to ensure the collections use them.
Live Automatic: The Collection Tool will download the latest version of the rules when the collection starts.
Live Manual, Live File: The rules are copied to the extracted folder. You’ll need to extract the collection tool again to get the latest version of the rules.
KAPE, Disk Image, Logical Files: Local copies of the latest rules are used.
2.3. Analysis Settings
The analysis of collected data happens as soon as data is added, so you will want to customize the analysis modules (if needed) before doing your first collection.
2.3.1. Yara Signatures
Cyber Triage can use Yara rules identify files that have patterns that have been associated with malicious activity. More details of how Yara is used can be found in Yara Rules. This section outlines where to put the rules so that they are in place when the first data is added to the system.
Cyber Triage® uses libyara 3.8.1. Documentation can be found at: https://yara.readthedocs.io/en/v3.8.1/
To include Yara signatures in the analysis, you need to copy them into a specific folder. You can find that folder by going to the Options panel.
Options Panel
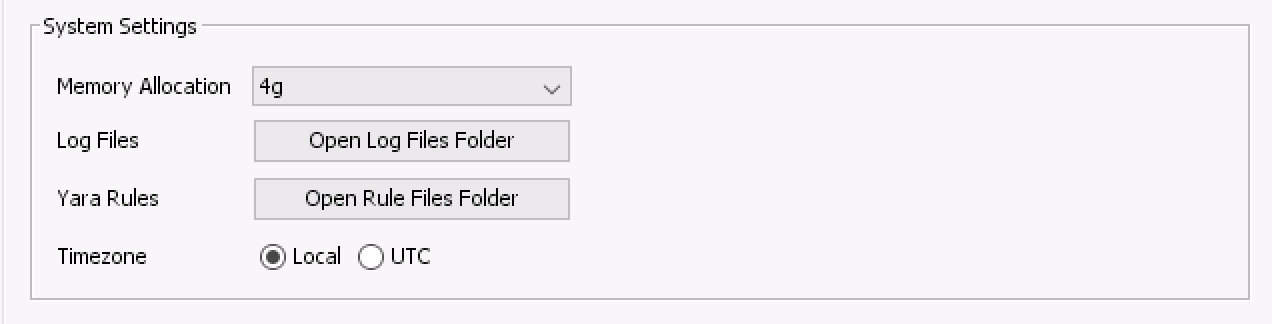
The default path is %localappdata%\cybertriage\config\yara_rules. However, this location is can be changed by changing the data folder location in the Cyber Triage® options panel.
Cyber Triage® will not search sub directories for Yara files. If you would like to organize your Yara rules with sub directories, then you’ll need to have a Yara file in the root directory that uses an include statements to refer to the other files.
Note
You will not be able to import the entire Yara Rules GitHub repository. This repository has links between its .yar files and causes many false positives. You should copy in only the rules that you are searching for.
2.3.1.1. File Location in Team Deployment
When running in a Team environment, nearly all of the analysis happens on the server. The exception is memory images. Volatility is run within the client. So, if you are in a Team environment and adding memory images, you need to have the Yara rules in your local AppData folder.
2.3.2. Configure Bad and Good Lists
Cyber Triage can use lists of indicators to identify a file as good or bad. You can import lists from threat intelligence feeds and manually add items during your analysis.
The Options Panel has tabs for both Good and Bad Lists. From there, you can add and remove entries.
2.3.2.1. Manually Adding a List Entry From Options
From within the appropriate Good or Bad List panel, you can choose Add Entry to manually enter the relevant details. You will have the option of adding the item at a global level so that it applies to all future hosts or at the Incident level so that it is applied only to future hosts in the same Incident.
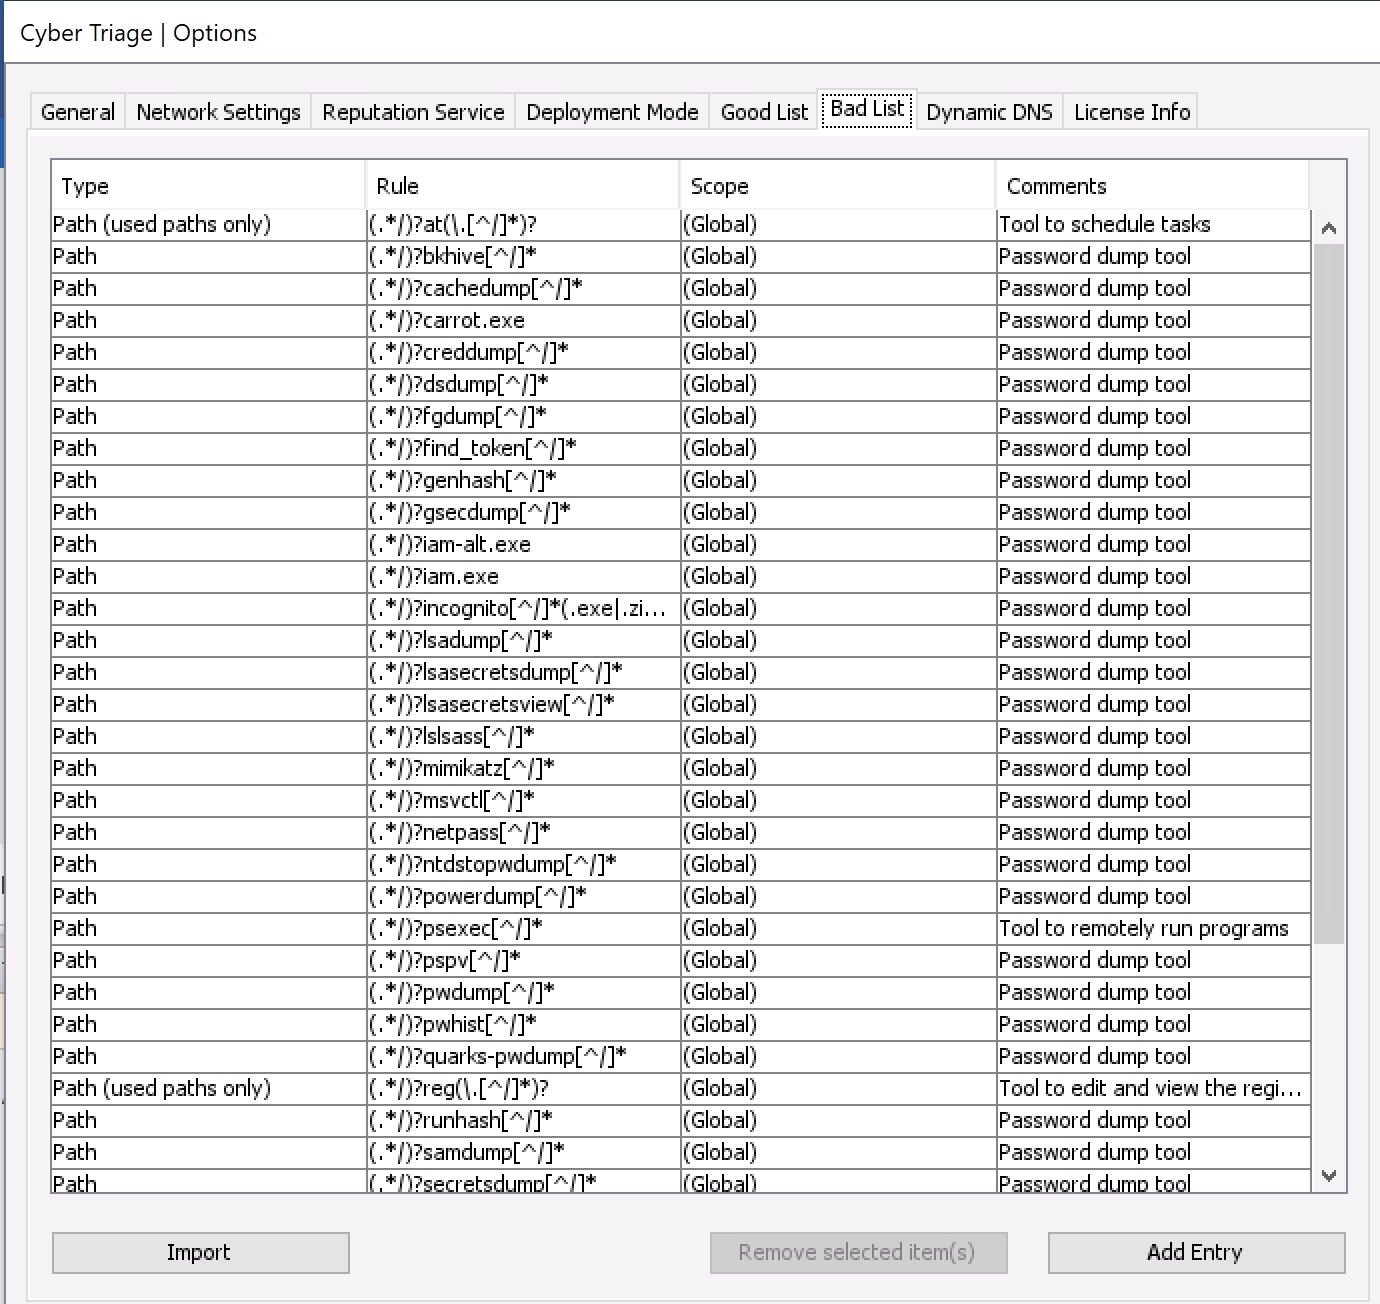
Options (Bad List Tab)
2.3.2.2. Importing Good and Bad Lists
You can bulk add Bad List items by pressing the Import button. Supported formats include:
Bad / Good List CSV format
Openphish (for Bad List items)
Cyber Triage Bad Items JSON (that was generated as a report from another Cyber Triage host).
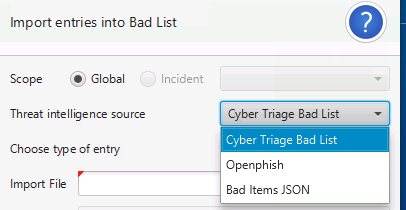
Import Bad List
Use the Generate Sample File button to generate a sample CSV file to determine what columns need to exist.
2.3.2.3. Removing Good or Bad List Entries
One or more Good or Bad List entries can be removed from their respective tables by highlighting the entry and selecting Remove selected item(s).
2.3.2.4. Editing Lists From Other Panels
When analyzing data in other panels, such as all logons or startup items, you can also add that item to a Good or Bad List, or remote it from the Good List. These options are from right clicking.
To add an item to the Good List, right click on it and choose Add To Good List. You can then choose to add it to a global- or incident-level Good List or only for that session.
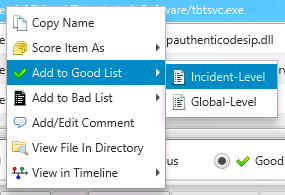
Add Item to Good List
You can remove Good List entries in two ways. One is to right click on an item that is on the Good List and choose Remove from Good List.
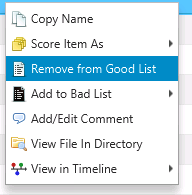
Remove Item from Good List
2.4. Security Settings
2.4.1. TLS Certificates
Cyber Triage uses TLS to encrypt various network communications:
Between the Collection Tool and Cyber Triage
Between the Team Server and Clients
Between the ActiveMQ Server and Clients
In most environments, there is nothing to configure. You just need to know about the certificate that was generated for you. But, you may need to configure Cyber Triage to know about a TLS intercept proxy, if you have one.
2.4.1.1. Certificate Verification
To prevent man in the middle attacks:
Cyber Triage generates a unique self-signed certificate for each application installation.
Cyber Triage applications connecting to the server will verify the hash value of the certificate they receive.
The Collection Tool will be passed in the server’s certificate hash as a command line argument. If the certificate it receives in the TLS handshake is different, the connection will be dropped.
The Team Client will be prompt the user to confirm the server certificate hash the first time it connects. Once that value is locally saved, the Client will use it to verify each connection. If the Client receives a new certificate during the handshake, it will prompt the user.
2.4.1.2. Internal Intercept Proxies
If your network has a proxy that decodes TLS traffic, then you need to add configure Cyber Triage to know about it. When configured, Cyber Triage will use the proxy certificate to validate the connection.
From the options panel, you can import the certificate used by the Proxy:
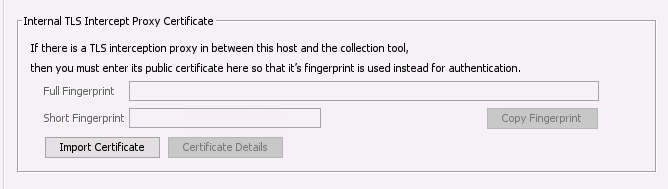
Add TLS Intercept Proxy Certificate