2.2.4. Cyber Triage Server Installation
The Cyber Triage Server will need to be running whenever you want to anlyze or review data.
You can choose to have it be running automatically as a Windows service or launched each time manually. Running it as a service ensures that it runs when the computer starts and does not require a user to be always logged in. But, it adds some administration complexity with respect to installation and making configuration changes.
2.2.4.1. Installing The Cyber Triage Server
The first step is to launch the .msi installer on the server and choose the default options. The same installer works for Standard, Server, and Client.
2.2.4.2. Configuring the Cyber Triage Server
There are some settings for you to configure after you install it.
NOTE: These settings are saved with the user account that launches Cyber Triage. Launch Cyber Triage as the user that will be running the server. You can use “Shift + Right Click -> Run as different user” if that account is not your primary one.
Launch Cyber Triage and it will prompt you for a license, choose the license file that you received that has _server in the name.
When Cyber Triage® is open:
Data Folder: Open the Options panel and choose “System” / “Storage”. By default, Cyber Triage will store all of its data into an AppData folder for the user running Cyber Triage. It can get quite large. If you want to move this to a different volume, you should do it as your first step.
Deployment: Open the Options panel and choose “System” / “Deployment Mode”. Change the mode to Team - Server. If you do not have this option, then you did not supply a Team license key.
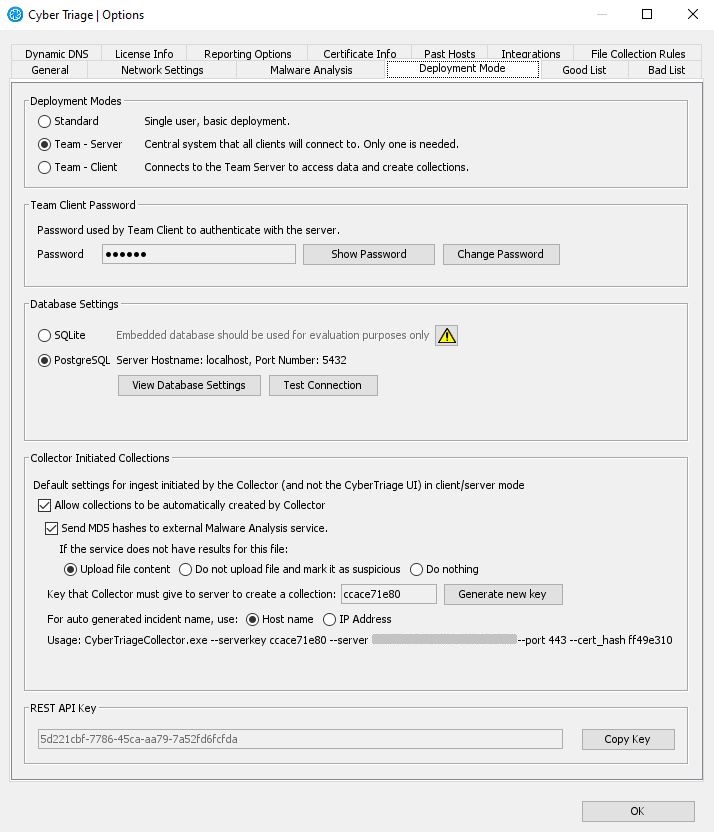
Options (Deployment Mode Tab)
Admin Password: In the Server Administrator Password section, press the Change Password button and pick a password that will be associated with the ‘administrator’ user account. This account will not be able to ingest and analyze data. You will use it to log into the browser-based options panel.
- Database: In the Database Setting section, enter your PostgreSQL information by pressing the View Database Settings button. Use localhost as the host if you are running the server on the same system as the server.
Press “Enable SSL” only if you followed the above instructions and configured PostgreSQL to listen for SSL.
Press “Verify SSL Connection” if you imported the PostgreSQL certificate into Cyber Triage using the above instructions.
Press “Test Connection” to make sure everything works. Refer to Debugging PostgreSQL SSL Issues if you have problems.
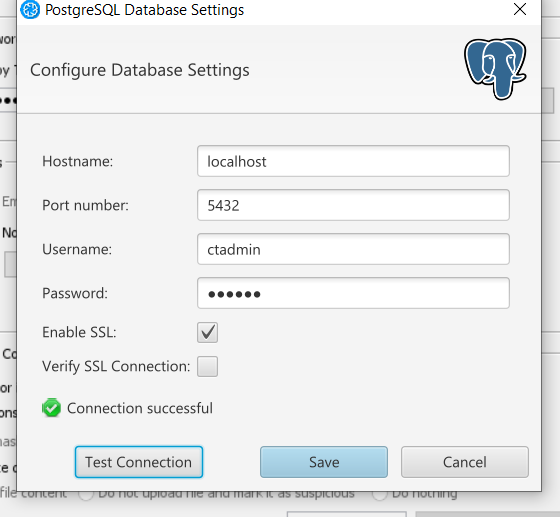
PostgreSQL Database Settings
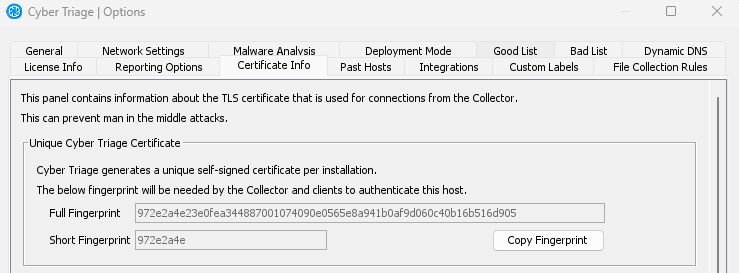
Certificates: Go the License Info section of the Options panel and record the short TLS certificate hash from the self-signed certificate created on that system. The client installation will prompt you to ensure it is the right hash.
Proxy: If you have a TLS intercept proxy in between the Server and the Clients, configure Cyber Triage with the proxy’s certificate. See Internal Intercept Proxies.
Press OK and it will restart Cyber Triage®.
When it restarts, your host firewall software may ask permission to open ports. These are required for the server to operate.
When running as a Server, the Cyber Triage® interface will only allow you to go to the options panel or extract the Collector. You cannot create or open sessions directly on the server.
2.2.4.3. Open Network Ports
The Cyber Triage Server will be listening on 3 ports. Make sure your host-based firewall allows incoming TCP connections for ports:
443 (Ingest from collectors)
9443 (Clients API)
61616 (Active MQ)
2.2.4.4. Installing Server as a Service
You can optionally run the Server as a Windows Service so that it start every time the computer starts.
NOTE: You should run the service as a normal user account (not a service account) because an interactive account is needed to configure the Server. It is possible to run it as a non-interactive service account, but it is currently a complicated process. Contact support if this is a requirement for you.
2.2.4.4.1. SvcMgr.bat Service Script
Cyber Triage ships with a script called ‘svcmgr.bat’ in a ‘cybertriage\service’ folder. This will help you install, uninstall, and update the service. You can do many of the same things from the Windows Services manager, but this script can make things easier.
To start or stop the service at any time:
Open an admin command prompt
Change to the Cyber Triage directory, such as ‘C:\Program files\Cyber Triage\cybertriage\service’
Type in ‘svcmgr.bat start’ or ‘svcmgr.bat stop’.
2.2.4.4.2. Service Installation Instructions
Before you begin the process, make sure you have an interactive user account that will be running the service.
The following steps will install Cyber Triage and configure it as a service.
Install and configure Cyber Triage using the MSI installer and the steps outlined above. Configure it using the account that will be used to run the service.
Close the Cyber Triage Server application.
- In an Admin command prompt, change to the Cyber Triage folder:
cd C:\Program Files\Cyber Triage\cybertriage\service
- Install the basic service by running:
svcmgr.bat install
- By default, services will run as “Local Service” and you need to change it to the user account that Cyber Triage will run as. Launch the Service Manager application from the same folder:
CyberTriageServicew.exe
- From the service manager, configure the user account the service will run as on the “Log On” tab.
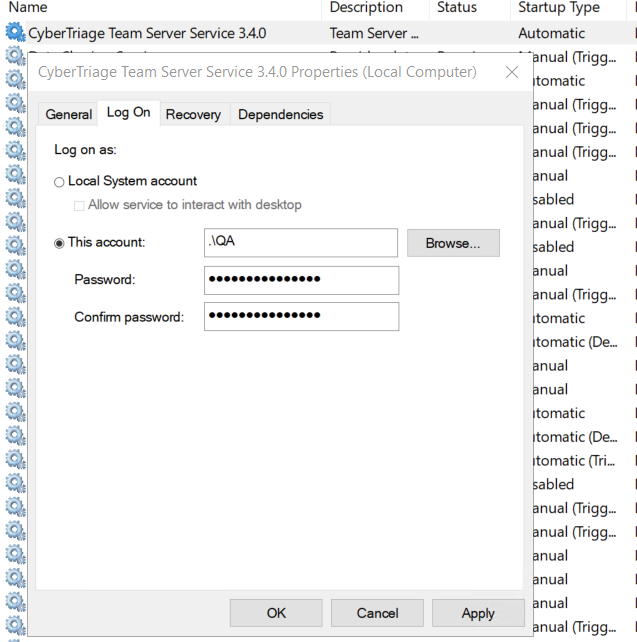
Team Server Log On Screen
Press OK to save the settings.
- Start the service by typing the following in the admin prompt that you used to install the service:
svcmgr.bat start
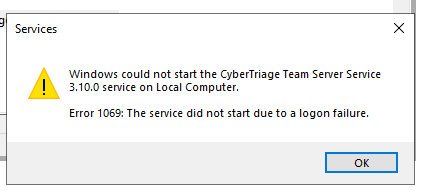
2.2.4.4.3. Server Service Won’t Start
If the service for the server doesn’t automatically start, then:
Go to the Windows Services Manager (where you configured the user name and password)
Manually try to start it
If you get a message such as this, then it is a permission error. Confirm the user account you are using is allowed to launch this service. In this situation, Cyber Triage is never even given a chance to start. You can also confirm that Cyber Triage was never able to start because no Cyber Triage log entries are created. You need to investigate the permissions or password of your user account.
2.2.4.4.4. Making Application Configuration Changes as a Service
To make application configuration changes at any point when the server is running as a service, you will need to connect to the following URL with a web browser and enter a Cyber Triage user account that has administrator access:
https://localhost:9443/app/index.html