2.3. Setup (Standard and Team)
This section outlines the basics of the UI and various settings that you may need to change before adding data. Configuration of a Team infrastructure is covered in Team Installation and Configuration.
In many cases, you can use Cyber Triage with no additional configuration. But, this section provides an overview of things to consider. Sections below will provide the details for any that seem relevant to you.
Collection settings:
Custom File Collection Rules: If you plan to customize the files that the Collector will collect, then refer to Customize File Collection.
Cloud Storage: If you plan to have the Collector upload to cloud storage (S3-compatible or Azure), then refer to Configure Cloud Storage Profiles.
Encryption: If you want to have the Collector encrypt its output using a public key that can only be decrypted by your system, then refer to Configure Collector Output Encryption.
PsExec: If you plan to use the “Network - PsExec” feature of Cyber Triage that allows you to copy over the collection tool via PsExec, then refer to Configuring for Network - PsExec Collections.
EDR Telemetry: If you plan to import telemetry directly from an EDR using its API, then refer to Configure EDR APIs to Import Telemetry.
Analysis Settings:
Yara: If you want to use your own Yara rules or edit the Good / Bad lists, then refer to Configure Yara Signatures or Configure Bad and Good Lists.
Baseline: If you want to have a gold image whose contents will not get scored as bad or suspicious, then refer to Configure Baselines (Gold Images).
Network Settings:
Firewalls: If your network restricts traffic based on destinations and ports, then refer to Network Traffic (Ports and Hosts Used) for details on what Cyber Triage needs.
Proxy: If you have a TLS intercept proxy, then you need to configure Cyber Triage so that it validates that certificate. Refer to Internal Intercept Proxies.
2.3.1. Customize File Collection
You can collect additional files beyond what Cyber Triage already collects. This is useful when you want to make sure you get logs from a certain application or from indicators of a recent attack.
The following terms are used in this process
File Rule: A set of criteria that, when matched, will cause the file to be collected.
File Rule Set: A set of file rules. The file will be collected when any rule matches. You can organize rules in any way that makes sense for you.
2.3.1.1. Adding Custom File Collection Rules
To add a rule, go to the Options panel and chose “Collection” / “File Collection Rules”. Rules need to be in a set, so create a set if none exist or you want to organize the new rule differently than the others.
Create a new set with New Set. You need to give it a unique name and can optionally give it a description.
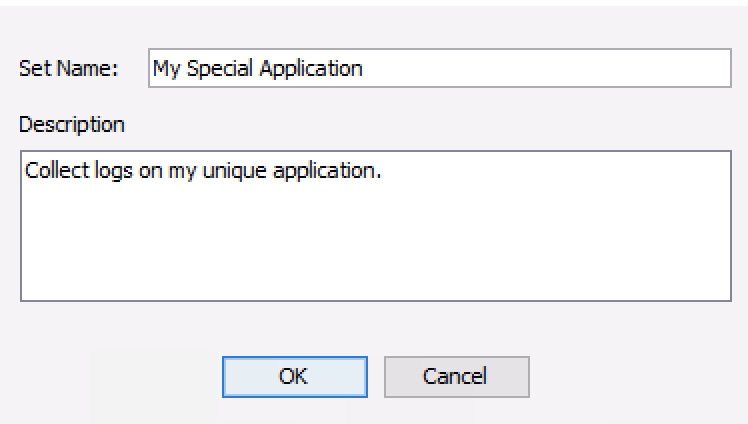
Add New File Set
Once the set is selected, you can add a rule to it with New Rule.
There are different types of rules, which have different performance impacts.
Exact Match: If the full path is specified (parent folder and file name), these are fast lookups since the Collector knows where to look.
Fuzzy Match: If only part of the parent folder or file name are specified, then the rule will be applied to each file in the system. This requires the full file system scan to occur.
A rule has the following fields:
A unique display name
File Name: Can be full name, empty, or have wild cards. Details are below.
Parent Folder: Can be full name, empty, or have wild cards. Details are below.
Max File Size: Allows you to ignore files that are too big to collect.
Max File Age: Allows you to optionally ignore files that are old and likely not relevant to a recent attack. This field is number of days and is applied to the file’s creation date.
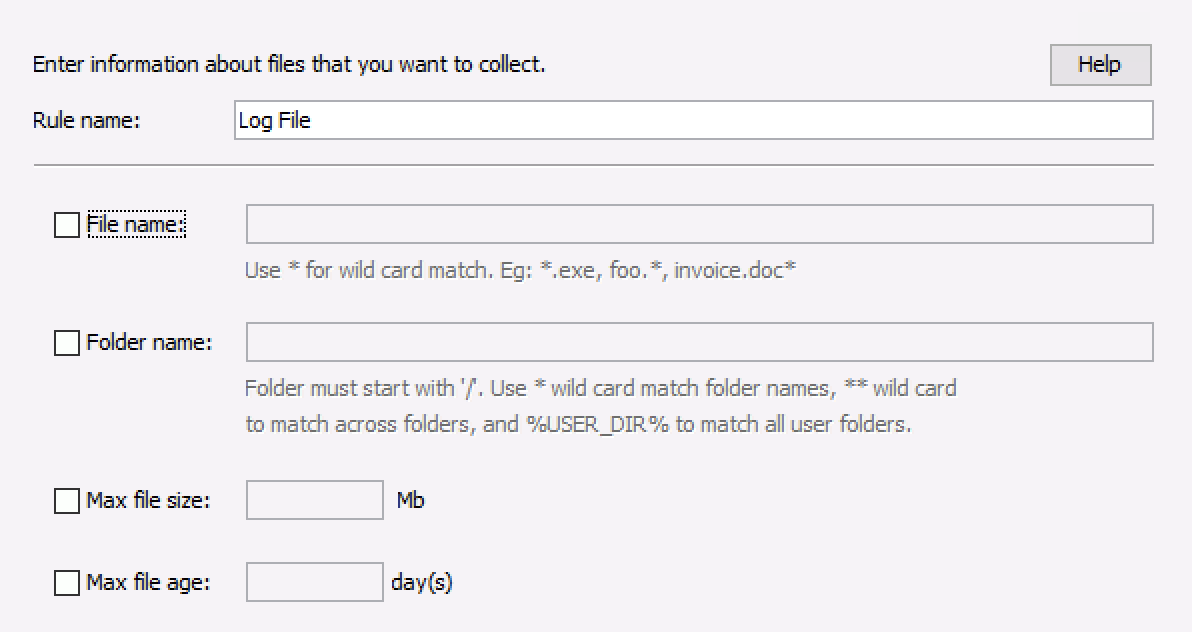
Add New File Rule
The following are more detailed requirements for file name:
This field is required if folder name is not specified
Comparison is case-insensitive.
Can not include any of the symbols that are not allowed in files: ‘:’, ‘>’, ‘<’, ‘:’, ‘”’, ‘/’, ‘', ‘?’
Can include one or more ‘*’ wild cards, which will match 0 or more of any character.
If no file name is given, all files in any directory matching the folder name will be collected (non-recursive).
The following are more detailed folder requirements:
This field is required if file name is not specified
Comparison is case-insensitive
Forward slash is used to separate folder names.
Can not include any of the symbols that are not allowed in files: ‘>’, ‘<’, ‘:’, ‘”’, ‘', ‘?’
Can start with %USER_DIR% to match the standard Windows user folders or any non-standard user folders extracted from the registry (if present).
If not using %USER_DIR% the path must start with a forward slash
Folder names should not end with a slash (unless using a single slash for the root folder)
- A ‘*’ wildcard that is not surrounded by forward slashes, will match 0 or more characters within a folder name.
/windows/system* will match /windows/system32
- A single ‘*’ wildcard surrounded by forward slashes will match any full folder name, but not recursively:
/Windows/*/notepad.exe will match /Windows/System32/notepad.exe
/Windows/*/notepad.exe will not match /Windows/System32/foo/notepad.exe
- A double ‘*’ wildcard surrounded by forward slashes will match any number of folder names:
/Windows/**/notepad.exe will match /Windows/System32/notepad.exe and /Windows/System32/foo/notepad.exe
If no folder name is given, all files with the specified file name will be collected.
Any wild card character will require the full file system scan. If you specify the full file name and the full folder path, then a targeted collection can be performed without the full file system scan.
Examples:
- To collect a specific log file (fast collection):
File Name: ‘logfile.txt’
Folder Name: ‘/ProgramData/ApplicationName/Logs’
- To collect all files in a specific folder newer than 60 days:
File Name: <Not specified>
Folder Name: ‘/ProgramData/ApplicationName’
Max File Age: 60
- To collect all executables in AppData:
File Name: ‘*.exe’
Folder Name: ‘%USER_DIR%/AppData/**’
- To collect the $MFT:
File Name: ‘$MFT’
Folder Name: ‘/’
2.3.1.2. Using Custom File Collection Rules
After you update or create rules, you may need to take additional steps to ensure the collections use them.
Network - PsExec: The Collector will download the latest version of the rules when the collection starts.
Network - Manual, Cyber Triage File: The rules are copied to the extracted folder. You’ll need to extract the Collector again to get the latest version of the rules.
KAPE, Disk Image, Logical Files: Local copies of the latest rules are used.
2.3.2. Configure Cloud Storage Profiles
Cyber Triage can use cloud storage in two ways:
The Collector can automatically upload to these locations
The main application can directly download from these locations
Cyber Triage supports:
S3-compatible providers, including AWS, BackBlaze, and others.
Microsoft Azure
You should configure the cloud storage profiles before you extract the Collector so that it will have the proper configuration data.
2.3.2.1. Basic Cloud Storage Approach
Every organization uses cloud storage differently and has different requirements for how to manage cloud resources. With that in mind:
Cyber Triage will not create buckets, but we do provide guidance for how to do so. It is ultimately up to you to ensure they are secure and meet your organizations requirements. You can encrypt the Collector output using public key encryption or a password.
Cyber Triage assumes there is a single bucket that all Collectors will upload to.
- Cyber Triage is designed for credentials with minimal permissions. It uses two roles:
Collector Upload: This identity should be able to write to the bucket, but not read. If the threat actor compromises these credentials, they should not be able to read what else is in the bucket.
Bucket Manager: This identity can read the bucket. It will be used by the application to read data that was uploaded.
Refer to Configuring Cloud Storage Services for guidelines on configuring your service and these account types.
2.3.2.2. Cloud Storage Profiles
A Cloud Storage Profile defines a bucket with a set of credentials to access it. Namely:
The location and name of the bucket
“Upload” Credentials
“Manager” Credentials, which are optional
2.3.2.3. Adding a Cloud Storage Profile
To add a profile, go to the Options panel and choose “Collection” / “Cloud Storage’. You should make a profile for each set of credentials, buckets, and regions.
Choose “New Profile” and get the following dialog:
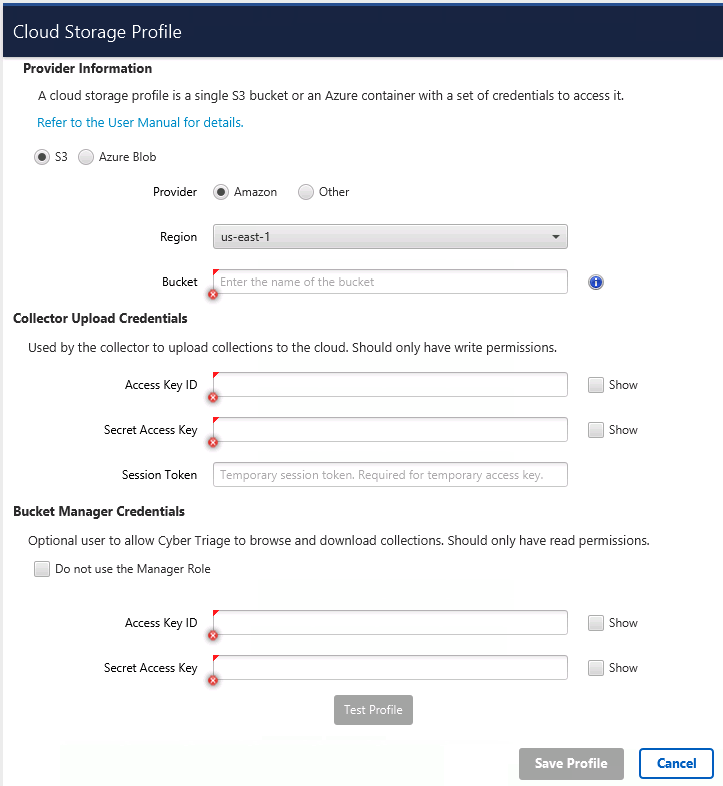
Pick if it is S3-compatible or Azure
For S3 buckets, configure:
Provider: Amazon AWS or another S3-compatible
Region: If using AWS, you’ll need to pick the region your bucket is in.
- Service URL: If using a non-AWS provider, you’ll need to specify the Service URL. It should have the region in the URL.
For example: S3.us-east-2.wasabisys.com
Bucket: The name of the bucket to save the results to. You will need to manually create this bucket. It should not be public.
- Collector Upload: This identity is used to write data. It should NOT be able to read.
Access Key ID and Key: You will need to get an access key from the provider. These will be saved unencrypted in the configuration file.
Session Token: Optional. Required only if you are using a temporary access key. You can generate this via the AWS Command Line Tool:
Bucket Manager: This identity is used to read data and browse the bucket. It is optional. Choose “Do not use” if you are interested in only having Cyber Triage upload to the bucket.
Press the “Test Connection” button so that Cyber Triage can verify the data and check the scope of the identities.
For Azure buckets, you’ll see this dialog:
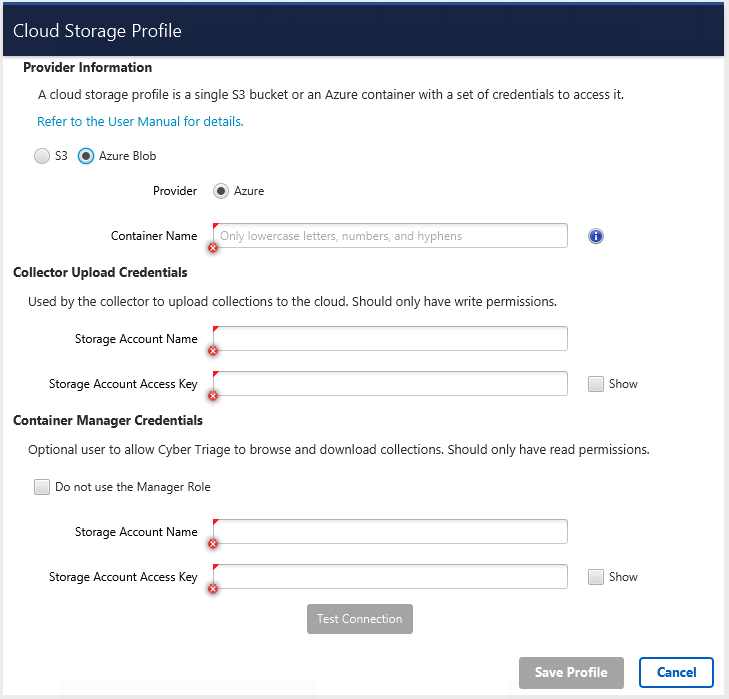
Configure:
Container: You are responsible for making this. It should not be public.
Collector Upload: This account should be able to write, but NOT read. Note that this is possible only with premium Azure tiers.
Bucket Manager: This account should be able to read and browse the container. It is optional.
Press the “Test Connection” button so that Cyber Triage can verify the data and check the scope of the accounts.
2.3.3. Configure Collector Output Encryption
Cyber Triage can use public key encryption to protect the output of the Collector.
Note that there are two ways to protect the output of the Collector:
Configure a public key so that the Collector can encrypt, but not decrypt the data. Only people with access to the private key (which stays with the Cyber Triage application) can decrypt it. This is the safest.
Supply a password at the time of collection. Anyone with this password can decrypt it and any typos when entering the password could result in the data being unrecoverable.
This section outlines the public key approach.
The basic process is:
Create a key pair within the Cyber Triage application
When you export the Collector from the main application, the ‘CollectorConfig.yaml’ file will include the public key
When the Collector runs, it will use the public key to encrypt its output file (as long as the ‘CollectorConfig.yaml’ file exists)
When you import that file using “Cyber Triage File”, Cyber Triage will use its private key to decrypt it
To generate the key pair, go to the Options panel and choose “Collector” / “Collector Encryption”.
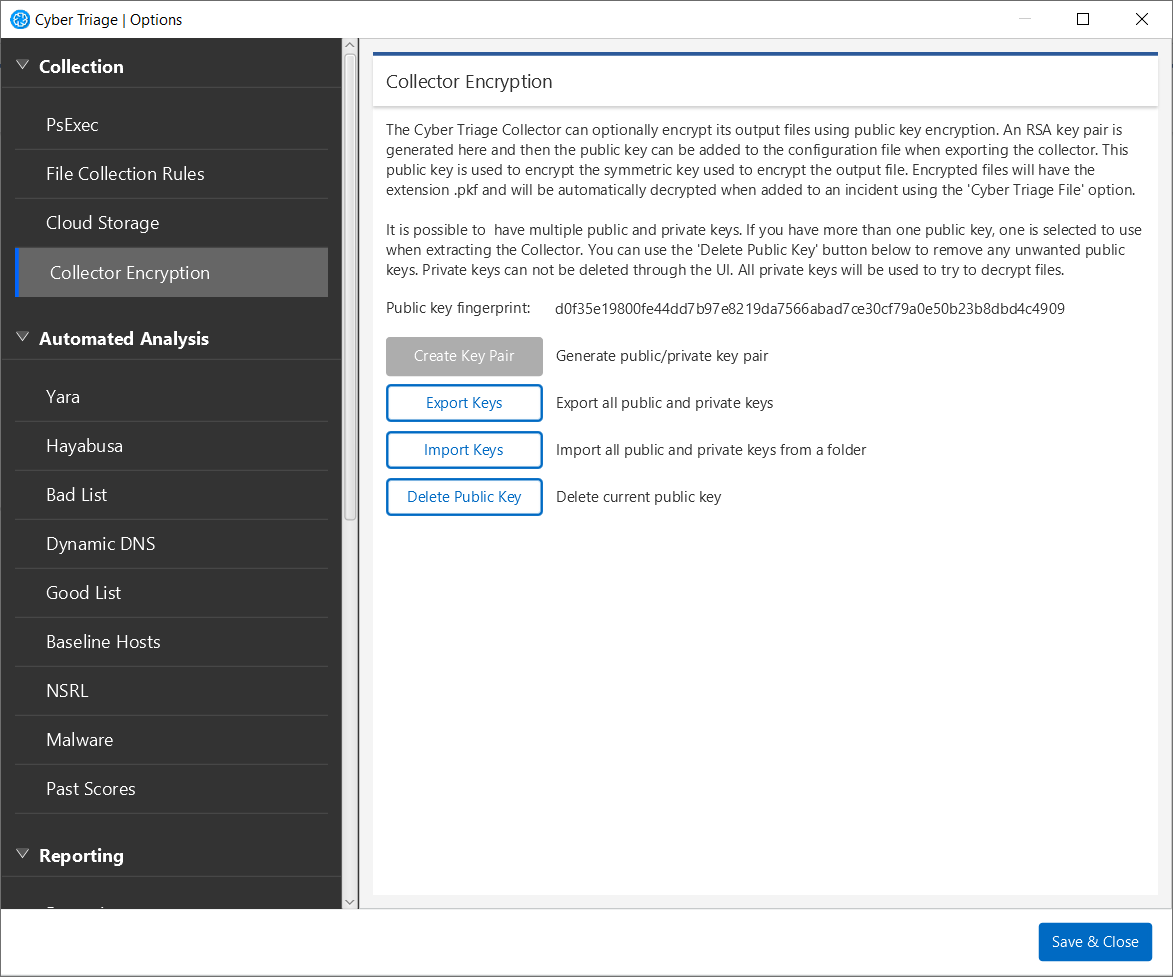
Select “Create Key Pair”. It will prompt you to save a backup copy of the keys. You should keep this backup copy safe. You can later import it into another Cyber Triage instance if you need to.
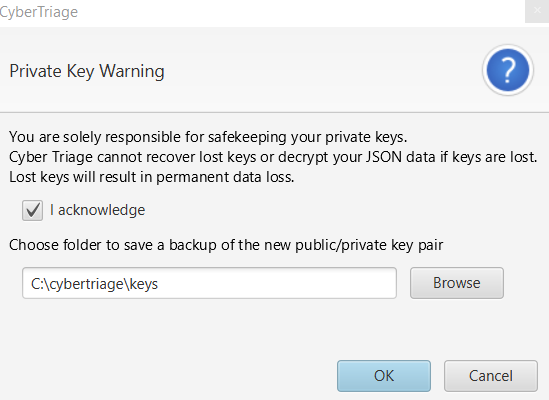
You can also explicitly export and import the keys (both private and public). A Cyber Triage instance can have multiple private keys to import data from multiple sources.
When you export the Collector, you will have the choice to include the public key in the configuration file.
Note
CollectorConfig.yaml must be in the same folder as the Collector when it runs for the key to be used.
The resulting file format is Cyber Triage-specific. It has a header with Cyber Triage information, the encrypted symmetric key, and then the encrypted Collector output. See Encryption for details on the encryption algorithms.
2.3.4. Configuring for Network - PsExec Collections
Cyber Triage has built-in support to deploy its Collector via PsExec, but additional configuration is needed before the ‘Network-PsExec’ add host method can be used (Add Over The Network - PsExec Launch). Namely
PsExec must be configured
Ensure the target computer is configured
NOTE: Microsoft has dropped support for Windows XP with the latest versions of PsExec. If you are still using Windows XP or 7 and require the Network - PsExec functionality, you will need to find an older version of PsExec (2.34 or earlier). Contact our support team if you need to use PsExec on XP systems.
2.3.4.1. Configure PsExec
Download PsTools version 2.33 or higher.
Unzip the PSTools.zip file to a folder on your computer.
Open the Cyber Triage Options panel from the opening Cyber Triage® window.
Navigate to the “Collection” / “PsExec” panel.
Choose the Browse button, and navigate to the folder that you extracted the contents into. Confirm that you read the PSTools End User License Agreement.

Configuring PsExec tool
2.3.4.2. Services Required on Target System
The target system for Network - PsExec must have file sharing enabled so that PsExec can copy over the Collector.
2.3.4.3. Enable Local Accounts
If you want to use a local account on the target system (instead of a domain account), then you’ll need to make a change from the default settings in order to use Network - PsExec.
Run the regedit.exe Windows program on the target computer.
Navigate to the HKEY_LOCAL_MACHINE\Software\Microsoft\Windows\CurrentVersion\Policies\System node.
Right click on the System node to add a REG_DWORD value with a name of LocalAccountTokenFilterPolicy (no quotes) and a value of 1.
Either reboot the computer or restart the “Server” service (LanmanServer) and the “Workstation” service (LanmanWorkstation). Either of these will ensure the new policy is used.
2.3.5. Configure Baselines (Gold Images)
To reduce false positives, you can configure a host as a ‘baseline’ and any of its contents will not be scored as bad or suspicious in future hosts.
Some important notes about baselines:
Baselines are applied when a host is added. When you add a baseline, it will not be applied to already ingested hosts. Only future ones.
If you add multiple baselines, they will all be applied to all future hosts. You cannot pick a specific one.
- Not all artifacts are included in a baseline. Only the following are:
Triggered Tasks
Processes
Active Connections
Listening Ports
Files that were collected (this does not include ALL files. Just the ones that were part of the triage collection).
To add a baseline host:
- 1, You must first add the host to Cyber Triage. For example:
Run the Collector on the live host, save the results to a file, and import it. See Add a Cyber Triage Collector File.
Add a disk image of the gold image. See Add a Disk Image.
After you have added the host, you can specify it as a baseline by going to the options panel and choosing ‘Automated Analysis’ / ‘Baseline Hosts’.
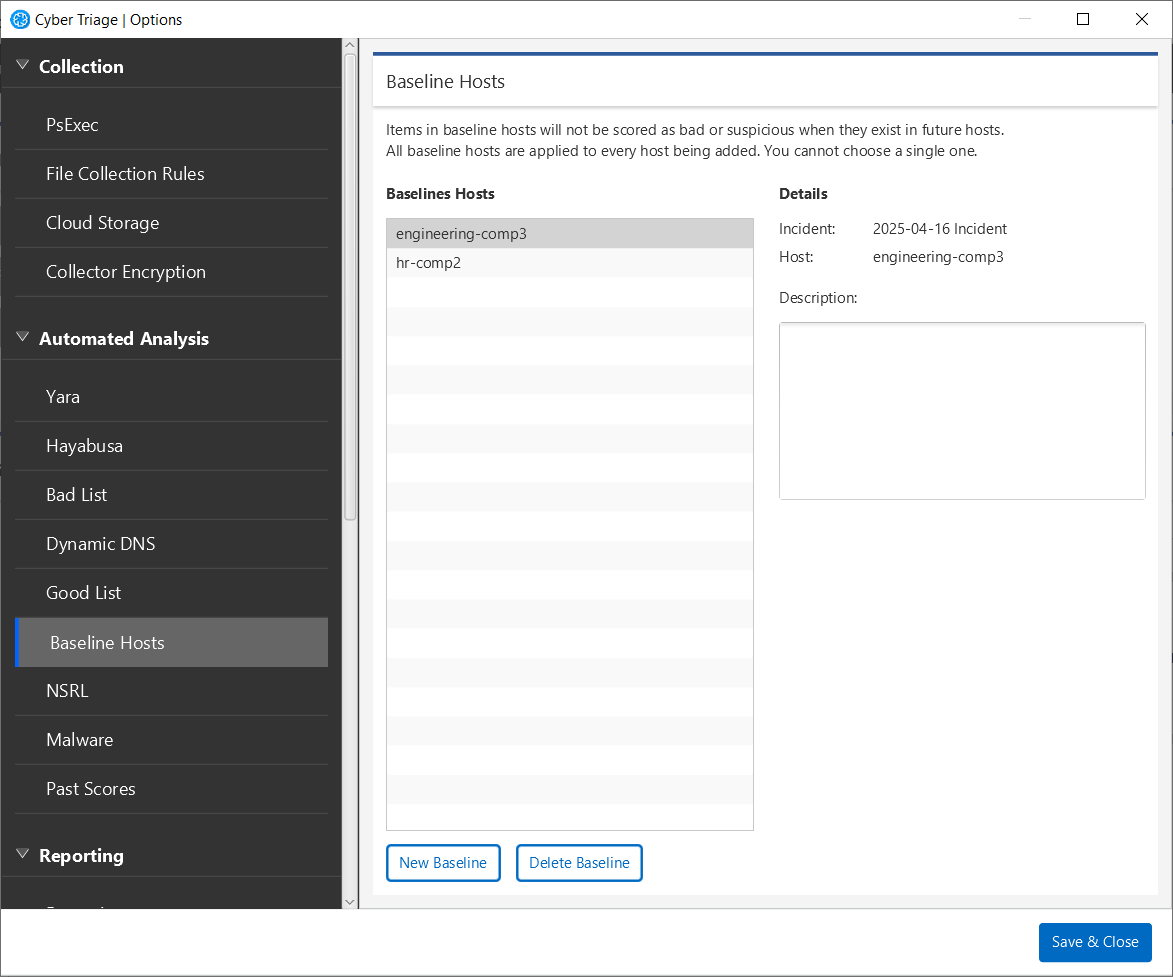
Then choose ‘New Baseline’ and select it from the dialog.
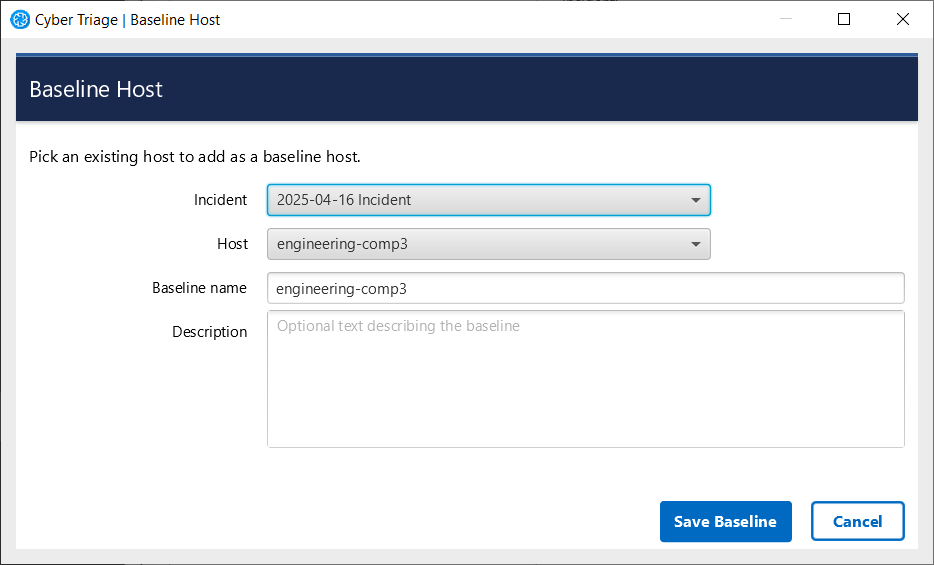
You do not need to do anything to use the baselines. They are all automatically applied to all future hosts that are added. You will see items with the green check mark that are scored as Good. The details will identify it as being from a baseline.
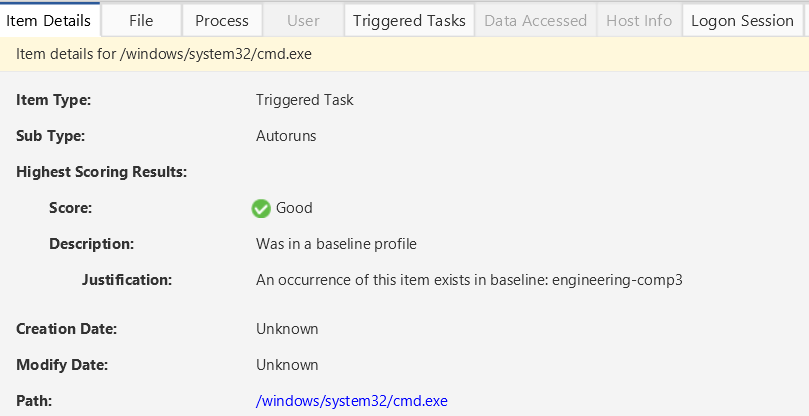
Technical Details: Cyber Triage is using the data in its correlation database for the baseline, not the original host database. You can delete the original host from Cyber Triage and still use it as a baseline as long as you do not also delete from the correlation database.
2.3.6. Configure EDR APIs to Import Telemetry
If you are going to import telemetry directly from an EDR, then configure it now. This feature requires a different license and is different from using EDR agents to deploy the Cyber Triage Collector. This feature will use data already recorded by the EDR.