3.2. Cyber Triage Collector Tool
This chapter outlines how to collect data with a focus on the Cyber Triage Collector. You should understand the Collector even if you have your own collection tool because:
Using the Cyber Triage Collector will provide the most amount of data in your investigation and will give you the best results.
The Cyber Triage Collector is used to extract data from disk images and other data sets you import
NOTE: The Cyber Triage Collector will give you the best results because it collects more than other tools do. It will resolve artifacts and collect files that are referenced, which results in more executables and file content. See our adaptive vs static blog post for details.
The next chapter of this manual focuses on importing already collected data into Cyber Triage.
3.2.1. Basic Concepts
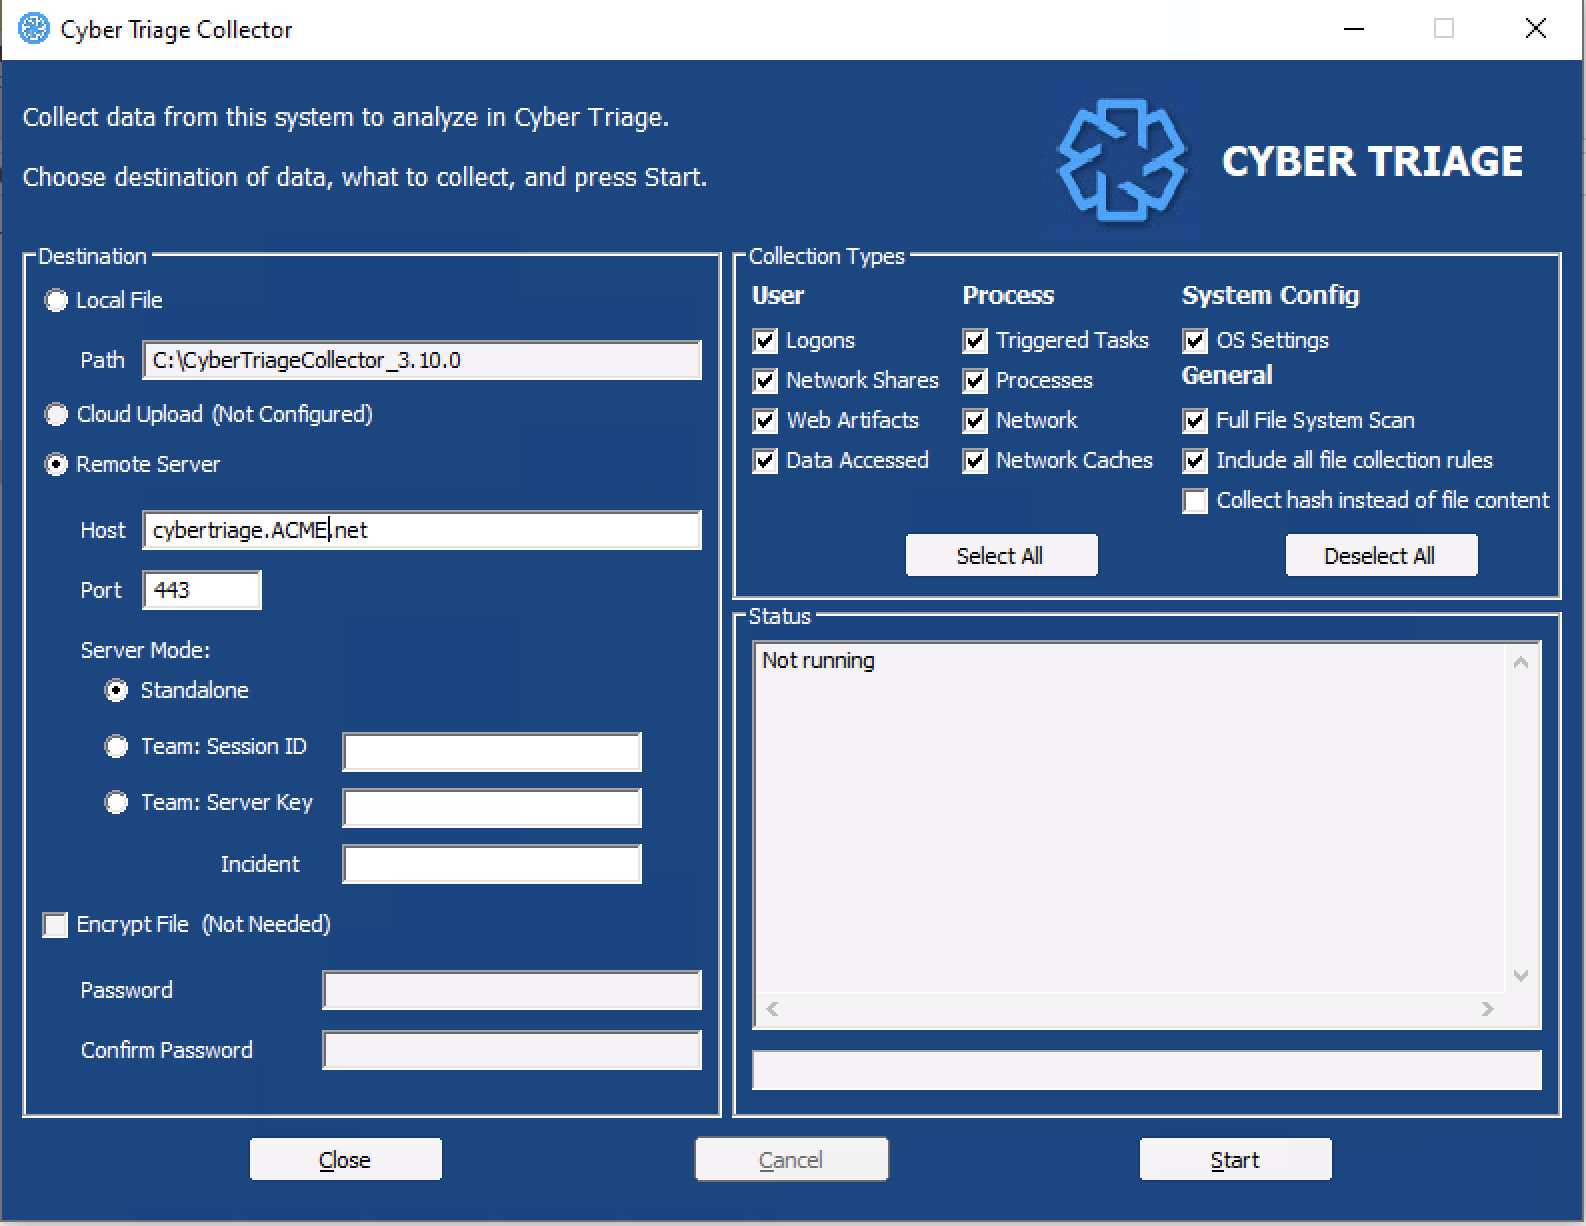
The Cyber Triage Collector is a separate program that will extract the key files and artifacts from a live system or data source (it is used behind the scenes on many of the 3rd party collections).
Is a single file, command line executable
Runs on Windows XP and above
Has no dependencies, such as .NET
Can write results to a local JSON file, over the network to Cyber Triage, or to cloud storage (S3-compatible or Azure).
Can encrypt the output using public key encryption.
Uses The Sleuth Kit to by parse the file system so that on a live system, it can bypass rootkits and access locked files. It can also access logical file sets and disk images.
Is adaptive and parses artifacts on the live system so that it can resolve additional files, such as collecting the EXE files associated with an AutoRuns Triggered Task item.
In some situations, Cyber Triage will run the Collector automatically. In others, you will need to manually launch it or configure IT infrastructure to do so.
3.2.1.1. Data Collection Types
When adding data into Cyber Triage, you will at some point be prompted for what kinds of data to extract and import. For example:
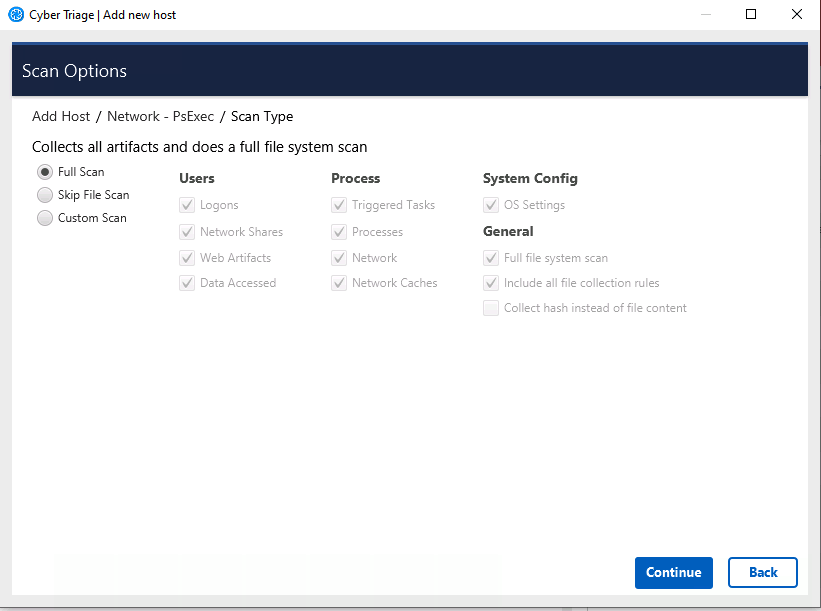
The data types listed are based on Information Artifact Types. You can choose to collect the underlying files and artifacts for them.
Additional settings often include:
Full File System Scan: Scans each file on the system, collects metadata, and the the file content if they are suspicious. This is the most time intensive step of the collection process.
Collect hash instead of file content: This will calculate the hash values for EXE and DLL files and save those instead of the full file content. This makes the collection smaller, but also means that the file can not be uploaded for full malware analysis.
The Collector will also make copies of various application-specific logs and configuration files, if they exist.
The data types and above settings are grouped into profiles:
Full Scan: The default, which includes all of the types listed above.
Skip File Scan: This skips the file system scan, but gets the rest of the artifacts. This is much faster than a full scan.
Custom allows you to pick and choose.
The Collector will, by default, copy the file content for all executables, libraries, and other files that are referenced by the other artifacts. Executables and DLLs signed by Microsoft are not collected and instead only the hash values are.
3.2.2. Collector Output Options
There are three main locations that the Collector can save data to:
A local file (this is the default behavior)
Over the network and directly to the Cyber Triage application
A cloud storage provider (S3-compatible or Azure)
Each of these will now be covered in more detail.
3.2.2.1. Save To a File
The default behavior is to save the results to a file. You can then copy that file around and import it into Cyber Triage using the “Cyber Triage File” method.
You can choose to encrypt the file, see Configure Collector Output Encryption.
When the Collector has finished, there will be a directory called CyberTriageOutput with a uniquely named JSON file in it.
3.2.2.2. Send Over Port 443 to Cyber Triage
You can also have the Collector make a connection to Cyber Triage and send data directly over the network. The data is encrypted and the server certificate will be validated.
This approach is used for the following methods (which are covered in more detail in the next chapter):
Network - PsExec: Cyber Triage will use PsExec to copy the Collector onto the target host, launch it, and data is sent back directly into Cyber Triage.
Network - Manual: You will launch Cyber Triage and it will reach out to the configured Cyber Triage server.
EDR/WMI/Powershell: You can configure your IT infrastructure to launch the Collector and have it reach out to the server. See Launch via PowerShell, WMI, etc..
This approach requires command line arguments to specify:
Server name
Server token and certificate hash
3.2.2.3. Send To Cloud Storage
You can also have the Collector upload the results to cloud storage (S3-compatible or Azure). This is much like saving results to a file, except the file is copied up into the cloud when the process completes.
Some special notes:
The cloud credentials are saved to a configuration file. You need to configure this when you extract the collector. If you included the cloud credentials in the extraction, the tool will automatically upload to that cloud resource.
The Collector will save the artifacts to a file first and then upload. So, you will need space to store the output locally.
The Collector will use a unique file name with the host name and collection time stamp in it. It will also break it up into smaller files. You should not get collisions in a single bucket with other collections that are happening at the same time on other hosts.
If you configured a profile with reader permissions, you can directly import the file from the “Cyber Triage File” feature.
You can either use public key encryption or a password if you want the file to be encrypted in the cloud.
See Configuring Cloud Storage Services for details on configuring your storage.
3.2.3. Extracting the Collector
If you are going to directly launch the Collector on a live system, then you must first extract it from the main application. This is required for the following scenarios:
You are going to configure an EDR to copy the Collector and launch it
You are going to put the Collector on a network share and launch it
You are going to send the Collector to a client for them to launch
Before you extract the Collector, refer to Setup (Standard and Team) to configure things like custom file collection rules, cloud storage, and public key encryption.
To extract the Collector:
Choose the Extract Collector feature from the upper right of the opening Cyber Triage windows.
Choose a folder to copy the files to (a subfolder will be created inside of it).
Optionally choose to encrypt the output using public key encryption (Configure Collector Output Encryption).
Optionally choose to include cloud storage information from a previously configured profile (Configure Cloud Storage Profiles).
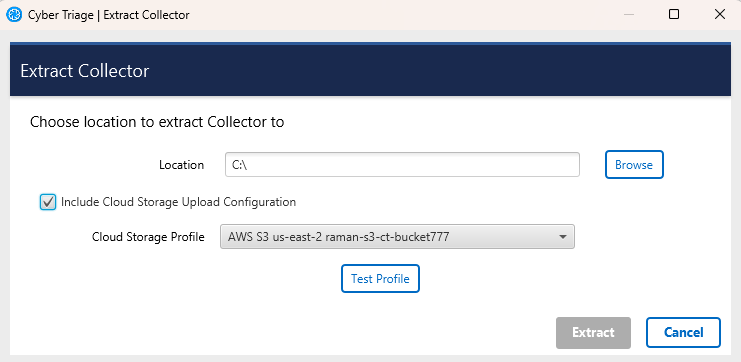
Extract Collector
This process will make a CyberTriageCollector folder with the command line and graphic interface programs inside of it. It will also have a configuration file if cloud storage credentials were specified.
NOTE: This version of the Collector will not process an E01 disk image. There are rare scenarios where people can’t simply import the disk image into Cyber Triage and instead want to run the Collector on it to get the JSON file. To do this, follow the instructions in Using The Collector on Disk Images.
3.2.3.1. Files in the Collector Folder
You technically need only a single EXE when you launch the Collector, but you may notice that there are other files in the folder when you extract it. This section outlines what the other files are and if you need to copy them to a remote system.
Executables:
CyberTriageCollector.exe: This is the primary tool, however different versions exist for XP and Vista.
CyberTriageCollector_Vista.exe: Collector that runs on Vista.
CyberTriageCollector_XP.exe: Collector that run on XP.
CyberTriageCollectorGUI.exe: This is a graphical interface wrapper that allows you to launch CyberTriageCollector.exe. If you are sending the Collector to someone who does not want to launch a command prompt, then you can send them this program AND CyberTriageCollector.exe.
Configuration files may include:
CollectorConfig.yaml: Contains settings such as cloud storage credentials and public encryption keys.
filesets.yaml: Contains custom file collection rules.
config.conf: Contains settings that CyberTriageCollectorGUI.exe uses to pre-populate fields (such as the server name).
Here are some scenarios and which files you need:
You can use only the CyberTriageCollector.exe program if it’s a modern Windows system and all options can be specified on the command line (no confiuration files required).
You can use CyberTriageCollector.exe and the YAML configuration files if do not need the GUI, but do need some configuration (such as public encryption keys).
You can use CyberTriageColector.exe, YAML configuration files, CyberTriageGUI.exe, and config.conf if you are sending it to someone who will want to launch the GUI version.
3.2.4. Command Line Arguments
3.2.4.1. Collector Command Line Arguments
The Collector is a command line program with various optional arguments that allow you (or other applications) to control what it will collect. To see the options, you can choose supply the —help option.
If you supply no arguments, the Collector will collect from the live running system using default settings:
CyberTriageCollector.exe [-i input_source] [-o output_file] [<other options>]
File Output Options:
  -o: Specify the full path and name of the output JSON file. Default is in CyberTriageOutput folder
  --encrypt_outfile password password : Encrypt the output file with a password (specify the password twice)
  --split_output_file : Split output files into segments of approximately 1.5 GB.

Network Output Options:
  --server host : Stream data back to the given Cyber Triage server hostname/IP instead of to a file
  --cert_hash hash : Hash (full or short) of the server cert. Use 'nohash' to skip verification. Req'd with --server.
  --port port : Port number to connect to the Cyber Triage server. Optional. Default is 443.
  --sessionid sessionID : Session ID to add host to. Required for Live Manual and Live Automatic
  --serverkey serverkey : Key used to authenticate with the Team server. Can be found on the server options panel
  --incident name : Specify an incident name to add the host to. Use with --serverkey

Cloud Options:
S3 Options: The first four options below must be set to upload to S3
  --s3_Region region: Region (ex: us-east-2)
  --s3_Bucket bucketName : The name of the bucket to save the results to
  --s3_AccessKeyID accessKeyID : Access key ID
  --s3_AccessKey accessKey : Secret access key
  --s3_SessionToken sessionToken : Required only if using a temporary access key
  --s3_EndpointOverride url : Used to specify the Service URL if using a non-AWS provider
Azure Options: Either the first option alone (azure_SasUrl) or all three of the other options must be set to upload to Azure
  --azure_SasUrl SAS URL : Shared access signature token. Should start with https://
  --azure_ContainerName containerName : Container name
  --azure_StorageAccount storageAccount : Storage account name
  --azure_AccessKey accessKey : Access Key

Collection Options:
  --fast : Skips full file system scan. Faster but less comprehensive triage
  --dtypes : Comma list of data types. Use '--dtypes list' to get list of options
  --mft : Collect $MFT
  --usnjrnl : Collect $UsnJrnl:$J
  --ruleset_file ruleset_file : Path to file with rules of additional files to collect
  --request_rule_sets: Indicates that the server should be contacted to get a file collection rule set
  --skip_file_contents : Report only hashes and not content for files of interest.
  --skip_source_file_contents : Report only hashes and not content for source files (registry hives, prefetch, etc..)
  --set_max_source_file_size_mb size_in_mb: Set the maximum file size (in MB) for collected source files. Only affects files larger than 150MB.
  --tempdir : Path where temp files are written to

Input Options:
  -i: Specify the input. Must be an OS device. Default is \\.\PhysicalDrive0
  --logical_dir : Indicates that the input is the path to a logical directory
  --kape : Indicates that the image/logical dir was created by KAPE
  --uac : Indicates that the logical dir is a UAC output folder
  --analyze_offline : Indicates that the input is not from the system currently running this collector
  --os : Specify operating system for input. Will auto-detect if option is not used. Currently supported: 'win', 'linux'
  --image_password : Specify password for image (Only BitLocker is currently supported)

General Options:
  --ct_config ct_config_file : Specify path to the config file (typically named CollectorConfig.yaml)
  --reference_date date : Specify the date (YYYY-MM-DD) to use for time-based collection decisions. Interpreted as the start of selected day (12:00 AM UTC).
  --reference_timestamp timestamp : Specify the timestamp (Unix epoch) to use for time-based collection decisions
  --hostname_override hostname : Override the hostname used in the output file name and sent to the Cyber Triage server
If you want to specify the list of data types to collect, the list is below. Note that if you just want to skip the full scan, you should use ‘–fast’:
F:\>CyberTriageCollector.exe --dtypes list
Specify the following 2-letter codes separated by commas, to indicate the data types to collect:
    lo - Logons
    ns - Network shares
    wb - Web artifacts
    sc - Triggered tasks
    pr - Processes
    nw - Network
    nc - Network caches
    co - Config settings
    ud - User accessed data
    fs - Full file system scan
The program will return 0 if successful or non-zero if an error occurred or the program was terminated by an EDR.
3.2.4.2. Command Line Examples
Collect from local system and save output to a file in the default location:
F:\>CyberTriageCollector
Collect from local system, send data to server (for Network - Manual):
F:\>CyberTriageCollector --server 192.168.0.1 --sessionid 12345 --cert_hash 4a781abe
Collect from local system, save to encrypted file, and skip the full scan (NOTE: We recommend you use the public key encryption instead):
F:\>CyberTriageCollector --fast --encrypt_outfile passw0rd passw0rd
Collect from local system and copy only processes to a local file:
F:\CyberTriageCollector --dtypes pr
Collect from local system, send data to S3 using arguments (and not a config file):
F:\>CyberTriageCollector --s3_Region us-east-2 --s3_Bucket xyz --s3_AccessKeyID IWLAS383819AWAQ. --s3_AccessKey s8li209sjha33au34y3u4ysuyds7
Collect from local system, send data to Azure using presigned (SAS) URL arguments (and not a config file):
F:\>CyberTriageCollector --azure_SasUrl https://myaccount.blob.core.windows.net/mycontainer/myblob.txt?sv=2021-06-08&st=2025-05-09T14:00:00Z&se=2025-05-10T14:00:00Z&=sr=b&=sp=r&sig=vp229Zp38YroruUvpeHOfkoF5i9iyuZnhe2c8lTYUMA
Collect from local system, send data to Azure using access key arguments (and not a config file):
F:\>CyberTriageCollector --azure_ContainerName Test123 --azure_AccessKey "N7oR3eE1bU0uV1wX2yZ3aB4/wU5eF6g==" --azure_StorageAccount mystorageaccount123
3.2.5. Output Files and Naming Conventions
3.2.5.1. Collector Error Log
The Collector will maintain a log file in the same folder that its writing the artifacts to. The log file will have a “.log” extension and have the same base name as the artifact JSON file. For example, “cttout_host1_20250424_19_37_02.log”.
If the collection is successful, this file will be deleted. If it is not, then it will be retained (and uploaded to S3/Azure). You can refer to this if you are remotely launching the program and need to debug why it is having problems.
3.2.5.2. Output Manifest File
If you save the output to a file or upload it to cloud storage, you will find a manifest file that has the same base name as the output, but it has a ‘.txt’ extension. This contains information about:
Arguments you used to launch the program
Size and hash values of output files
If it ended with an error
3.2.5.3. Output File Names (In Progress, Error, etc.)
To help debug issues and give insight about the progress of background collections, Cyber Triage edits the file names based on stages of the collection.
While the collection is happening, the output files will have IN_PROGRESS in the name.
When the collection is done, that phrase will be removed.
If the collection ends with an error, it will have ERROR in the name.
You can use these names as follows:
If the files have neither ERROR or IN_PROGRESS, the files should be ready to use.
If the files have ERROR, then look at the logs and see what you need to do in order to get a full collection.
If the files have IN_PROGRESS, then check if the Collector is still running. If it is, then wait. If it is not, then this indicates the Collector abrubtly terminated from either it being killed by an EDR or a crash. Check your EDR logs first. Otherwise, make sure you get the log file and manifest file and contact support.
3.2.6. Launching The Collector Manually
If you are going to manually interact with a system to launch the Collector, you have three options:
If you want to use the default settings and save to a file, you can right click on CyberTriageCollector.exe and choose “Run as Administrator”.
Launch the GUI Wrapper (CyberTriageCollectorGUI.exe) by double clicking on it.
Open an Administrator command prompt, navigate to the Collector folder, and specify the needed arguments (see Collector Command Line Arguments).
The basic approach would be to:
Extract the Collector to a folder (see Extracting the Collector)
Copy the folder to the target system
Launch with one of the above listed appropaches and deciding if the output will go to a file, S3/Azure, or over port 443.
If the output was saved to a local file, then copy the folder back to the computer running Cyber Triage.
3.2.7. Launch via EDR
We recommend that you use the Cyber Triage Deployer Powershell script (see Configure the Collector Deployer Powershell Script) to run Cyber Triage from an EDR. If that doesn’t work for your EDR, then you simply need to copy the collector and launch it using your EDR capabilities.
3.2.8. Launch via PowerShell, WMI, etc.
If you have a Team deployment, you can launch the Collector via IT infrastructure that allows you to remotely run programs.
There are two phases of configuration:
If you will send data back over the network, you’ll need to configure the Cyber Triage server to accept connections that are not initiated by Cyber Triage. Refer to Allow Collector To Initiate Ingests (Team Only) for details.
Configure the infrastructure to copy and launch the collector.
Details for various systems (such as WMI and Powershell Remote) are given in the subsections, but here are the common elements:
Extract the Collector as outlined in Extracting the Collector
Identify what command line arguments you want to use based on what you want to collect and where you want data saved to. See Collector Command Line Arguments for the list of arguments.
Most users will send data to a waiting server and therefore you’ll ultimately need to specify at least:
The hostname of your server
The server key (from the Deployment Mode on options panel)
The certificate hash of the server (from Certificate Info on options panel)
Something like:
CyberTriageCollector.exe --server cybertriage.acme.com --server-key 123456 --cert_hash 3241eabd
If the server is at capacity when the collection starts, it will accept the data, but queue it up for later processing.
If the collection was successful, CyberTriageCollector will return 0 for its exit code. A non-zero value indicates an error or that it was killed by an EDR or other anti-virus program.
One challenge with most of these methods is that they can be hard to debug when they do not work. If they launch the process, but you don’t get data back, then you can debug by saving the STDERR (Standard Error) messages to a file and then looking at them. You can do this by adding “2>Errors.txt” to the end of the command and then copying the file off. For example:
CyberTriageCollector.exe --server [...] 2> C:\windows\temp\errors.txt”
You can then log into the system and look at this file. This is obviously more useful while testing your environment than during a real incident.
3.2.8.1. Collect with WMI
If your environment is configured to run remote software with WMI, you can use that to copy the collector and launch it. This section assumes you read the parent section (Launch via PowerShell, WMI, etc.) on enabling the server to listen for connections.
On your “trusted” system, open a command prompt that runs as an account that has administrator access on the target machine you want to collect from.
You next need to copy the collector to the target machine. One way to do that is to copy by UNC paths if file sharing is enabled on the target system, such as:
copy CyberTriageCollector.exe “\\192.168.3.10\ADMIN$\Temp”
Run the collector by executing the following WMI command from the command prompt. You’ll need to specify the Cyber Triage server address:
wmic.exe /node:192.168.3.10 process call create ”c:\windows\temp\CyberTriageCollector.exe --server cybertriage.acme.com --server-key 123456 --cert_hash 3241eabd”
If it was successful, wmic will print the process ID. Though, the process could have not collected data if it could not connect to the server or if invalid arguments were given.
WMI-specific Troubleshooting Steps:
Ensure winmgmt (WMI), DCOM, RPC, and RPC Endpoint Mapper services are running. These services are normally enabled by default.
Ensure WMI is allowed through firewall (https://learn.microsoft.com/en-us/windows/win32/wmisdk/connecting-to-wmi-remotely-starting-with-vista)
Ensure that you are using domain users. If you are using a local user you’ll need to disable token filtering on the remote endpoint (https://learn.microsoft.com/en-us/troubleshoot/windows-server/windows-security/user-account-control-and-remote-restriction)
3.2.8.2. Collect with Powershell (PSRemote)
This section provides an example for deploying the collector using Powershell Remote. It assumes you read the parent section (Launch via PowerShell, WMI, etc.) about the basic steps of getting the collector and what arguments to specify.
3.2.8.2.1. Prerequisites
An Administrator-level user account on the target system
Powershell v5 or higher
PS-Remoting enabled on local and target system. It is enabled by default only on Servers. See below for steps.
3.2.8.2.2. Collection Steps
Open up PowerShell prompt on your trusted analysis system. Optionally, open it as the same user that has admin rights on the target system.
Copy the Collector to the target system:
Copy-Item -Path <Path To CyberTriageCollector.exe> -Destination C:\Windows\Temp\CybertriageCollector.exe -ToSession $(New-PSSession <target_hostname> -Cred $(Get-Credential))
Update ‘Path’ with where you extracted the Collector to.
Update ‘<target_hostname>’ with the target host.
This will prompt you for the username and password to use on the target system. You can skip the ‘-Cred’ argument if you run this Powershell prompt as the same user that has admin access on the target system.
Create a remote session:
Enter-PSSession <target_hostname> -Cred $(Get-Credential)
‘<target_hostname>’ is the same as the copy-item command.
You can skip ‘-Cred’ if this shell is running as a user with admin rights on the target system.
Start the copied CybertriageCollector within the remote session. If you are sending data back over to a server, the command would look like:
Start-Process -Filepath "C:\Windows\Temp\CybertriageCollector.exe" -Wait -ArgumentList "--server cybertriage.acme.com --server-key 123456 --cert_hash 3241eabd"
Or, if you are saving to a file on the target system, it would look like:
Start-Process -Filepath "C:\Windows\Temp\CybertriageCollector.exe" -Wait -ArgumentList "-o c:\Windows\Temp\Cybertriage"
Update ‘-ArgumentList’ with any other arguments that you want to use.
The ‘-Wait’ argument will force Powershell to wait until the program has been completed. You can also skip this if data is being sent back and you do not need to wait.
After completion, you can exit the remote session using:
Exit-PSSession
If you sent data back to the server over the network, you are done. If you saved it to a file (i.e. ‘-o’), you’ll need to copy the output back with something like:
Copy-Item -Path “c:\Windows\Temp\*.json.gz” -Destination <local_path> -FromSession $(New-PSSession <target_hostname> -Cred $(Get-Credential))
Update ‘-Path’ with where you specified in the Start-Process command.
‘<local_path>’ is a place on your system to copy the data to
‘<target_hostname>’ is the same as the previous two commands.
3.2.8.2.3. Enable PS-Remoting
PS-Remoting is enabled by default on Servers, but not other Windows systems. It must be enabled on the source and target systems for the above process to work.
Microsoft has documentation to enable this.
The basic idea is to: * Open an Administrator PowerShell command prompt on the system to enable. * Type in: ‘Enable-PSRemoting -Force’
If you get an error to the effect of “WinRM firewall exception will not work since one of the network connection types on this machine is set to Public. Change the network connection type to either Domain or Private and try again.”. If so, then use ‘Enable-PSRemoting -SkipNetworkProfileCheck -Force’
3.2.9. Using The Collector on Disk Images
There are a few (rare) scenarios where you may have limited access to a disk image and you want to run the Collector on it. The Collector that you get from Extracting the Collector does not support E01, VMDKs, and other disk image formats. You’ll need to configure your own setup for this.
Here are the steps for manually extracting and executing the ‘library’ version of the Collector:
Copy the ‘C:\Program Files\Cyber Triage\cybertriage\collector’ folder to a new location (and you may want to rename it)
- Copy the following directories into the new collector folder you copied in the previous step:
‘C:\Program Files\Cyber Triage\cybertriage\evtexport’
‘C:\Program Files\Cyber Triage\cybertriage\evtx_dump’
At this point, you should have a folder with a file named ‘CyberTriageCollector_Libs.exe’ and it has subfolders named ‘evtexport’ and ‘evtx_dump’.
To run this on a disk image:
Open a command prompt with admin privileges
- Type in a variation of: ‘CyberTriageCollector_Libs.exe -i <disk_image> –skip_live_analysis’
Where you replace ‘<disk_image>’ with the path of your disk image
The ‘–skip_live_analysis’ is important because otherwise processes and network connections from your analysis computer will be saved in the JSON output
After the program runs, you’ll have a json.gz file in the ‘CyberTriageOutput’ folder.
You can then import this via Add a Cyber Triage Collector File.