5. Adding a Host
As mentioned in the previous chapter, Cyber Triage supports a variety of ways of getting host data into it. Some scenarios will involve using the Cyber Triage Collector tool to extract artifacts from a live system. Others involve importing an already collected data set, such as an E01 image.
This chapter assumes you know how to get a data set to import. The basic importing process is:
Ensure the threat intelligence is up to date
Specify the data set to import
Configure what types of artifacts to extract from it
Configure the automated analysis settings, such as malware scanning
5.1. Configure Threat Intelligence
Some forms of threat intelligence must be configured in the Options panel before you can start the add host process. These include:
Yara (Configure Yara Signatures)
Good/Bad Lists (Configure Bad and Good Lists)
These are applied as soon as data starts coming in. So, ensure they are up to date before adding a data source.
5.2. Add Host Types
To add data from a host, press Add New Host from the Incident Dashboard and you’ll be presented with this screen, which gives you several options:
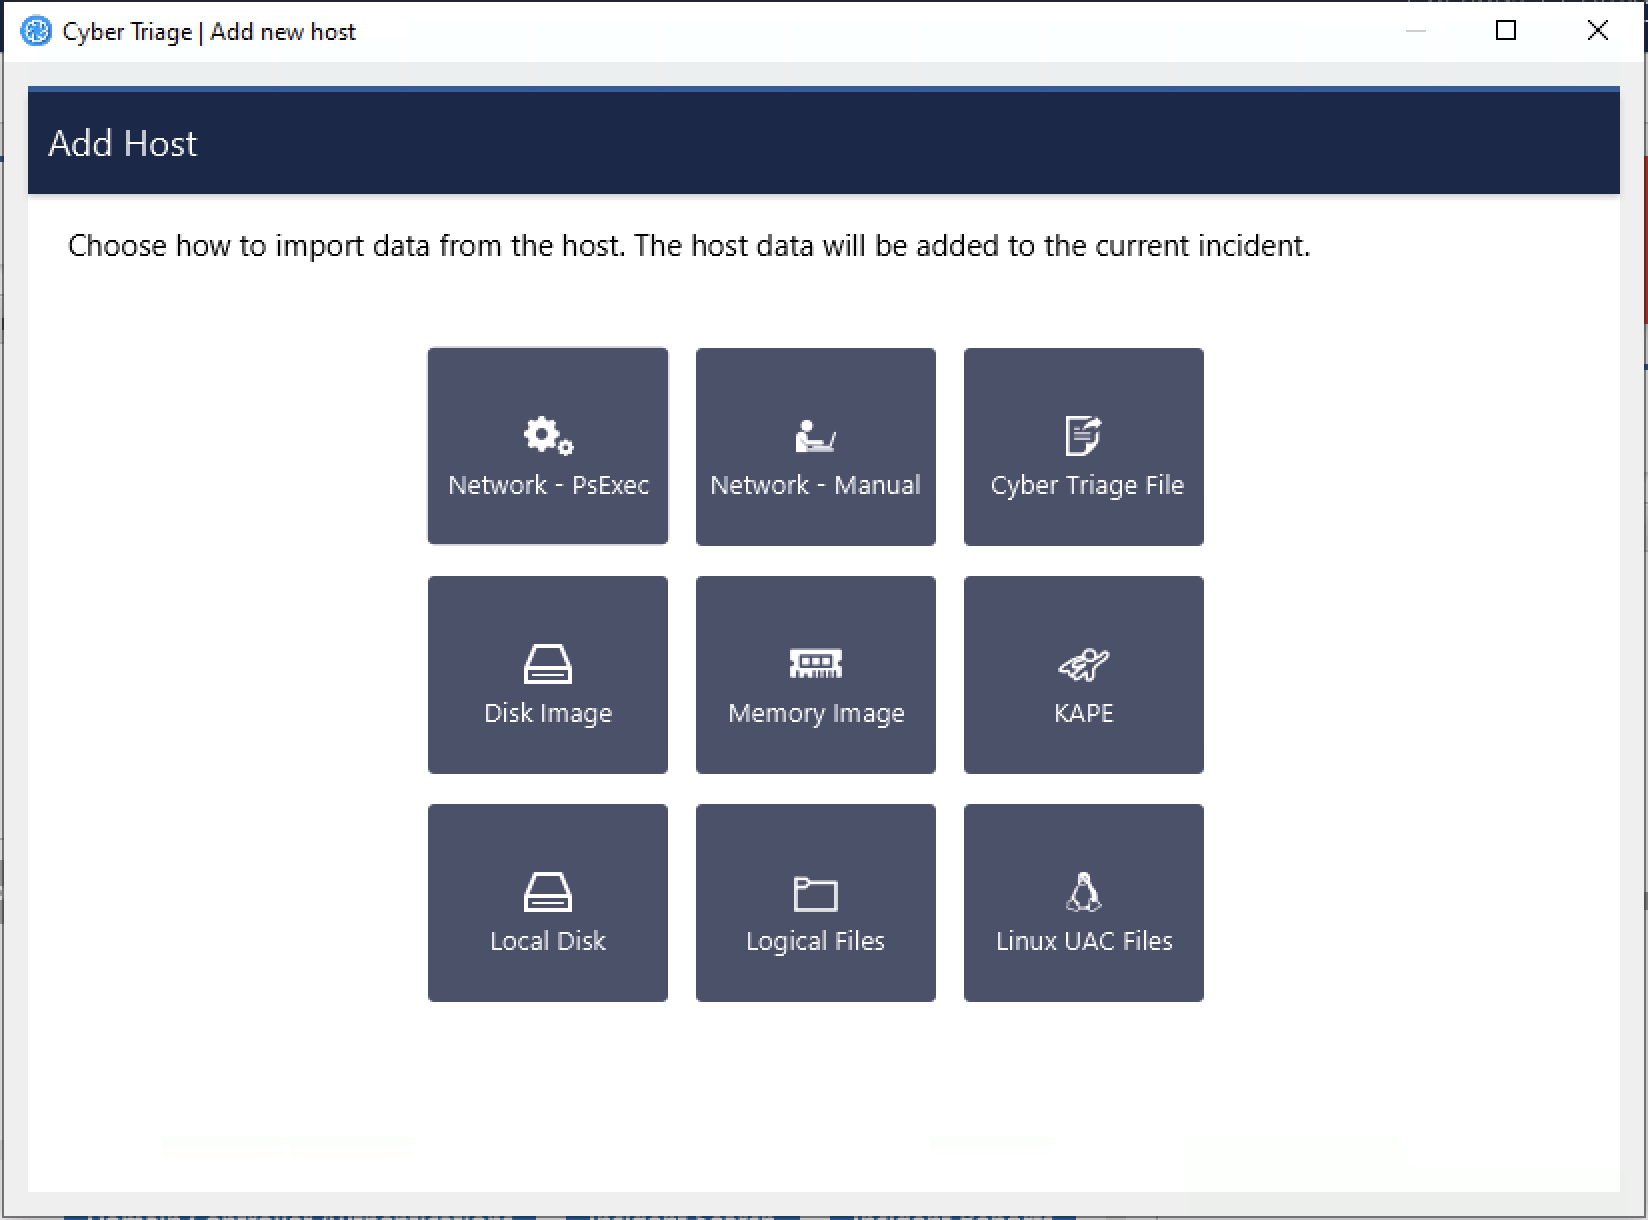
Add New Host Panel
There are many ways to get data into Cyber Triage, but they can be put into three categories.
- Network launch of the Cyber Triage Collector:
Network - PsExec: Cyber Triage® will push the Collector to a remote host over the network using PsExec. Collected data is sent directly back to Cyber Triage®. See Network - PsExec for details. This is not available in the Lite version.
EDR/PowerShell/WMI: The Collector can be pushed to computers using an EDR or other IT infrastructure. See Deploy via EDR, PowerShell, WMI, etc. for details.
- Manually launch the Collector on a live host using an interactive login:
Cyber Triage File: The Collector is manually run from a network or USB drive on the remote host. Data is saved to the USB drive, network share, or S3/Azure bucket and then manually imported into Cyber Triage®. This is useful when the host has been unplugged from the network or for consultants who have clients perform the acquisition. See Cyber Triage File for details.
Network - Manual: The Collector is manually run from a network or USB drive on the remote host (like Cyber Triage File), but the data is sent over the network instead of being saved to the USB drive. See Network - Manual for details.
- Import data from another acquisition method:
Disk Image: An existing raw, E01, or virtual disk image are analyzed by the Collector. See Disk Image for details.
Memory Image: Volatility v2 is run on a memory image that was previously acquired (using your own tools - Cyber Triage® does not do memory acquisition). See Memory Image for details.
KAPE: The output of the third-party KAPE tool is analyzed by the Cyber Triage Collector. See KAPE for more information.
Logical Files: A folder with a set of files is analyzed by the Collector. Hives and event logs are parsed if they are in the correct relative path. See Logical Files for more information.
Local Disk: A locally mounted drive (such as G:) is analyzed by the Collector. This is most often used when a disk image mounting tool is used, which could be required if the image was encrypted. See Local Disk for more information.
Linux UAC: The output of the third-party UAC script is analyzed and artifacts are added. See Linux UAC for more information.
The following sections provide more details of each method.
5.3. Queueing Up Data
If you have a Standard Pro or Team version of Cyber Triage, then you can add more than one host at a time. Cyber Triage has a scheduler that will process hosts as resources become available.
You can queue up hosts in two ways:
Many of the “Add Host” UIs will allow you to add multiple files or hosts in a single step. The set of files will get added to the scheduler.
When you add a host and others are already being analyzed, the new host will get added to the scheduler.
Note
You cannot add a “Local Disk” to the queue because there is the risk that the image is unmounted or the removable media is unplugged.
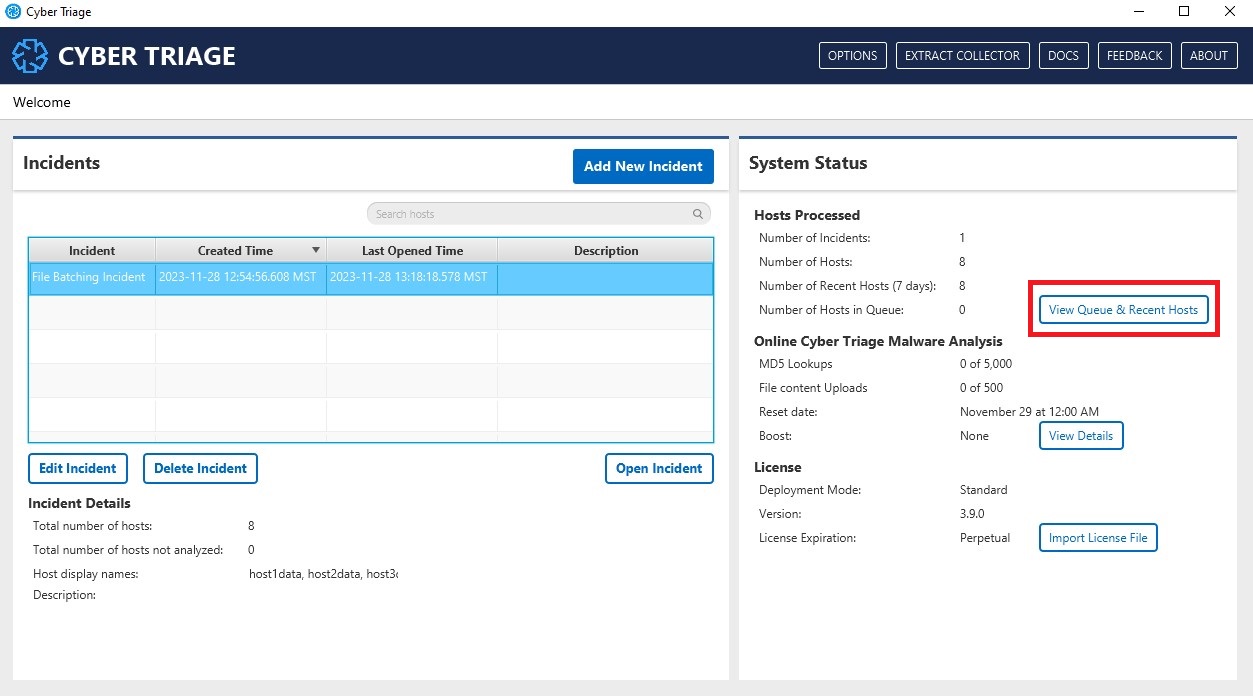
At any point, you can see the status of the queue by pressing the “View Queue and Recent Hosts” dialog from the opening window.
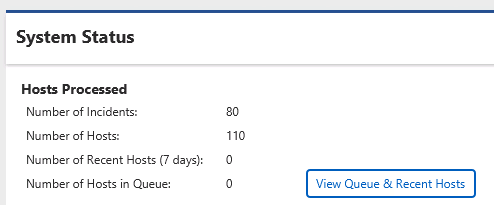
Incident Dashboard - Queued Data
5.4. Network - PsExec
With Network - PsExec (previously called ‘Live Automatic’), Cyber Triage® will push the Collector to a live system using PsExec and it will send its results back to Cyber Triage® over the network.
This feature is not available in the Lite version.
To do this, you’ll need the following on the remote Windows system:
File and network sharing enabled
Administrator privileges
Refer to Network - PsExec Target: Listening Ports (Standard and Team) for details on network requirements and Configuring for Network - PsExec Collections for details on configuring the target systems.
5.4.1. Adding a Single Live Host
To perform the collection on a single host, select the Network - PsExec icon. You will be presented with a panel to enter:
Host name of computer to collect from
User name, domain, and password for an account on the remote system that has administrator privileges
If you did not configure PsExec as described in Configure PsExec, then you will be prompted to do so.
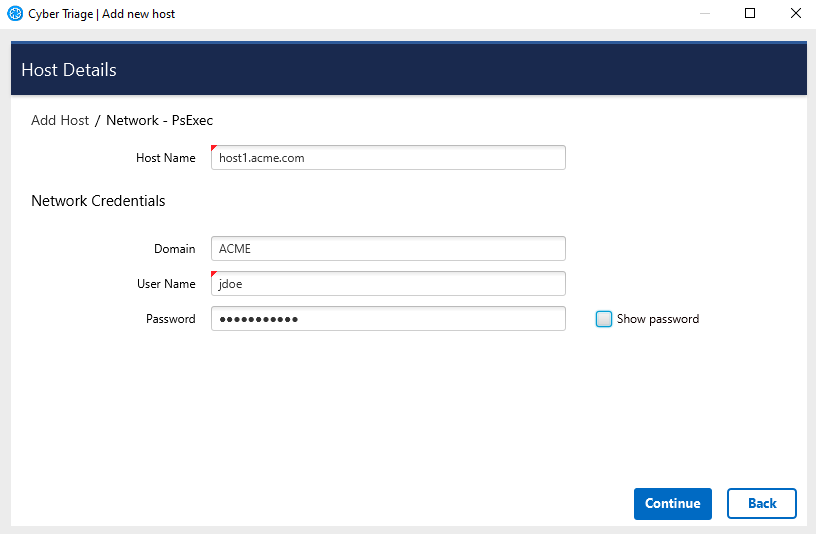
Single Network - PsExec Options
After pressing Continue, you will be prompted to choose:
Data types to collect (see Data Collection Types)
Malware scanner settings (see Malware Analysis Settings)
If this is your first time running the program, you may also be prompted by Windows or a security program to allow Cyber Triage® to open a network port. You will need to allow this to happen so that the Collector can send data to Cyber Triage® on TCP port 443.
See Configuring for Network - PsExec Collections if the administrator account on the remote system is a local account and you are having problems.
After the collection has started, you will be able to see the results. Proceed to Analyzing The Host Data for an overview of the analysis techniques.
5.4.2. Adding Multiple Live Hosts
If you have a Team deployment of Cyber Triage®, you can submit multiple host names to collect from. This allows you to enter a set of hosts, have basic data collected from them, and then you can prioritize what you review. To do this, use the Add Multiple button when entering host details.

Multiple Network - PsExec
You can then enter a list of host names.
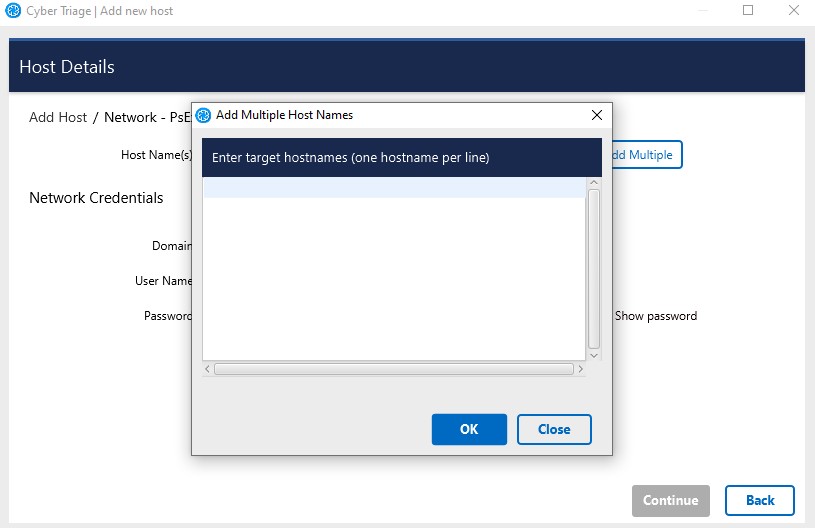
Add Multiple Host Names
Cyber Triage® will then validate the credentials with those host names and then queue them up. You can see progress from either the Incident Dashboard (which is where Cyber Triage® will redirect you to) or by choosing the All Hosts button from the main panel.
All Hosts Button on Opening Panel
5.5. Cyber Triage File
The Cyber Triage File (previously called ‘Live File’) method will import a file that has already been created using the Cyber Triage Collector. The file needs to be copied onto the computer running Cyber Triage and may come from a USB or cloud storage.
See Using The Collector on a Live System for the various options on how to launch the Collector and get data back. The simplest approach is to:
Extract the Collector to a folder
Copy the folder to the target system
Right click on the CyberTriageCollector.exe program and run as administrator
Once the collection finishes, copy the folder back to the computer running Cyber Triage.
Warning
If using USB on target devices, it is important to have AutoRun disabled on the computer running Cyber Triage® so that it does not get infected by malware that spreads by USB devices.
5.5.1. Adding a Single Host File
Use the following steps if you have a single file to add.
From the Incident Dashboard, choose Add New Host and then choose the Cyber Triage File box.
Enter a display name for the remote host (it can be a host name or more descriptive).
In the file selector, navigate to the folder that was created for the collection on the USB drive or downloaded S3 bucket.
Choose the JSON file in that folder. This will import the data into Cyber Triage®.
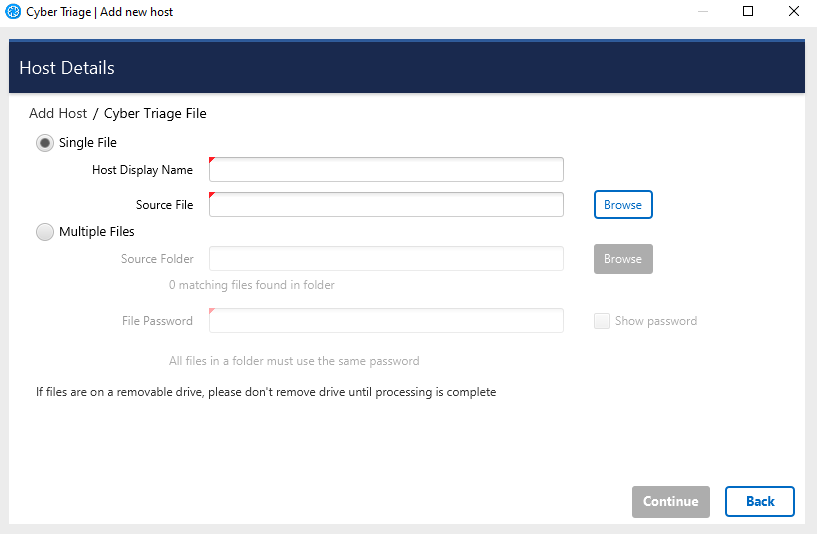
Cyber Triage File
You will then be prompted to configure malware scanning settings, see Malware Analysis Settings.
After the ingest has started, proceed to Analyzing The Host Data for an overview of the analysis techniques.
5.5.2. Adding Multiple Host Files
You can add multiple files in one step if you have Team or Standard Pro. The multiple files must be either:
In the same folder. This is the default behavior of the Collector, which will save files into a single ‘CyberTriageOutput’ folder.
In a subfolder of the same folder. This is the behavior of previous versions of the Collector.
As an example of the subfolders, you could have two JSONs at the following paths:
C:incident1host1file.JSON.gz
C:incident1host2file.JSON.gz
You can point Cyber Triage at the ‘C:incident1’ folder and it will go down into the ‘host1’ and ‘host2’ folders to find JSON files in there.
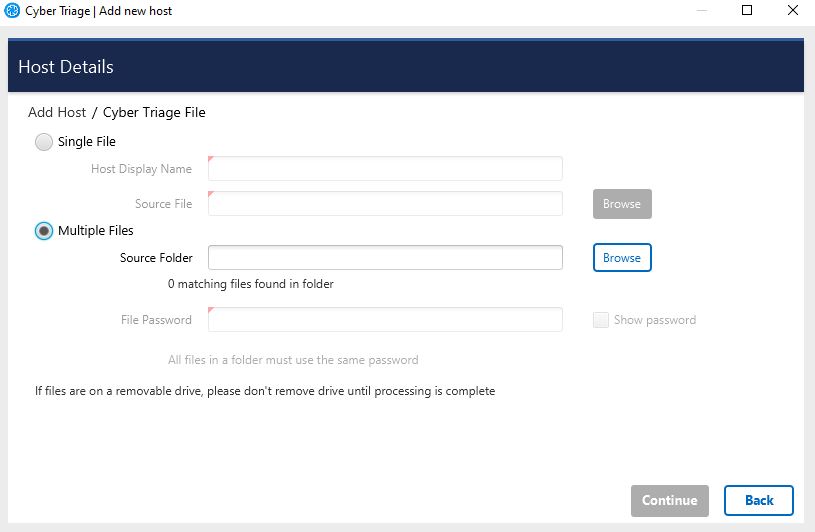
To specify a folder of files to add, use the following steps:
From the Incident Dashboard, choose Add New Host and then choose the Cyber Triage File box.
Enter a host name for the remote host.
Select Browse next to Multiple Files and select the folder that contains your JSONs.
Once you select the folder, the number of files found will be listed under the source folder path, like so:
Press Continue on bottom right and the files will begin to process.
You will then be prompted to configure malware scanning settings, see Malware Analysis Settings.
Return to the Incident Summary Panel to show the status and open the ones that have been processed.

Note that there are two steps to this scheduling process. The first is for each file to get added to the “ingest scheduler” and then it needs to be fully processed.
The hosts will be added with a display name that equals the file name.
5.6. Network - Manual
Network - Manual (previously called ‘Live Manual’) is for cases when you cannot automatically push the Collector to the remote system. In this approach, you run the Collector from the remote system and it sends the results over the network to Cyber Triage®.
As with Network - PsExec, the Collector will need to be able to communicate with the Cyber Triage® system over TCP port 443.
If you haven’t already done so, extract the Collector to a USB drive using the steps outlined in Extracting the Collector.
To perform the collection, you will need to interact with both Cyber Triage® and the remote system.
5.6.1. Prepare Cyber Triage For the Data
In Cyber Triage®:
Choose the Network - Manual box from the Add New Host area.
You will be prompted to enter information about the host being collected from. The display name can be a host name or more descriptive.
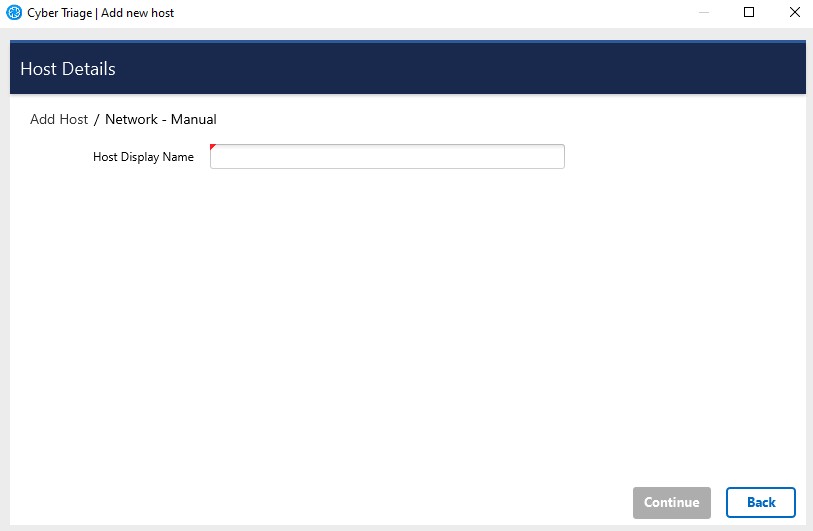
Network - Manual
If this is the first time that you are running Cyber Triage®, you maybe prompted by Windows Firewall or another security application to allow Cyber Triage® to accept connections. You will need to do this to allow data to be imported into Cyber Triage®.
Cyber Triage® will tell you what settings to use on the remote system.
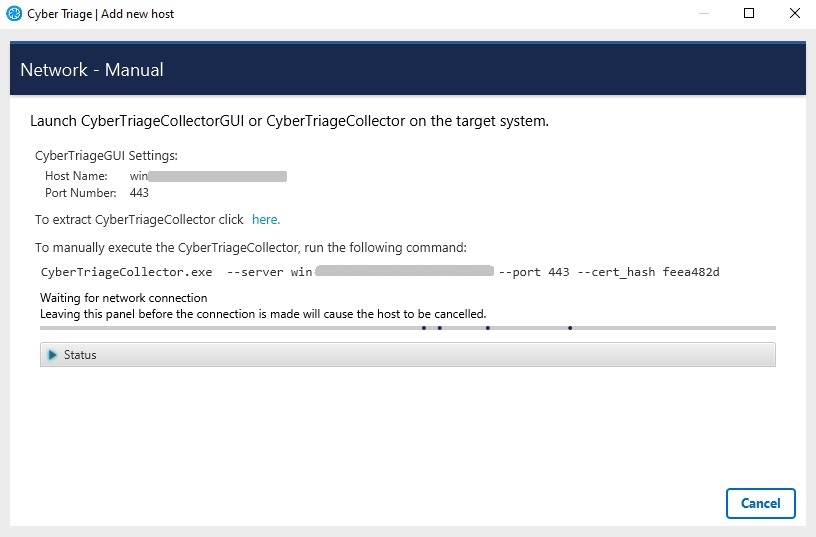
Network - Manual
You will then be prompted to configure malware scanning settings, see Malware Analysis Settings.
At this point, Cyber Triage is waiting for an incoming connection from the Collector.
5.6.2. Start Collection on Remote Host
Next, perform the following on the remote system.
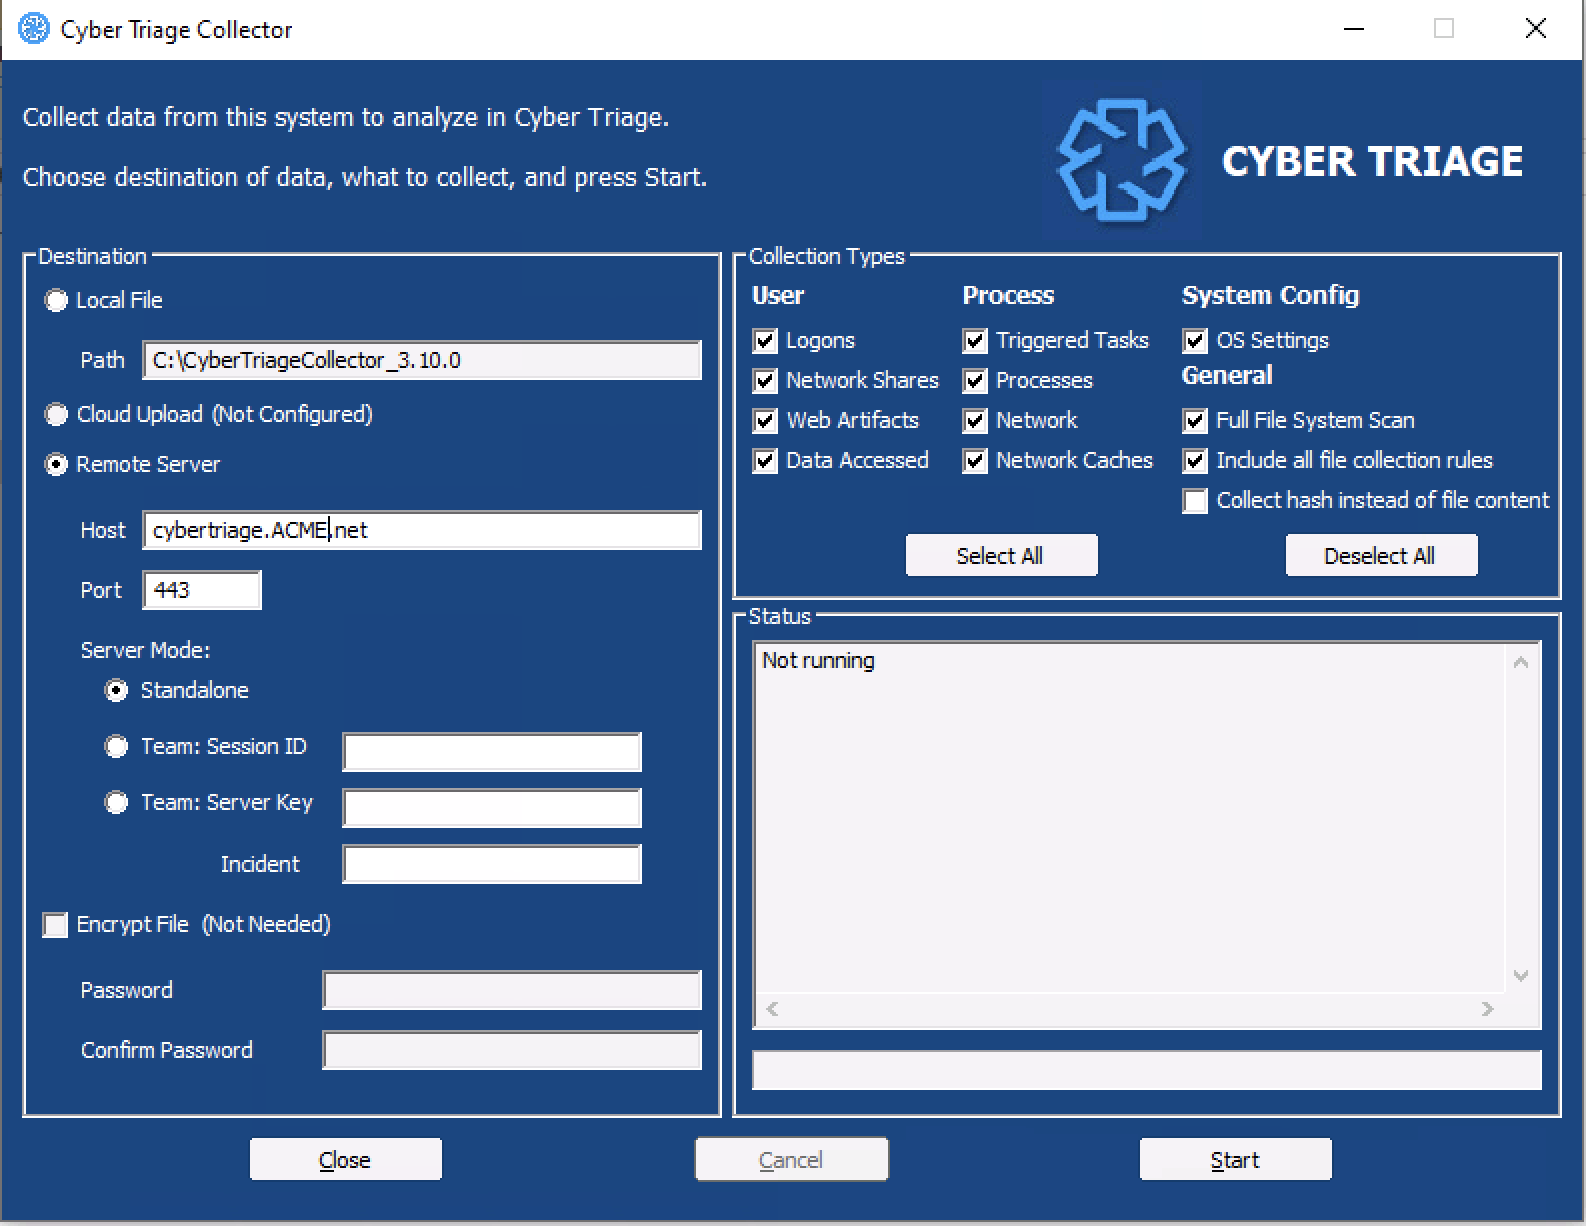
Insert the USB device with the Collector, or ensure that the Collector is available via a network share. See Using The Collector on a Live System for details.
- Launch the Collector either:
- From the command line and specify ‘–server’ and other arguments
CyberTriageCollector.exe --server host1 --cert_hash e21be6eb --sessionid 1234567890
From the GUI Wrapper and specify the server name as the target.
After collection has started, proceed to Analyzing The Host Data for an overview of the analysis techniques.
5.7. Disk Image
You can import a Windows disk into the system, which is is useful if a full disk image has already been performed of the system.
Note
Linux disk images are not supported. Linux is supported via UAC only.
Supported disk image formats:
Raw Single (*.img, *.dd, *.raw, *.bin)
Raw Split (*.001, *.aa)
EnCase (*.e01)
Virtual Machine Disk (*.vmdk)
Virtual Hard Disk (*.vhd, *.vhdx)
To import data from a disk image:
Choose the Disk Image button from the Add New Host area.
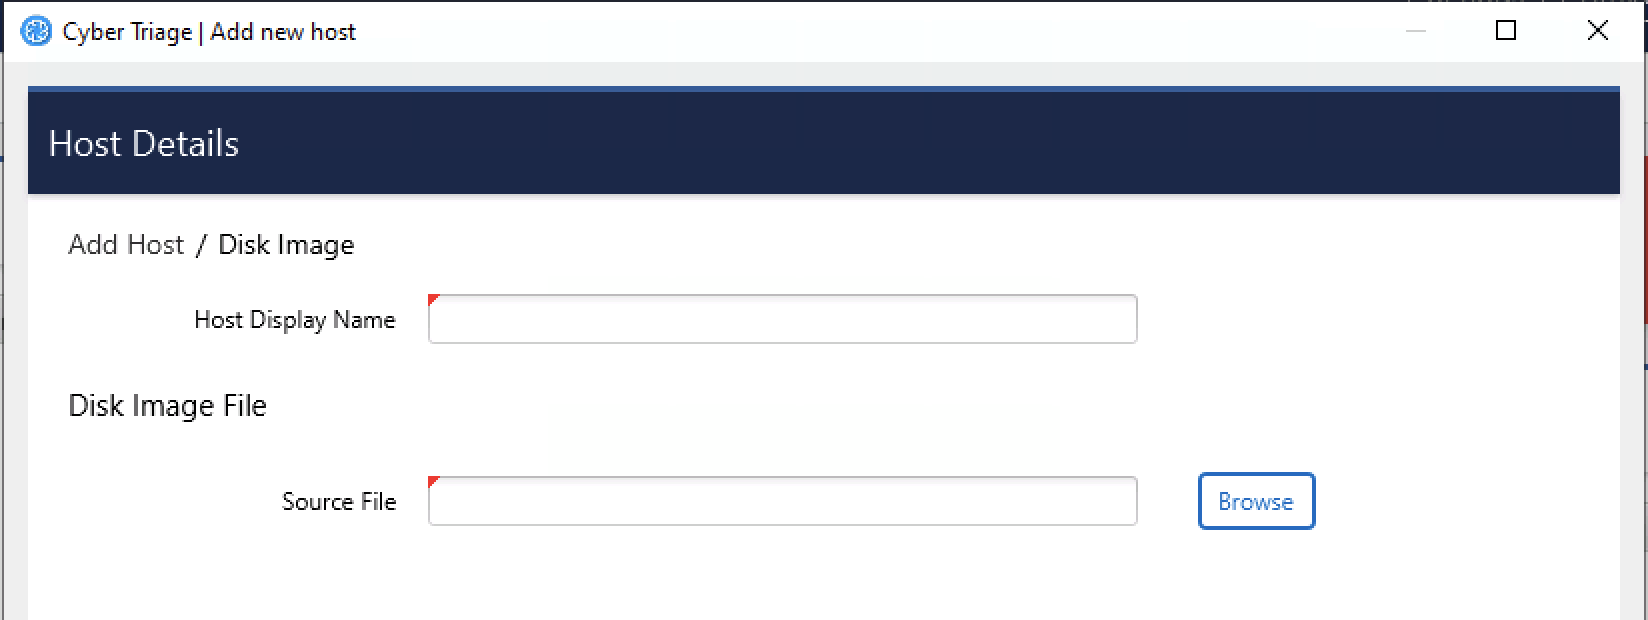
Enter a display name for the host (it can be a host name or more descriptive).
Browse to your image file.
If BitLocker is detected, you will be prompted to enter in the password or recovery key. Cyber Triage will automatically attempt to decrypt BitLocker using the clear key.
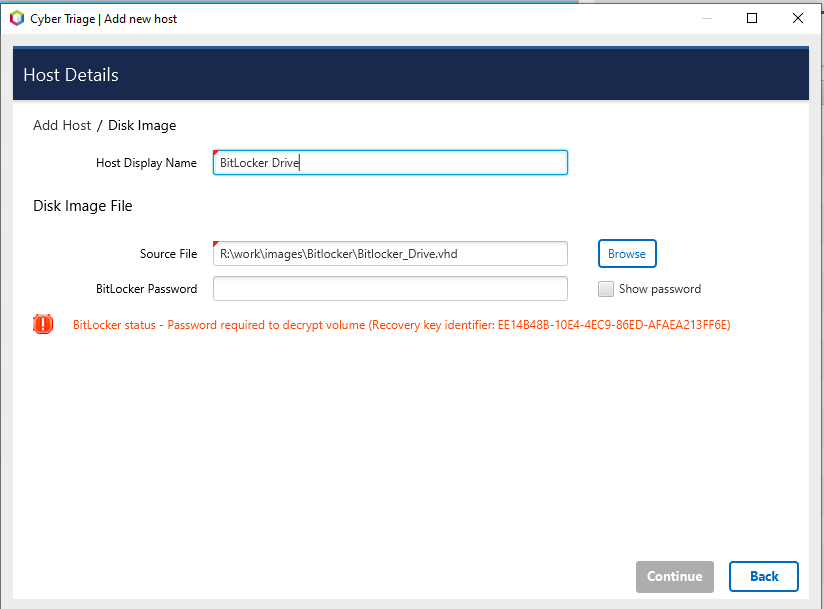
Press Continue to then configure what data types to collect (see Data Collection Types) and malware settings (see Automated Analysis Settings).
After collection has started, proceed to Analyzing The Host Data for an overview of the analysis techniques.
There are some special considerations of disk images:
Not all files will be analyzed after importing the disk image. Only the files that the Collector was interested in will be, for example, malware scanned. You will have access to all content though as long as the disk image is still accessible. Some of the files are directly imported into Cyber Triage, but most of them will be available only from the disk image.
During the ingest, some files will be extracted from the disk image into the temp folder in your Data Directory (see Changing Where Data is Stored). This could cause local antivirus to flag files. You should good list this folder with your AV/EDR
If you are using the Team version of Cyber Triage, then the client will do the parsing of the disk image and send the results to the server. The client must continue to run until the disk image has been parsed.
5.8. Memory Image
Memory image-based analysis allows you to review volatile data from a system and bypass advanced rootkits and malware. Cyber Triage® uses the open source Volatility 2 program to parse the Windows memory images. You need to acquire the memory with your own software. Cyber Triage will not make an image of memory.
Note
Linux memory images are not supported.
Supported memory image formats:
Raw (.img, .bin, .raw, .mem)
Lime (.lime)
AFF4 (.aff4)
.dmp
.vmem
.hpak
.E01
To import a memory image:
Choose the Memory Image button from the Add New Host area.
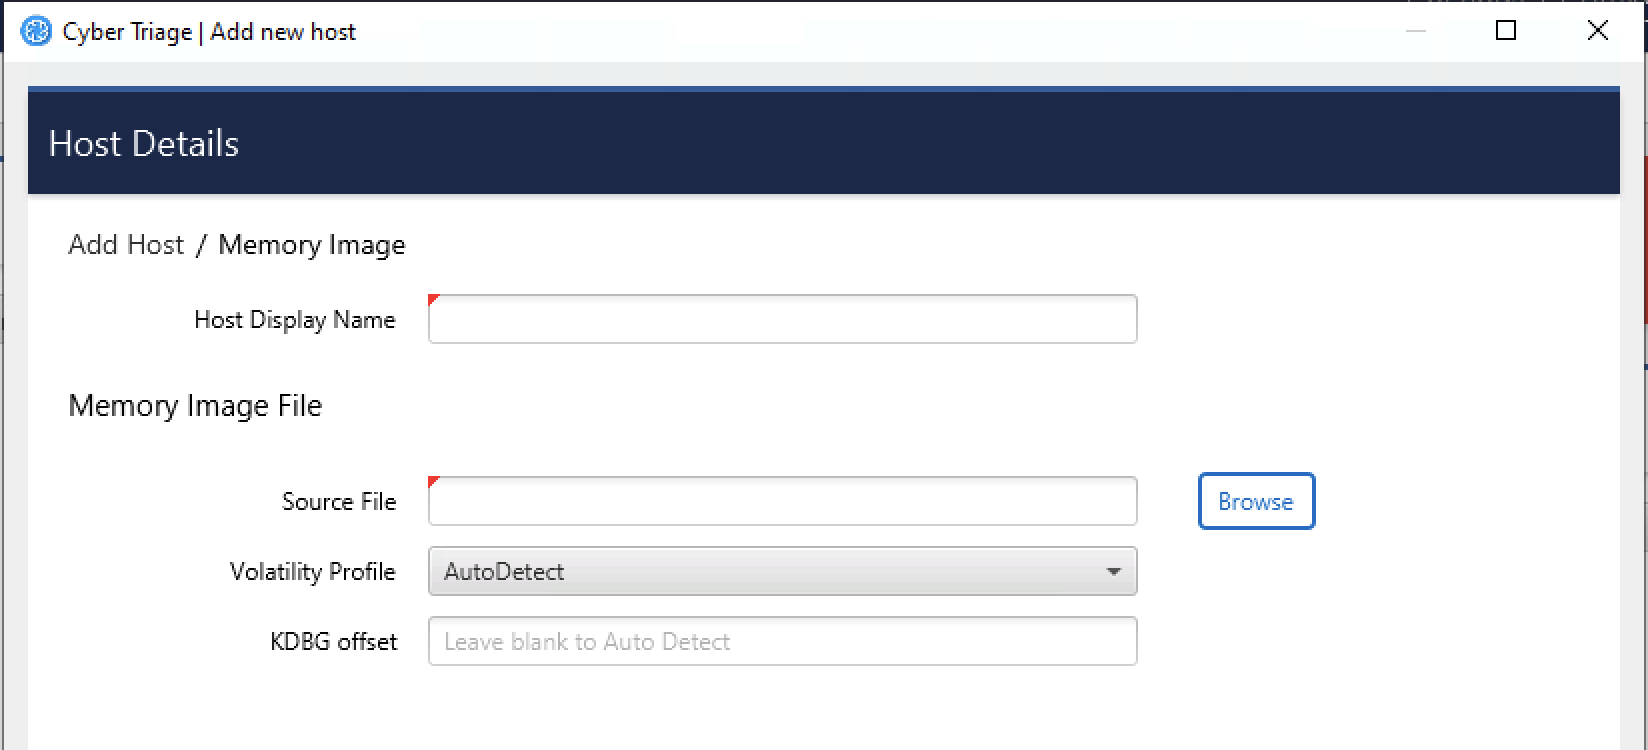
Browse to your memory image file
Choose the Volatility profile, if you know it. Cyber Triage® will use Volatility’s auto detection features, but sometimes they are not correct and manually picking will provide better results.
Enter a display name for the host. It can be a host name or more descriptive.
Press Continue to then configure what data types to collect (see Data Collection Types) and malware settings (see Automated Analysis Settings).
After collection has started, proceed to Analyzing The Host Data for an overview of the analysis techniques.
If you are using the Team version of Cyber Triage, then note that the client will do the parsing of the memory image and send the results to the server. The client must continue to run until the memory image has been parsed.
Note
A host created from a memory image will not have all of the data and fields that you’d see from the Cyber Triage® Collector. The interface will identify places that have incomplete data.
5.9. KAPE
KAPE is an external collection tool, the output of which can be imported into Cyber Triage®. If you use KAPE to collect data from a computer, but want to take advantage of the analytics in Cyber Triage, then you can import the KAPE .vhd or .zip file.
Note
Currently Cyber Triage imports only the KAPE .vhd and .zip file contents. It ignores any other KAPE outputs, and will not parse KAPE “Module” output.
To export data from KAPE for import into Cyber Triage®.
Run KAPE with either the !BasicCollection or !SANS_Triage options selected.
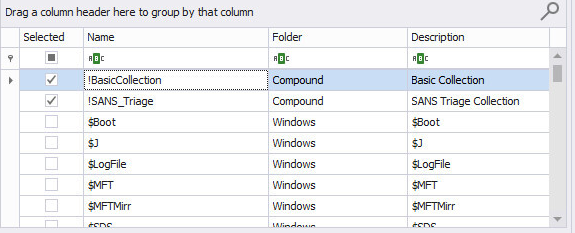
Use either No Container, VHD, or VHDX for the output.
Note
You may see warnings from KAPE, however with these options selected Cyber Triage® should have no issue reading the file.
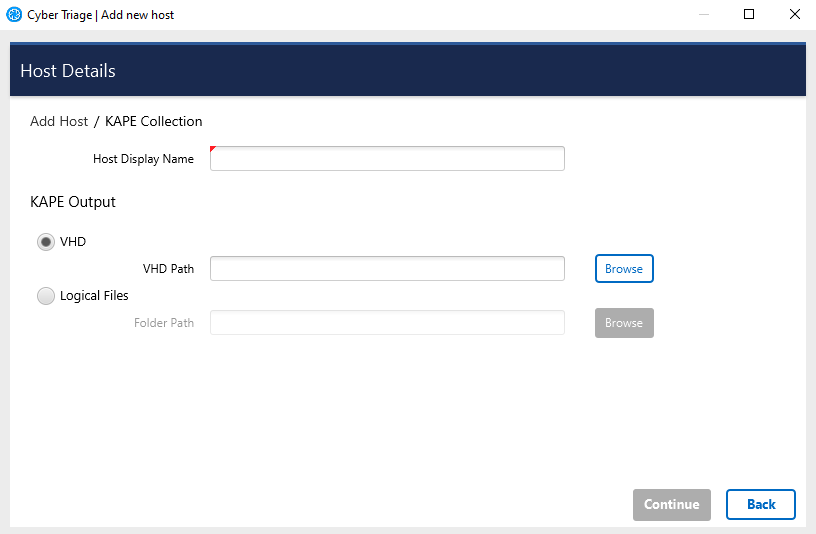
To import KAPE data:
Choose the KAPE button on the right-hand side of the Add New Host area.
Enter a display name (it can be a host name or more descriptive).
If your KAPE data is in a VHD or VHDX file, then Browse to the file.
If your KAPE data is in a ZIP file, then extract the contents to a folder and Browse to that folder. The selected folder must contain a subfolder named either ‘C’ or ‘C%3A’.
Press Continue to then configure what data types to collect (see Data Collection Types) and malware settings (see Automated Analysis Settings).
If you are using the Team version of Cyber Triage, then note that the client will do the parsing of the KAPE data and send the results to the server. The client must continue to run until the VHD or folder have been parsed.
After collection has started, proceed to Analyzing The Host Data for an overview of the analysis techniques.
You can read more about KAPE and the differences between it and our collection tool on our blog.
5.10. Logical Files
If you have a folder of files, you can import them by using the Logical Files feature. If registry hives and event logs are at the correct relative offset, then they will be parsed. For example:
The SAM registry hive could be locally stored at c:\cases\case1\host1\windows\system32\config\SAM.
You should import the c:\cases\case1\host1 folder so that the SAM file is at its usual relative offset.
All files in the imported folder will be added to the Incident.
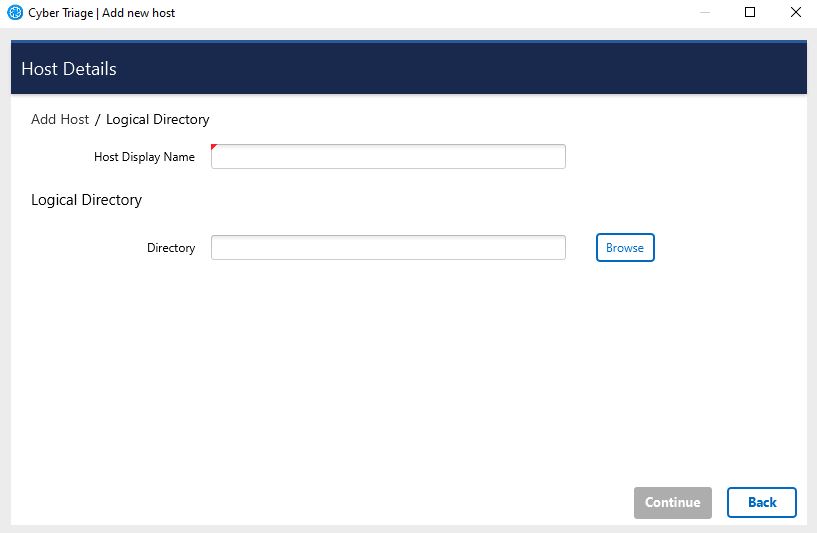
To import logical files:
Choose the Logical Files button from the Add New Host screen.
Enter a display name (it can be a host name or more descriptive).
Browse to the logical file directory, press Select.
Press Continue to then configure what data types to collect (see Data Collection Types) and malware settings (see Automated Analysis Settings).
The software will warn you if it cannot find a Windows subfolder within the selected folder, which may indicate that the incorrect folder was specified.
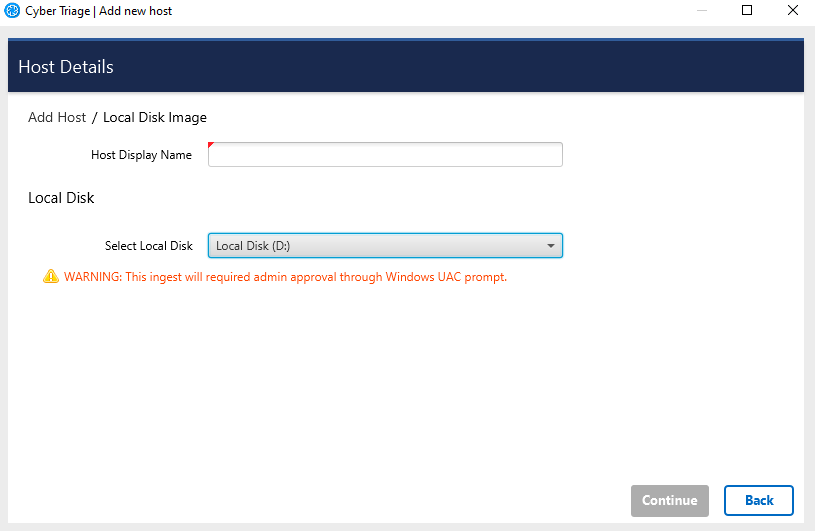
5.11. Local Disk
You can analyze a mounted drive, which most often occurs when you have a disk image that is not directly supported by Cyber Triage. This most often occurs when the disk image is encrypted with BitLocker.
Note
Admin credentials are needed for this and you will be prompted to grant those via UAC.
To import a local disk:
Choose the Local Disk button from the Add New Host screen.
Enter a display name (it can be a host name or more descriptive).
Choose the disk from the pulldown. It will not show the C:drive or network shares.
Press Continue to then configure what data types to collect (see Data Collection Types) and malware settings (see Automated Analysis Settings).
Note that you cannot queue up a Local Disk even if you have Team or Standard Pro. So, you will need to wait until other hosts are done processing before adding in a local disk.
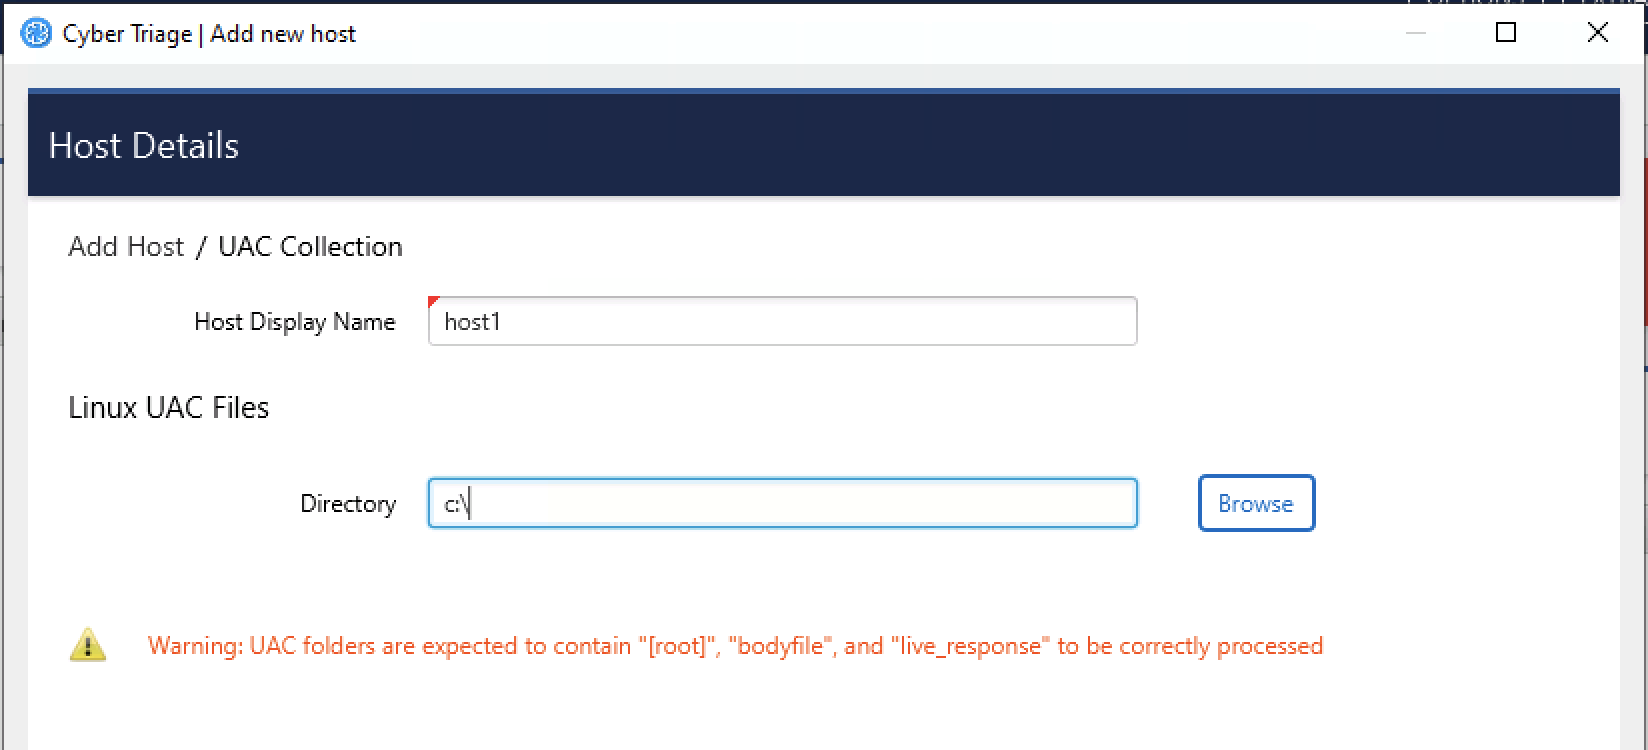
5.12. Linux UAC
You can import the output of the Linux UAC tool into Cyber Triage. The files in the output will be parse and artifacts created and analyzed.
You should use the “-p full” option when you run the collection tool. Otherwise not enough data will exist for Cyber Triage to analyze.
./uac -p full /tmp
To import a Linux UAC collection: 1. Choose Linux - UAC button from the Add New Host screen. 2. Enter a display name (it can be a host name or more descriptive). 3. Choose the folder the UAC data resides in. It should contain subfolders for “[root]” or “bodyfile”. 4. Press Continue to then configure what data types to collect (see Data Collection Types) and malware settings (see Automated Analysis Settings).
5.13. Automated Analysis Settings
Regardless of the method used to get data from the target system into Cyber Triage®, you will need to decide at some point about how to detect malware.
5.13.1. Malware Analysis Settings
Before the ingest starts, you will be prompted to choose how the files will be analyzed for malware.
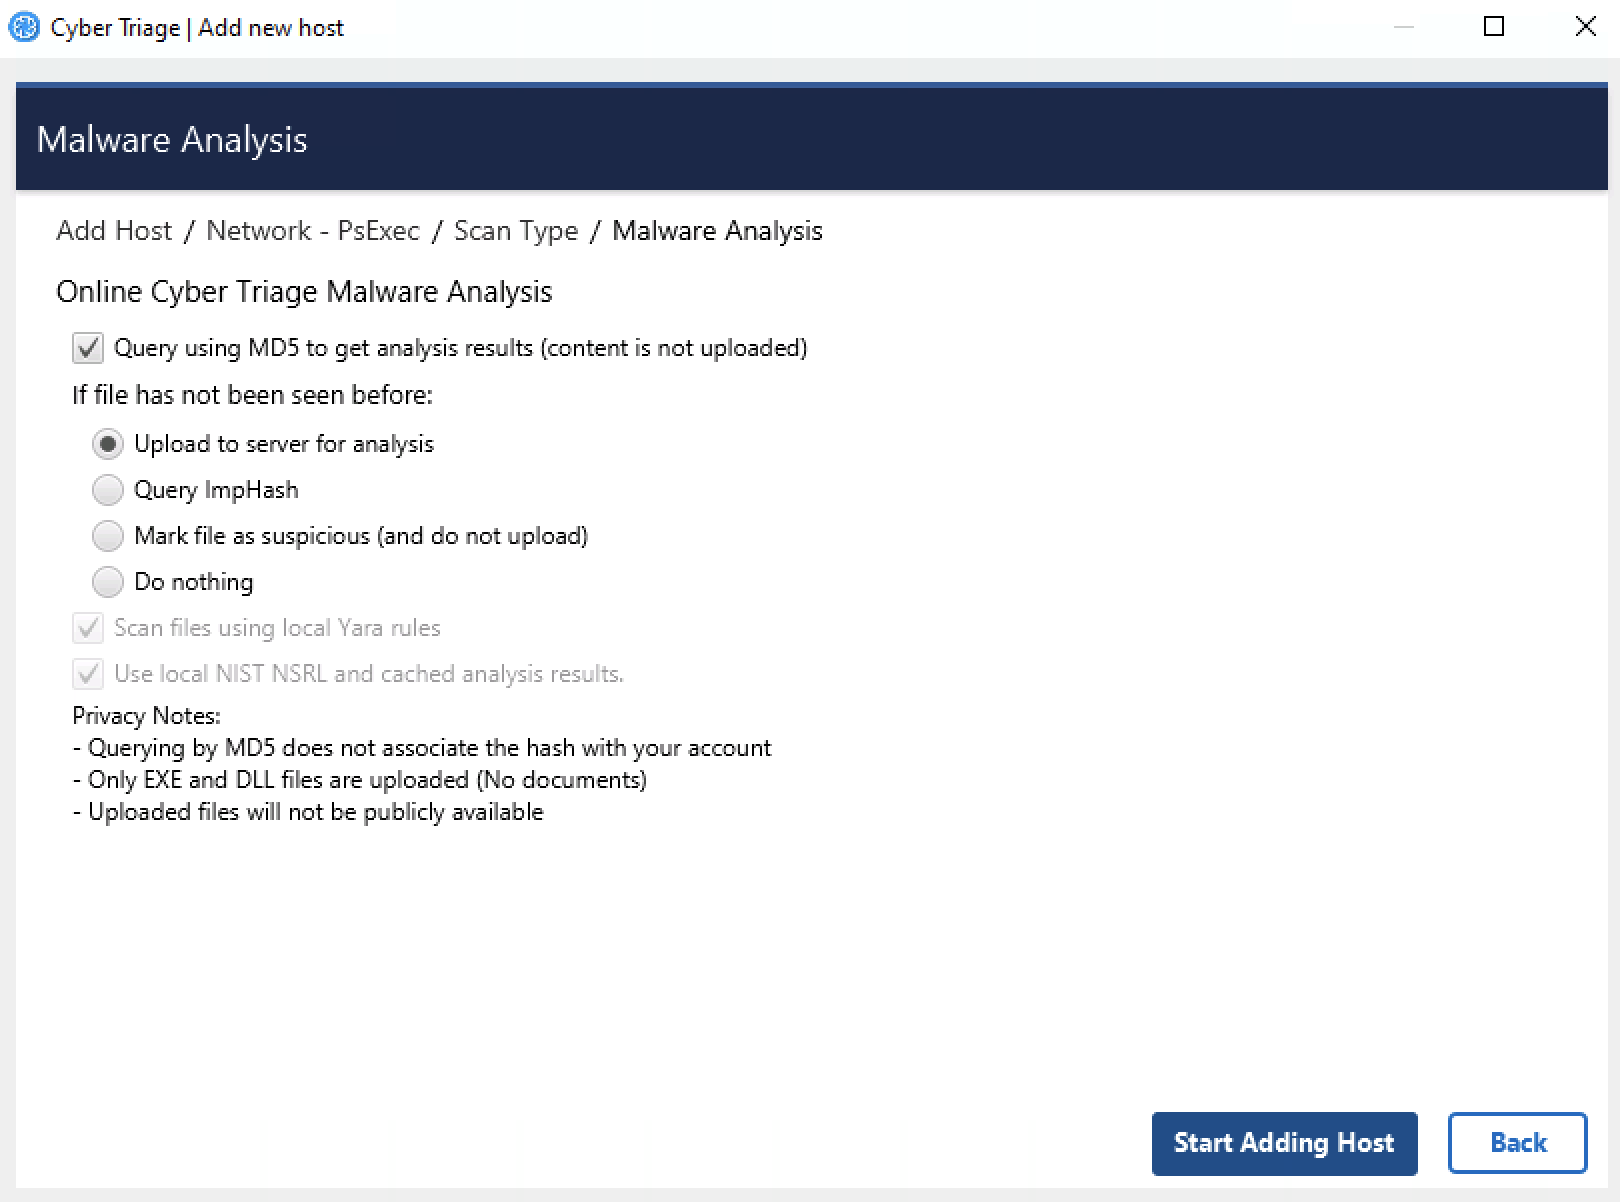
Malware Analysis Options
Cyber Triage® uses its Online Malware Analysis Service to analyze files for malware. This service uses ReversingLabs, the NIST NSRL, and other sources to assign a score to each file.
You need to configure what data is uploaded. See Analyzing The Host Data for details on how these results are used.
Upload MD5 hashes: This will send only the MD5 hash of your files to the service. If the service knows that the file content is associated with malware, then it will identify it as such. Note that any minor change to malware will change its MD5 and it will not be flagged as malware using this technique.
If the file’s hash is not known to Cyber Triage, then you need to decide which of the four that you want to do:
Upload file content: This will send the full file to the service if the SHA1 value was not found. It will be scanned and a result will be returned. The raw content will not be visible to other users, only the analysis results.
Query with ImpHash: This will use a fuzzy match algorithm called ImpHash, which is based on executable import tables, to look at similar executables that were already analyzed and identify if any of them were identified as malware.
Mark unknown file as suspicious: If the file was not known to the service and you do not want to upload file content, you can choose to have those files marked as suspicious so that you can be aware of them and decide that they are worth additional analysis or ignored.
Do nothing: Ignore the unknown files.
If you use Cyber Triage® on a computer not connected to the Internet, then you have two options:
You can export hash values and manually submit them to the online service using a website (Advanced Topics)
You can use a local copy of the NIST NSRL to ignore known files (see Advanced Topics)
Note
To scan files using the Recorded Future Sandbox malware scanning service after your collection is processed, see Scanning Files in the Recorded Future Sandbox. Note that this service happens after the data has been processed and has different privacy terms than the above methods.
5.13.1.1. Common Privacy Questions
Because some responders are sensitive about uploading files and how it could be associated with them, here are some notes about common questions:
When you query by MD5 or ImpHash hash value, there is no link stored between your account and the hash value.
Only EXE and DLL files can be uploaded. This reduces a PII leak risk.
Uploaded files will not become publicly available.
5.13.1.2. ImpHash Results
ImpHash is a fuzzy matching algorithm that can be quite powerful if you do not want to upload content. But, it is not as precise as using a cryptographic hash such as SHA-256 or MD5.
ImpHash works by looking at the “import table” of an executable file. This is where the file lists out which DLLs it is going to depend on. The theory behind ImpHash is that attackers may change a few bits in the file, but the import table stays the same. So, you can find variations of an attacker’s tools by relying on its ImpHash value.
Cyber Triage uses ImpHash to query Reversing Labs and it will return a list of SHA-256 hashes of files that it knows about that use the same import table. Cyber Triage then queries for the results of those files to see if any were previously identified as malicious.
There are some caveats:
There are some ImpHash values that are shared by tens of thousands of files. Cyber Triage is not getting the results for all of those files. You would go through all of your hash lookups. Cyber Triage will examine a subset of them. In our experience, .Net applications will end up with the same ImpHash value.
It is possible for some files with the same ImpHash to be identified as Bad and some as OK. In that case, Cyber Triage will mark this file as suspicious and the message will say what percentage of similar files were scored as bad.