11. Team Installation and Configuration
This section outlines the installation and configuration of Cyber Triage® Team, which is a client-server deployment with one server and one or more clients.
Here are some basic concepts of a Team deployment:
Only one instance of Cyber Triage® can run on a system at a time, so this means you will need at least two computers. One for the server and one or the client.
Any client can open any session, even if it did not create the session.
Some functionality is currently more limited in a client-server deployment, such as the ability to cancel collections and malware analysis.
11.1. Architecture
There are three components of a Cyber Triage® Team cluster:
Cyber Triage® Server: Where the processing and analysis occurs. This contains the REST API used by clients and other integrations.
Cyber Triage® Clients: Runs on examiner systems and interacts with the Cyber Triage® Server.
Database: Where the collected data is stored. There are a few options for this, which are addressed in the next section. One main concept though is that the database can run on either the same host as the server or on its own host.
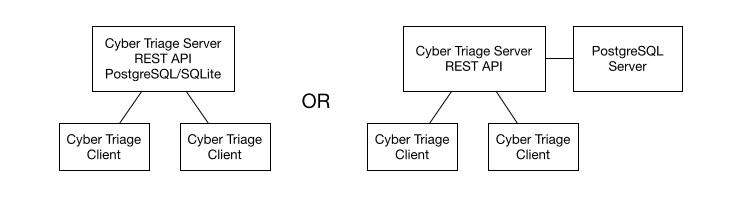
Cyber Triage® Team cluster
All three components should be on the same private network. The Cyber Triage server and database should NOT be on a public-facing address. You can run Cyber Triage in a cloud environment, but all components should be within a Virtual Private Cloud (VPC) and in the same region.
11.1.1. Database Options
There are three database options in a Team cluster:
SQLite: The server can create local SQLite databases for each incident. This is sufficient for evaluation purposes because it requires no additional configuration. However, its performance will be limited as the number of incidents and ingested hosts increase within Cyber Triage. SQLite allows only one write at a time (and blocks reads during a write), so it will not perform well with multiple hosts being analyzed at the same time.
PostgreSQL on the same host as the server: With this setup, a single computer will have both the Cyber Triage Server and PostgreSQL. This setup minimizes the number of hosts to maintain and can be more secure because PostgreSQL access can be restricted to the local host. However, this scenario requires more memory and storage resources on a single host. Refer to the following section to test your systems’s PostgreSQL speed.
PostgreSQL on its own host: Lastly, you can run PostgreSQL on its own dedicated host (Windows or Linux) or use a managed PostgreSQL service if you are running in a cloud VPC. This can be useful if you do not have a single server with enough resources for both, if you want to use Linux for PostgreSQL, etc.
We recommend that you start your production environment with PostgreSQL on the same host as the Cyber Triage Server.
Warning
There is NO data migration path between SQLite and PostgreSQL.
If you are going to run Cyber Triage in a cloud VPC, then you can refer to blog posts that we did where we tested various managed PostgreSQL services. For example, here is the post about AWS.
11.1.2. Testing PostgreSQL Speed
When choosing between running PostgreSQL on its own server versus running alongside Cyber Triage®, you can measure the PostgreSQL performance using pgbench. We have found this is much more reliable than focusing on hardware specs. We recommend that your PostgreSQL installation is able to get at least 4250 transactions per second (TPS).
You can start by installing PostgreSQL on the same server as Cyber Triage® (as outlined below). You can then use the following commands to measure the TPS. If they are too slow, then you can consider setting up a dedicated server.
- Setup the test by running the following. It will prompt you for the superuser password you entered during the installation.
C:\Program Files\PostgreSQL\13\bin\pgbench -U postgres -i -s 50 postgres
- Run the test:
C:\Program Files\PostgreSQL\13\bin\pgbench -U postgres -c 5 -j 2 -t 1000 postgres
Note
The final values may change in between runs, so you might want to run it a few times.
11.2. Team Software Requirements
Cyber Triage MSI installer.
PsExec 2.2(or newer) if you want to push the Collector to remote hosts over the network.PostgreSQL 13 (or newer) For production environments using PostgreSQL (not required for basic evaluation)
11.3. Team Hardware Requirements
Team Server:
64-bit version of Windows Server
- RAM:
16GB+ if server is running only Cyber Triage Server
32GB+ if also running PostgreSQL server
4+ CPU cores
500GB+ of free hard drive space (SSD recommended)
Display of at least 1366×768
Team Clients:
64-bit version of Windows 7 or newer
12GB+ of RAM
4+ CPU cores
50GB+ of free hard drive space (SSD recommended)
Display of at least 1366×768
Dedicated PostgreSQL Server (optional)
OS: Either Linux or Windows Server
16GB+ of RAM
4+ CPU cores
250GB+ of free hard drive space (SSD recommended)
11.4. Installing and Configuring PostgreSQL
If you are going to use PostgreSQL, then the following sections outline its installation and configuration on Windows.
11.4.1. PostgreSQL Installation
PostgreSQL can be installed in a variety of ways, including with installers, package managers, or containers such as Docker.
The easiest method for most Cyber Triage® users will be to use a PostgreSQL windows installer and choose the default settings. You do not need to use StackBuilder if it prompts you to.
Note
Data Folder: The default is inside of the PostgreSQL installation folder.
Superuser Password: You’ll need this to configure the database.
At the end of the Windows installer process, PostgreSQL will be running as a service as the Network Service account.
If you wanted to test the PostgreSQL speed as outlined in Testing PostgreSQL Speed, you can do that now before doing further configuration.
11.4.2. PostgreSQL Configuration
There are several settings that must be changed from the default installation. After you have made these changes, you should reboot the system for them to all take effect.
11.4.2.1. Create Database User
A special user will need to be created for the Cyber Triage® Server to access the database. We’ll use the name cyber_triage.
From a Windows Command Prompt run:
C:\Program Files\PostgreSQL\13\bin\psql -U postgres postgres
You will be prompted for the superuser password you entered during the installation.
You will next get a
postgres=#prompt. To create the user enter the following code below and replaceChangeMeASAPwith a real password.
Ensure you record the password because you will need to enter it into the Cyber Triage® server.CREATE ROLE cyber_triage PASSWORD 'ChangeMeASAP' CREATEDB LOGIN;
Type
\qto exit prompt.
11.4.2.2. Basic Configuration Changes
There are several settings that we suggest making to improve performance and enable logging to make debugging problems easier.
Note
These are all oriented around a Windows installation and a Linux deployment have other settings that will make it more optimal.
Open the following file in a text editor:
C:\Program Files\PostgreSQL\13\data\postgresql.conf
The following settings should be changed or uncommented (by removing the leading #):
- Edit the maximum number of connections:
max_connections = 200
- Increase the value of the buffer setting:
shared_buffers = 512MB
- Enable huge_pages by uncommenting this line:
huge_pages = try
- Uncomment the following performance-oriented lines and change the default values:
temp_buffers = 80MB
shared_memory_type = windows
fsync = off
synchronous_commit = off
Uncomment and change the effective cache size based on the amount of RAM available. We recommend the value be 50% of the total RAM.
effective_cache_size = 16GB
- Uncomment the following log-oriented lines and change the default values:
log_min_duration_statement = 300
log_lock_waits = on
This file also allows you to restrict access to the database from other hosts.
- If PostgreSQL is on the same host as the Cyber Triage® server, then edit the
listen_addressline to the following: listen_addresses = 'localhost'
- If PostgreSQL is on the same host as the Cyber Triage® server, then edit the
- If PostgreSQL is on a different host, then confirm that the line is:
listen_addresses = '*'
11.4.2.3. Lock Pages in Memory Setting
If you are running PostgreSQL on a Windows system, we recommend that you also enable the Lock Pages in Memory setting for the Windows user that the service will be running as. By default, this is the Network Service account.
Open the Local Group Policy Editor
Navigate to Local Computer Policy -> Windows Settings -> Security Settings -> Local Policies -> User Rights Assignment
Select the Local pages in memory item and double click on it.
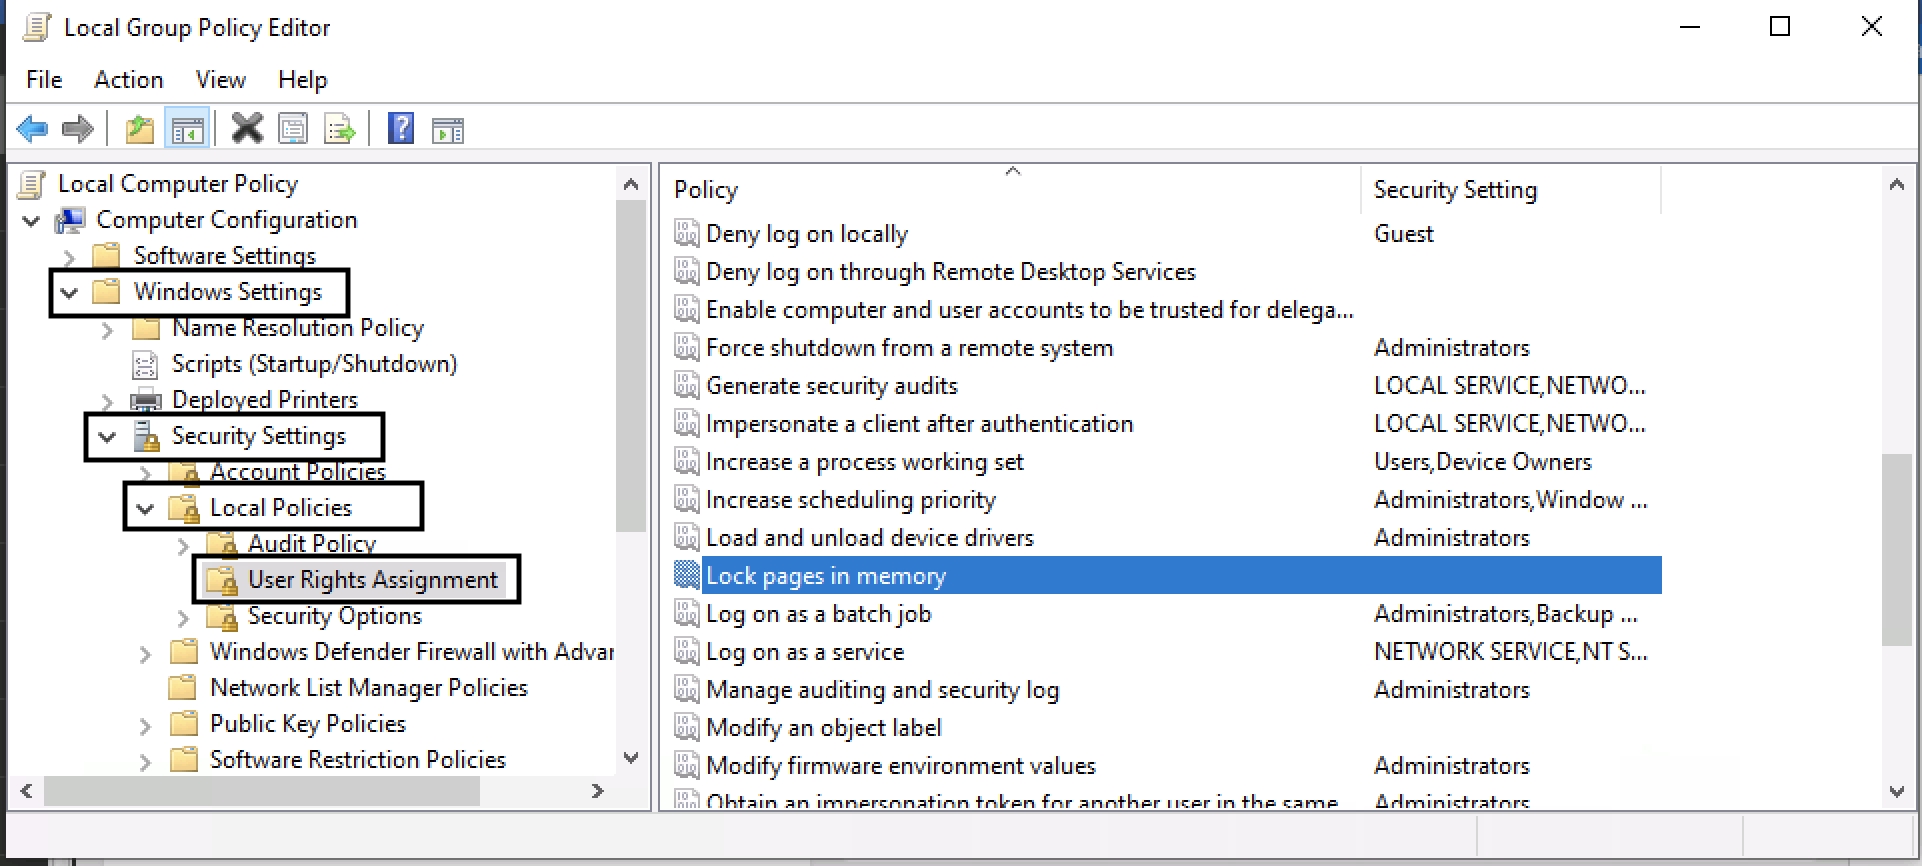
Local Group Policy Editor
Add the user that the PostgreSQL service will be running as (i.e. Network Service)
11.4.2.4. Dedicated PostgreSQL Server Changes
If you are running PostgreSQL Server on a system different from the Cyber Triage® server, you’ll need to make an additional change.
Open the following in a text editor:
C:\Program Files\PostgreSQL\13\data\pg_hba.conf
Add a rule to the bottom similar to:
host all cyber_triage 10.10.10.10/32 scram-sha-256
Update the above rule based on:
IP Address of the Cyber Triage® Server
The
password_encryptionvalue in the postgresql.conf file.
11.4.2.5. Encrypting Network Traffic with SSL
You can ensure the data between the server and database is encrypted.
To enable encryption on the database, use the PostgreSQL Instructions
To prevent man in the middle attacks, you should configure the Cyber Triage Server to know about the PostgreSQL certificates and verify them. To do so:
Copy the PostgreSQL server certificate (server.crt) to the Cyber Triage Server.
Locate the trust store file that is in the Cyber Triage data folder. An example would be:
` C:\Users\USER_NAME\AppData\Local\cybertriage\customer_certs\ctTruststore.jks ` * Import the certificate using the ‘keytool’ program that is part of Java and ships with Cyber Triage. This should all be run on the server from a command prompt:
` cd c:\program files\CyberTriage-3.9.0\jre\bin keytool -keystore "C:\Users\USER_NAME\AppData\Local\cybertriage\customer_certs\ctTruststore.jks" -alias postgres_ca -import -file "\path\to\server.crt" `
Replace C:UsersUSER_NAMEAppDataLocalcybertriagecustomer_certsctTruststore.jks with the actual path to your Cyber Triage customer certificate truststore. Replace pathtoserver.crt with the actual path to the server certificate file.
The password for Cyber Triage customer certificate truststore can be found by opening Cyber Triage on the Team Server machine, and Navigating to Options -> Certificate Info -> TLS Store Config. NOTE: The customer certificate trusttore password is only displayed when Cyber Triage is configured to run in “Team - Server” mode in Options -> Deployment Mode.
Type in yes when prompted Trust this certificate? [no]:. You should see command line output stating Certificate was added to keystore.
11.4.2.6. Restart The Host
After all the above configuration changes, restart the computer so that the service and database settings take effect.
11.5. Initial Server Installation
The Cyber Triage® server will need to be running whenever you want to use any of the Cyber Triage® clients to create or open sessions. It will be receiving the network connections from the various target systems and will be performing all of the automated analysis.
You can run the server either as a Windows service or launch it each time manually. Running it as a service ensures that it runs when the computer starts and does not require a user to be always logged in. But, it adds some administration complexity with respect to installation and making configuration changes.
- You should run the service as a normal user account because an interactive account is needed to configure the Server.
It is possible to run it as a non-interactive service account, but it is currently a complicated process. Contact support if this is a requirement for you.
To make changes to the Server, you will need to stop the service, launch Cyber Triage® interactively as a user to make changes via the Options panel, close Cyber Triage®, and then start the service back up again.
Choose a section below based on how you want to run the server.
11.5.1. Installing Server as a Non-Service
The installation steps for the server (and client) start the same way as the standard version, which are outlined in Standard Installation.
All you need to do is launch the .msi installer and choose the default options. The same installer works for Standard, Server, and Client.
Refer to Configure Cyber Triage Server for server configuration steps.
11.5.2. Installing Server as a Service
11.5.2.1. SvcMgr.bat Service Script
Cyber Triage ships with a script called ‘svcmgr.bat’ in a ‘cybertriage\service’ folder. This will help you install, uninstall, and update the service. You can do many of the same things from the Windows Services manager, but this script can make things easier.
To start or stop the service at any time:
Open an admin command prompt
Change to the Cyber Triage directory, such as ‘C:\Program files\Cyber Triage\cybertriage\service’
Type in ‘svcmgr.bat start’ or ‘svcmgr.bat stop’.
11.5.2.2. Service Installation Instructions
If you upgrading and already have a Cyber Triage service, go to Upgrading a Service-based Server for update instructions.
Before you begin the process, make sure you have an interactive user account that will be running the service.
The following steps will install Cyber Triage and configure it as a service.
Install the application using the MSI installer. This can be done using any user account.
- In an Admin command prompt, change to the Cyber Triage folder:
cd C:\Program Files\Cyber Triage\cybertriage\service
- Install the basic service by running:
svcmgr.bat install
- By default, services will run as “Local Service” and you need to change it to the user account that Cyber Triage will run as. Launch the Service Manager application from the same folder:
CyberTriageServicew.exe
- From the service manager, configure the user account the service will run as on the “Log On” tab.
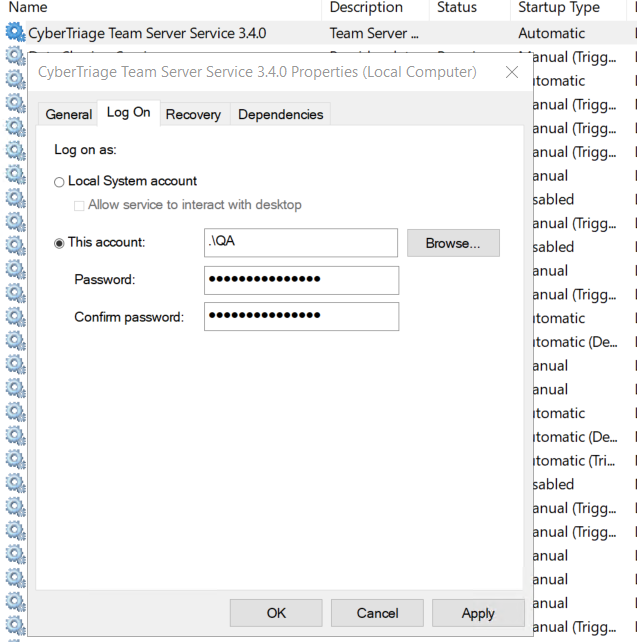
Team Server Log On Screen
Press OK to save the settings.
Next, you need to configure Cyber Triage.
- Launch Cyber Triage using the account that you configured the servicer to run as. You can use “Shift + Right Click -> Run as different user” if that account is not your primary one.
NOTE: It is very important that you are logged in as the user that the service will be running as so that the settings will be found when run as a service.
Configure the Server using the normal steps outlined in Configure Cyber Triage Server.
After the server is configured, close the application.
- Start the service by typing the following in the admin prompt that you used to install the service:
svcmgr.bat start
11.5.2.3. Making Application Configuration Changes as a Service
To make application configuration changes at any point when the server is running as a service, you will need to:
Stop the service using a command prompt and svcmgr or the Windows services panel (see SvcMgr.bat Service Script).
Launch Cyber Triage® as the user that the service runs as (use shift + right click if needed) and make your changes in the options panel or configuration files
Close the application
Start the service again with svcmgr.
11.6. Configure Cyber Triage Server
11.6.1. Enter License and Choose Deployment Mode
When Cyber Triage is first started, you will be prompted for a license, choose the license file that you received that has _server in the name.
When Cyber Triage® is open:
Open the Options panel and choose the Deployment Mode tab. Change the mode to Team - Server. If you do not have this option, then you did not supply a Team license key.
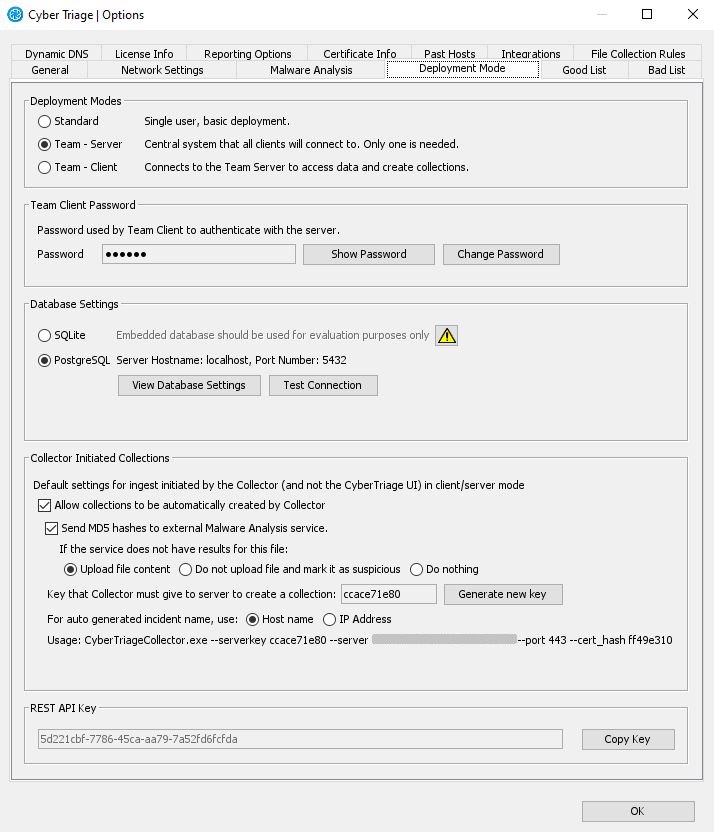
Options (Deployment Mode Tab)
In the Server Administrator Password section, press the Change Password button and pick a password that will be used to administer the cluster. This account will not be able to ingest and analyze data. You will need it to create other accounts.
- In the Database Setting section, either keep it as SQLite or enter in the PostgreSQL information by pressing the View Database Settings button. Use
localhostas the host if you are running the server on the same system as the server. Press “Enable SSL” only if you followed the above instructions and configured PostgreSQL to listen for SSL.
Press “Verify SSL Connection” if you imported the PostgreSQL certificate into Cyber Triage using the above instructions.
Press “Test Connection” to make sure everything works. Refer to the below debugging SSL connections section if you have problems.
- In the Database Setting section, either keep it as SQLite or enter in the PostgreSQL information by pressing the View Database Settings button. Use
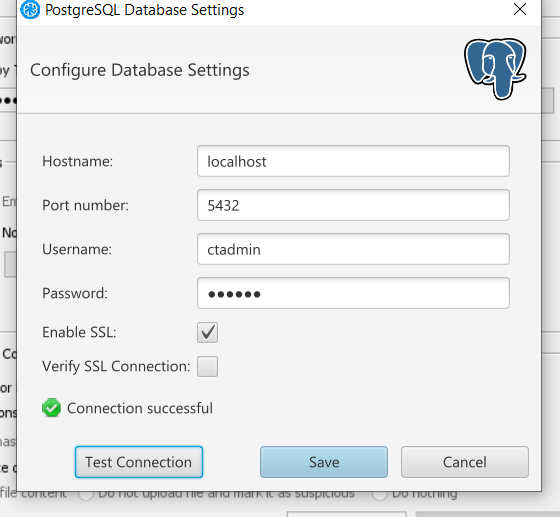
PostgreSQL Database Settings
Before restarting, go the License Info section of the Options panel and record the short TLS certificate hash from the self-signed certificate created on that system. The client installation will prompt you to ensure it is the right hash.
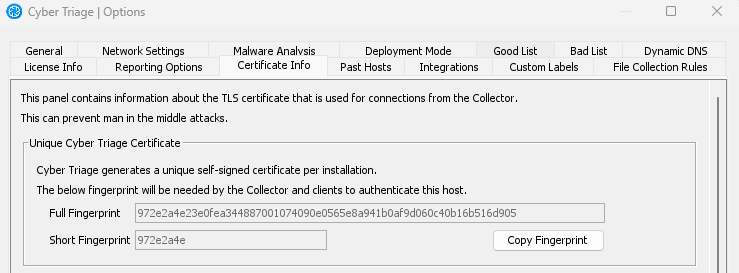
If you have a TLS intercept proxy in between the Server and the Clients, configure Cyber Triage with the proxy’s certificate. See Internal Intercept Proxies.
Press OK and it will restart Cyber Triage®.
When it restarts, your host firewall software may ask permission to open ports. These are required for the server to operate.
You will need to create user accounts for each investigator. Refer to Create and Manage Team Users for details.
When running as a Server, the Cyber Triage® interface will only allow you to go to the options panel or extract the Collector. You cannot create or open sessions directly on the server.
11.6.2. Create and Manage Team Users
Users need an account within Cyber Triage to access the server. User management is done in a separate web interface that can be accessed after you configure the server.
https://localhost:9443/app/index.html
Use the username ‘administrator’ and the password that you set as the Server Administrator Password when the server was configured.
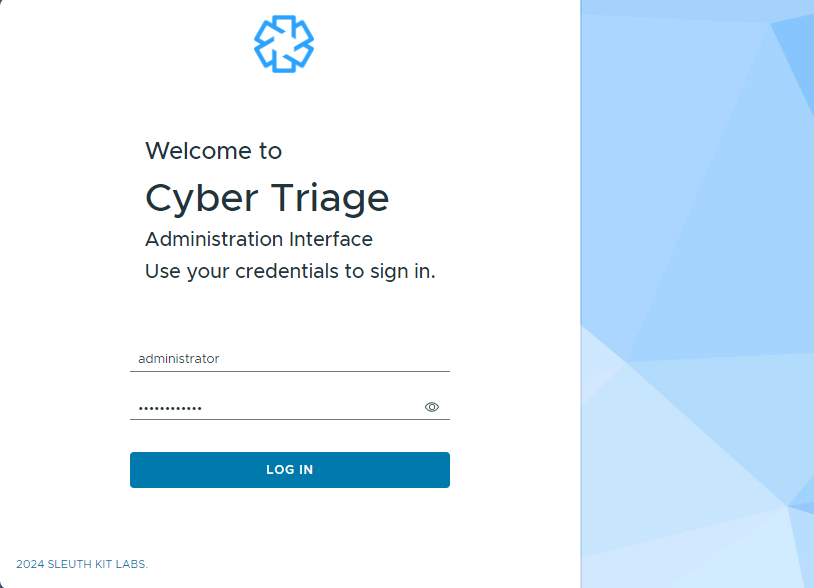
By default, you’ll see the administrator account and an ‘api-user’ account (for REST API access and integrations).
NOTE: If you upgraded from Cyber Triage 3.9 or earlier, the administrator password is the same as was previously called the “Team Client Password”.
11.6.2.1. Creating an Account
You can have as many accounts as you have licensed. To create an account, choose “Add User” and enter the user name and full name.
There are two types of account types:
Observer: Read-only account that can review data, but not add or edit.
Investigator: Writable account that can create and edit incidents.

A temporary password will be assigned. Copy this and share with the user so that they can login for the first time. They will be forced to change it.
11.6.2.2. Changing a User Password
Currently, a user cannot change their own password. The administrator must reset it for them in the web application and then the user can change it when they login next.
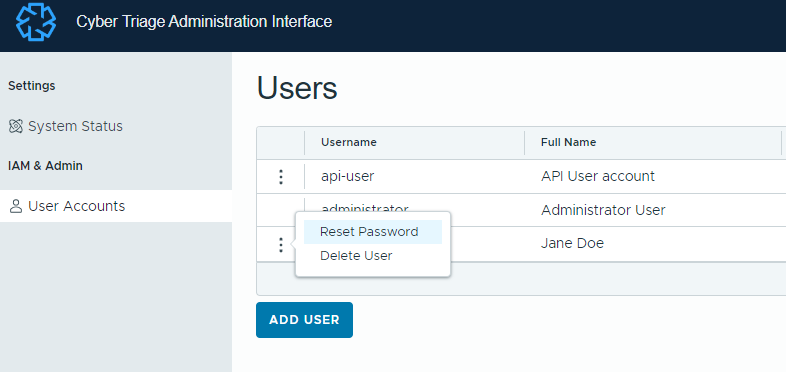
11.6.2.3. Deleting a User
Users can be deleted from the web application by selecting the three vertical dots and choosing “Delete User”. The administrator and API user cannot be deleted.
11.6.2.4. API User
The API user cannot be used by the Cyber Triage clients. It is intended for integrations. It is created automatically with a random password. The web application will provide you with the password and the legacy REST API key if you upgraded from an older version of Cyber Triage that used that feature.
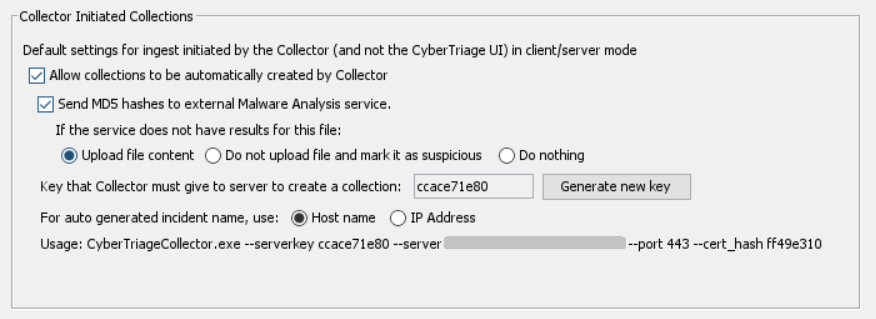
11.6.3. Allow Collector To Initiate Ingests
By default, the Cyber Triage Server listens for network connections only when initiated by a user. The Team Server can be configured to always listen for connections. Any connection without the secret key will be dropped.
This feature is useful when deploying the Collector via EDR or other IT infrastructure.
To enable this feature, go to the “Deployment Mode” section of the options panel (on the server) and enable “Allow collections to be automatically created by Collector”.
Choose the default malware scan settings and record the “key”. You’ll need that when you start the collections.
Refer to Collect with EDR for steps on launching the Collector.
11.6.4. Checking Server Status
You can get basic status of the Cyber Triage Server by pointing a web browser at: https://SERVER_HOST_NAME:9443/api/admin/service-status
11.6.5. Debugging PostgreSQL SSL Issues
If you have errors connecting with SSL, then follow these steps:
- First verify that you can successfully connect to PostgreSQL with SSL disabled. If that “Test Connection” fails, then review:
The PostgreSQL is running.
The client IP address range settings in pg_hba.conf
Firewall settings. You can try to temporarily disable firewall for debugging purposes.
- Once you can connect without SSL, then enable SSL, but do not verify the certificate. If that fails, then check:
Configuration: Your PostgreSQL configuration files, especially postgresql.conf and pg_hba.conf. Ensure that the file paths for SSL certificate and key are correct and there are no typos or missing files.
Permissions: Make sure the PostgreSQL service account has proper permissions to access the certificate and key files. The account running the PostgreSQL service needs read access to these files.
Port Conflict: If you configured PostgreSQL to use SSL on a different port (e.g., 5432 for non-SSL and 5433 for SSL), verify that the specified port is available and not in use by other services.
Windows Firewall: Check if the Windows Firewall or any other firewall software is blocking the specified SSL port. Make sure the firewall rules allow incoming connections on the SSL port.
Certificate Validity: Ensure that the self-signed certificate is still valid. Self-signed certificates usually have a limited validity period, and if it has expired, PostgreSQL may fail to start. You can check the certificate’s validity using the openssl x509 command.
Log Files: Review the PostgreSQL log files for more detailed error messages. The log files are typically located in the PostgreSQL data directory. They can provide insight into what specifically caused the service to fail to start.
System Event Viewer: Check the Windows Event Viewer for error messages related to the PostgreSQL service. It may provide additional information about the startup failure.
Service Account Permissions: Ensure that the service account used to run the PostgreSQL service has the necessary permissions to access PostgreSQL data and configuration files.
- If you want to verify the certificate and it fails only when that is enabled, then check:
Verify that the PostgreSQL server certificate was added to the truststore that is packaged in the Cyber Triage installation directory, NOT the system truststore.
While debugging, you can also use PgAdmin. - Open PgAdmin and connect to Posgres database. - Query the pg_stat_ssl view to check the SSL status for active connections SELECT * FROM pg_stat_ssl. This view provides information about the SSL state of client connections to the PostgreSQL server. This query will show you details about each SSL connection, including the SSL version, cipher, and whether SSL is enabled for each connection.
11.7. Upgrade The Cyber Triage Server
When the server is being upgraded, clients will not be ale to connect and processing will stop. The upgrade process for Cyber Triage Server is different depending on if it is configured to run as a service or not.
11.7.1. Upgrading a Non-Service Server
To upgrade a server that does not run as a service:
Turn the server off
Install the new version using the .MSI
Start the new version
11.7.2. Upgrading a Service-based Server
Cyber Triage 3.10.0 changed its installation process to make upgrading services easier. If you are upgrading, refer to the appropriate section below based on what version you have currently installed.
11.7.2.1. Upgrading from 3.9 or Earlier
Prior to 3.10.0, each version of Cyber Triage had a version number in its path. Therefore, the service needed to be updated for each update to make sure that it referred to the right executable. If you do not update the service, the old version will continue to launch.
The update process is:
Install Cyber Triage 3.10 or later on the server (you can keep the previous version running during this process).
- Open an Admin command prompt and change to the new installation folder.
cd C:\Program Files\Cyber Triage\cybertriage\service
- Stop the previous version of the Cyber Triage service using ‘svcmgr.bat’:
svcmgr stop
- Run the upgrade command so that the service points to the new path. The user account info will persist.
svcmgr upgrade
Launch Cyber Triage using the user account that the service runs as. This ensures that you can review any configuration dialogs. Use shift + right click if needed to pick a different user account. Close the application.
- Start the Cyber Triage service
svcmgr start
Manually uninstall the previous version (using the Windows Control Panel, etc.)
11.7.2.2. Upgrading from 3.10.0 and Later
Starting with 3.10.0, the server is installed into the same folder each time. The upgrade process is:
- Open an Admin command prompt and change to the Cyber Triage folder.
cd C:\Program Files\Cyber Triage\cybertriage\service
- Stop the existing version of Cyber Triage using ‘svcmgr.bat’:
svcmgr stop
Run the new MSI installer. This will uninstall the previous version of Cyber Triage.
Launch Cyber Triage using the user account that the service runs as. This ensures that you can review any configuration dialogs. Use shift + right click if needed to pick a different user account. Close the application.
- Start the Cyber Triage service from the previous admin command prompt.
svcmgr start
11.8. Install and Configure Cyber Triage Clients
Cyber Triage® clients can be installed on any analysis system. The responder will use the client to create and open incidents.
To configure each Cyber Triage® client:
Install Cyber Triage® using the same MSI as you used for the Server.
Supply the same appropriate client license key.
Open the Options panel using the button in the upper right and choose the Deployment Mode tab.
Choose Team - Client.
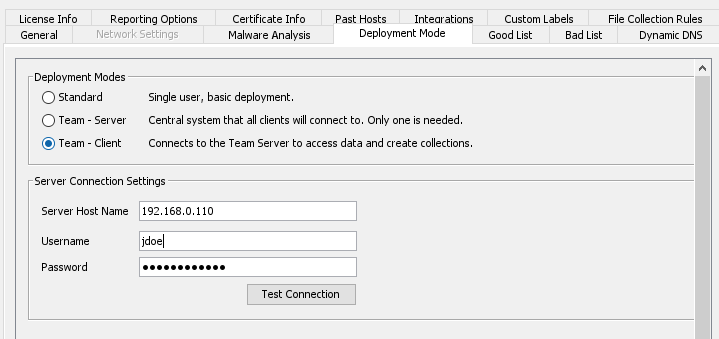
Options (Deployment Mode Tab)
Enter the hostname or IP address of the server and the examiner’s user name and password that was configured on the Cyber Triage Server. Press the Test Connection button to ensure that the client can connect to the Server.
You will be prompted to confirm the TLS certificate that was received from the server. Compare the value displayed with the value on the Server, which you can get from the Options panel on the Server.
You maybe prompted to change the password for the account if it is new.
Press OK and Cyber Triage® will restart.
12. Trouble Shooting
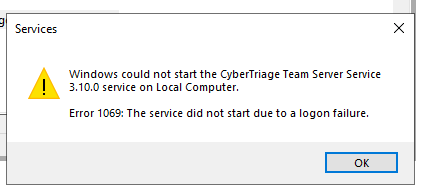
12.1. Server Service Won’t Start
If the service for the server doesn’t automatically start, then:
Go to the Windows Services Manager (where you configured the user name and password)
Manually try to start it
If you get a message such as this, then it is a permission error. Confirm the user account you are using is allowed to launch this service. In this situation, Cyber Triage is never even given a chance to start. You can also confirm that Cyber Triage was never able to start because no Cyber Triage log entries are created. You need to investigate the permissions or password of your user account.