3.3.9. Disk Image
3.3.9.1. What is it
Ability to import a full disk image of a Windows system.
Note
Linux disk images are not supported. Linux is supported via UAC only.
Supported disk image formats:
Raw Single (*.img, *.dd, *.raw, *.bin)
Raw Split (*.001, *.aa)
EnCase (*.e01)
Virtual Machine Disk (*.vmdk)
Virtual Hard Disk (*.vhd, *.vhdx)
Watch the Cyber Triage Basics Course Disk Image video on this technique.
3.3.9.2. How to Get The Data
Use any disk imaging tool.
3.3.9.3. Where To Put Your Data
The following locations are supported based on your access method:
Application |
Supported Locations |
|---|---|
Standard |
Locally accessible |
Team, Web Client |
Server Accessible Folder. |
Team, Local Client |
Locally Accessible or Server Accessible Folder |
If you are using the Team with a local client and the data is locally stored, then the client will do the parsing of the image and send the results to the server. The client must continue to run until the parsing is complete.
3.3.9.4. How to Import
To add Disk Image data, choose Add New Host from the Incident Overview and choose the Disk Image box.
Browse to your image file.

If you are using the Team Client, you will also have a Location choice between Local and Server Accessible. Choose Server Accessible to have the Server process the disk image instead of this client; the path must be within the Server’s configured data source folder (see Server Accessible Data Source Folder).
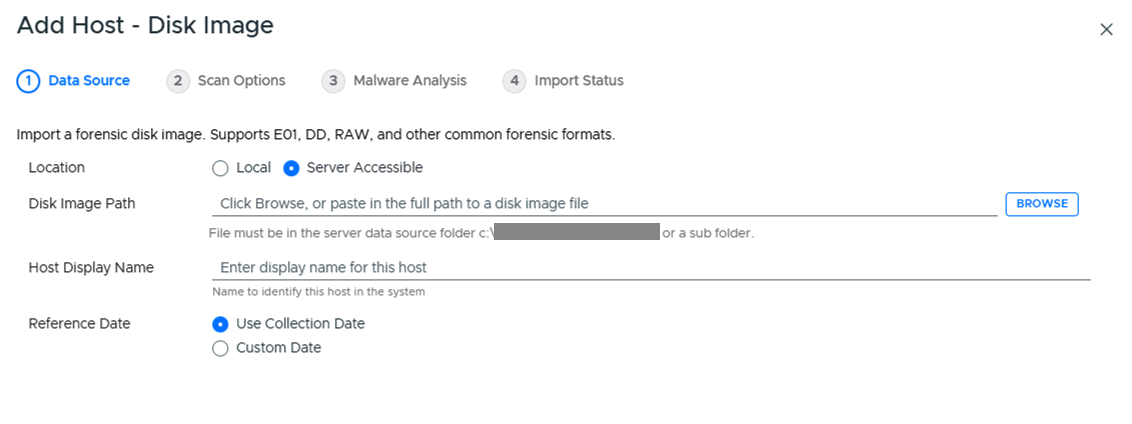
Server Accessible selected in the Team Client
If the Server has not enabled server-accessible data sources, Server Accessible will instead be disabled with a tooltip explaining why.

Server Accessible disabled
Update the display name and reference date as needed.
If BitLocker is detected, a BitLocker Password field will appear so you can enter the password to decrypt the volume. Cyber Triage will automatically attempt to decrypt BitLocker using the clear key first.

Press Continue to then configure what data types to collect (see Specifying Data Collection Types) and malware settings (see Ingest-Time Settings).
There are some special considerations of disk images:
Not all files will be analyzed after importing the disk image. Only the files that the Collector was interested in will be, for example, malware scanned. You will have access to all content though as long as the disk image is still accessible. Some of the files are directly imported into Cyber Triage, but most of them will be available only from the disk image.
During the ingest, some files will be extracted from the disk image into the temp folder in your Data Directory (see Changing Where Data is Stored). This could cause local antivirus to flag files. You should good list this folder with your AV/EDR.
If you are using the Team version of Cyber Triage, then the client will do the parsing of the disk image and send the results to the server. The client must continue to run until the disk image has been parsed.