3.3.12. Network - PsExec
With Network - PsExec, Cyber Triage® will push the Collector to a live system using PsExec and it will send its results back to Cyber Triage® over the network.
To do this, you’ll need the following on the remote Windows system:
File and network sharing enabled
Administrator privileges
PsExec itself must also be configured on the Cyber Triage® side before this method is available - see Configuring PsExec below.
Watch the Cyber Triage Basics Course PsExec video on this technique.
3.3.12.1. Configuring PsExec
Cyber Triage has built-in support to deploy its Collector via PsExec, but additional configuration is needed before this method can be used. Namely:
PsExec must be configured
Ensure the target computer is configured
NOTE: Microsoft has dropped support for Windows XP with the latest versions of PsExec. If you are still using Windows XP or 7 and require the Network - PsExec functionality, you will need to find an older version of PsExec (2.34 or earlier). Contact our support team if you need to use PsExec on XP systems.
3.3.12.1.1. Configure PsExec
Download PsTools version 2.33 or higher.
Unzip the PSTools.zip file to a folder on your computer.
Open the Cyber Triage Options panel from the opening Cyber Triage® window.
Navigate to the “Collection” / “PsExec” panel.
Choose the Browse button, and navigate to the folder that you extracted the contents into. Confirm that you read the PSTools End User License Agreement.
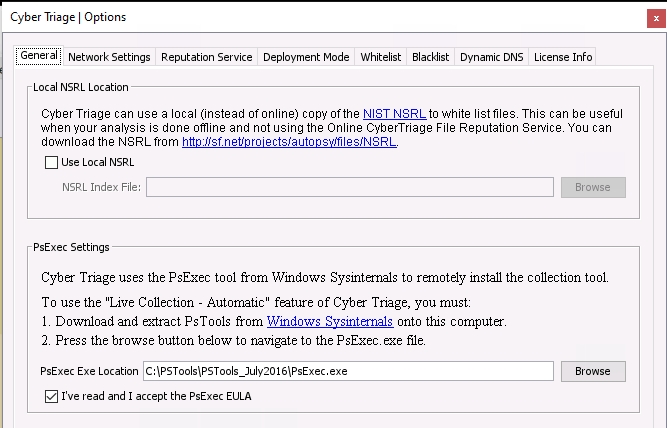
Configuring PsExec tool
3.3.12.1.2. Services Required on Target System
The target system for Network - PsExec must have file sharing enabled so that PsExec can copy over the Collector. This data is sent from the Cyber Triage application to the target system on the following port:
Ports Required on Target Machine for Network - PsExec |
||
|---|---|---|
Protocol |
Port(s) |
Usage (Inbound from) |
TCP |
445 |
PsExec uses file sharing to copy and launch the Collector. |
3.3.12.1.3. Enable Local Accounts
If you want to use a local account on the target system (instead of a domain account), then you’ll need to make a change from the default settings in order to use Network - PsExec.
Run the regedit.exe Windows program on the target computer.
Navigate to the HKEY_LOCAL_MACHINE\Software\Microsoft\Windows\CurrentVersion\Policies\System node.
Right click on the System node to add a REG_DWORD value with a name of LocalAccountTokenFilterPolicy (no quotes) and a value of 1.
Either reboot the computer or restart the “Server” service (LanmanServer) and the “Workstation” service (LanmanWorkstation). Either of these will ensure the new policy is used.
3.3.12.2. Adding a Single Live Host
To perform the collection on a single host, select the Network - PsExec icon. You will be presented with a panel to enter:
Host name of computer to collect from
User name, domain, and password for an account on the remote system that has administrator privileges
If you did not configure PsExec as described in Configure PsExec, then you will be prompted to do so.

Single Network - PsExec Options
After pressing Continue, you will be prompted to choose:
Data types to collect (see Specifying Data Collection Types)
Automated analysis settings (see Ingest-Time Settings)
If this is your first time running the program, you may also be prompted by Windows or a security program to allow Cyber Triage® to open a network port. You will need to allow this to happen so that the Collector can send data to Cyber Triage® on TCP port 443.
See Configuring PsExec above if the administrator account on the remote system is a local account and you are having problems.
After the collection has started, you will be able to see the results. Proceed to Host-level Examination for an overview of the analysis techniques.
3.3.12.3. Adding Multiple Live Hosts
If you have a Team deployment of Cyber Triage®, you can submit multiple host names to collect from by entering a comma-separated list in the Host Name field.

Network - PsExec with Multiple Host Names
Cyber Triage® will then validate the credentials with those host names and then queue them up. You can see progress from the Incident Overview, which is where Cyber Triage® will redirect you to.