1.3. Getting Data Into Cyber Triage
Cyber Triage is very flexible with how to collect and import data, which can also make it overwhelming.
This section will help you decide which approach to use.
1.3.1. Collect vs. Ingest
The first concept to be aware of is the difference between collection and ingesting.
Collect: Copying data from an endpoint using some form of tool, such as the Cyber Triage Collector or a disk imaging tool.
Ingest: Importing the collected into the Cyber Triage application and saving it to the database.
In most cases, these are two separate steps. You launch a collector and you import the results.
Cyber Triage has its own collection tool, called the Collector. It is a non-persistent tool and must be copied to the target system and launched. You can also import the output from other 3rd party tools.
1.3.2. Overview of Add Host Methods
When deciding how you will get data from the remote system into Cyber Triage, there are three main things to think about:
Are you using the Cyber Triage Collector (we recommend it) or a 3rd party? 3rd parties include EDR telemetry and disk imaging tools.
- If using the Cyber Triage Collector, how do you want to get it onto the host and launched?
Use an existing remote access feature (such as PowerShell Remote or an EDR agent)
Interactive login to the host
- If using the Cyber Triage Collector, how is data geting back into Cyber Triage?
Over the network, directly to Cyber Triage over port 443.
Saved to local file and copied back to Cyber Triage.
Uploaded to cloud storage (S3-compatible or Azure).
All combinations of the above are supported.
1.3.2.1. Launching The Cyber Triage Collector
Many scenarios involve you launching the Collector outside of the Cyber Triage application. Those include:
EDR Agents: You can configure many EDRs to copy and launch the Collector. The results can be saved to local file, cloud storage (S3-compatible or Azure), or sent back to Cyber Triage. See Launch via EDR for details.
Manual Launch: You can log into the system, access the Collector from a USB drive or network share, and launch it. You will get to decide where to send the results. See Extracting the Collector for details on how to get the Collector and the next section for details on how to import the results.
PowerShell Remote & WMI: Similar to EDR, you can also use other IT infrastructure to copy and launch the Collector and decide where the result goes. See Launch via PowerShell, WMI, etc. for details.
If you are using one of the above methods, refer to the next section to get the data into Cyber Triage.
Cyber Triage has one option in its Add Host panel that will launch the collector:
PsExec: With the Network - PsExec option (see Add Over The Network - PsExec Launch), Cyber Triage will push the Collector to a remote host over the network using PsExec. Collected data is sent directly back to Cyber Triage over port 443.
1.3.2.2. Importing Cyber Triage Collector Data
When you launch the Collector (either manually or via EDR), you get to pick where the data is saved to:
- Network: Cyber Triage can receive data over port 443, but it is not always listening. You need to tell Cyber Triage to open the port:
Network - Manual: This option (see Add Over The Network - Manual Launch) will open the port and wait for you to launch the Collector (either manually or via an EDR). The port closes after one host.
Streaming: If you have the Team version of Cyber Triage, you can configure it to always be listening on port 443 so the Collector can send data at any time (via EDR, manual launch, etc.). When you use this method, you do not need to use the Add Host feature. You just stream data into the system. See Allow Collector To Initiate Ingests (Team Only) for details.
Cloud Storage: If the Collector uploaded to S3 or Azure, then those files should be imported using the Cyber Triage File option (see Add a Cyber Triage Collector File). Cyber Triage can read the S3 buckets directly.
File: If the Collector saved to a file (USB, network share, etc.), then copy the file to your Cyber Triage computer and use the Cyber Triage File option (see Add a Cyber Triage Collector File).
1.3.2.3. 3rd Party Collectors
If you use a 3rd party collection tool, then the following options in the Add Host panel apply:
Disk Image: Import an existing raw, E01, or virtual disk image. See Add a Disk Image for details.
KAPE: Import the output of the KAPE tool. See Add KAPE and Velociraptor Output for more information.
Memory Image: Volatility v2 and MemProcFS are used on memory images. Cyber Triage does not do memory acquisition. See Add a Memory Image for details.
Logical Files: A folder with a set of files can be imported. Hives and event logs are parsed if they are in the correct relative path. See Add Logical Files and Folders for more information.
Local Disk: A locally mounted drive (such as G:) can be imported. This is most often used when a disk image mounting tool is used, which could be required if the image was encrypted. See Add a Local Windows Disk for more information.
Linux UAC: Import the output of the UAC tool on Linux. See Add Linux UAC Output for more information.
EDR Telemetry: To import data recorded from an EDR, see Add EDR Telemetry Data.
1.3.3. Decision Tree
Another way to identify how to collect is using the following decision tree:
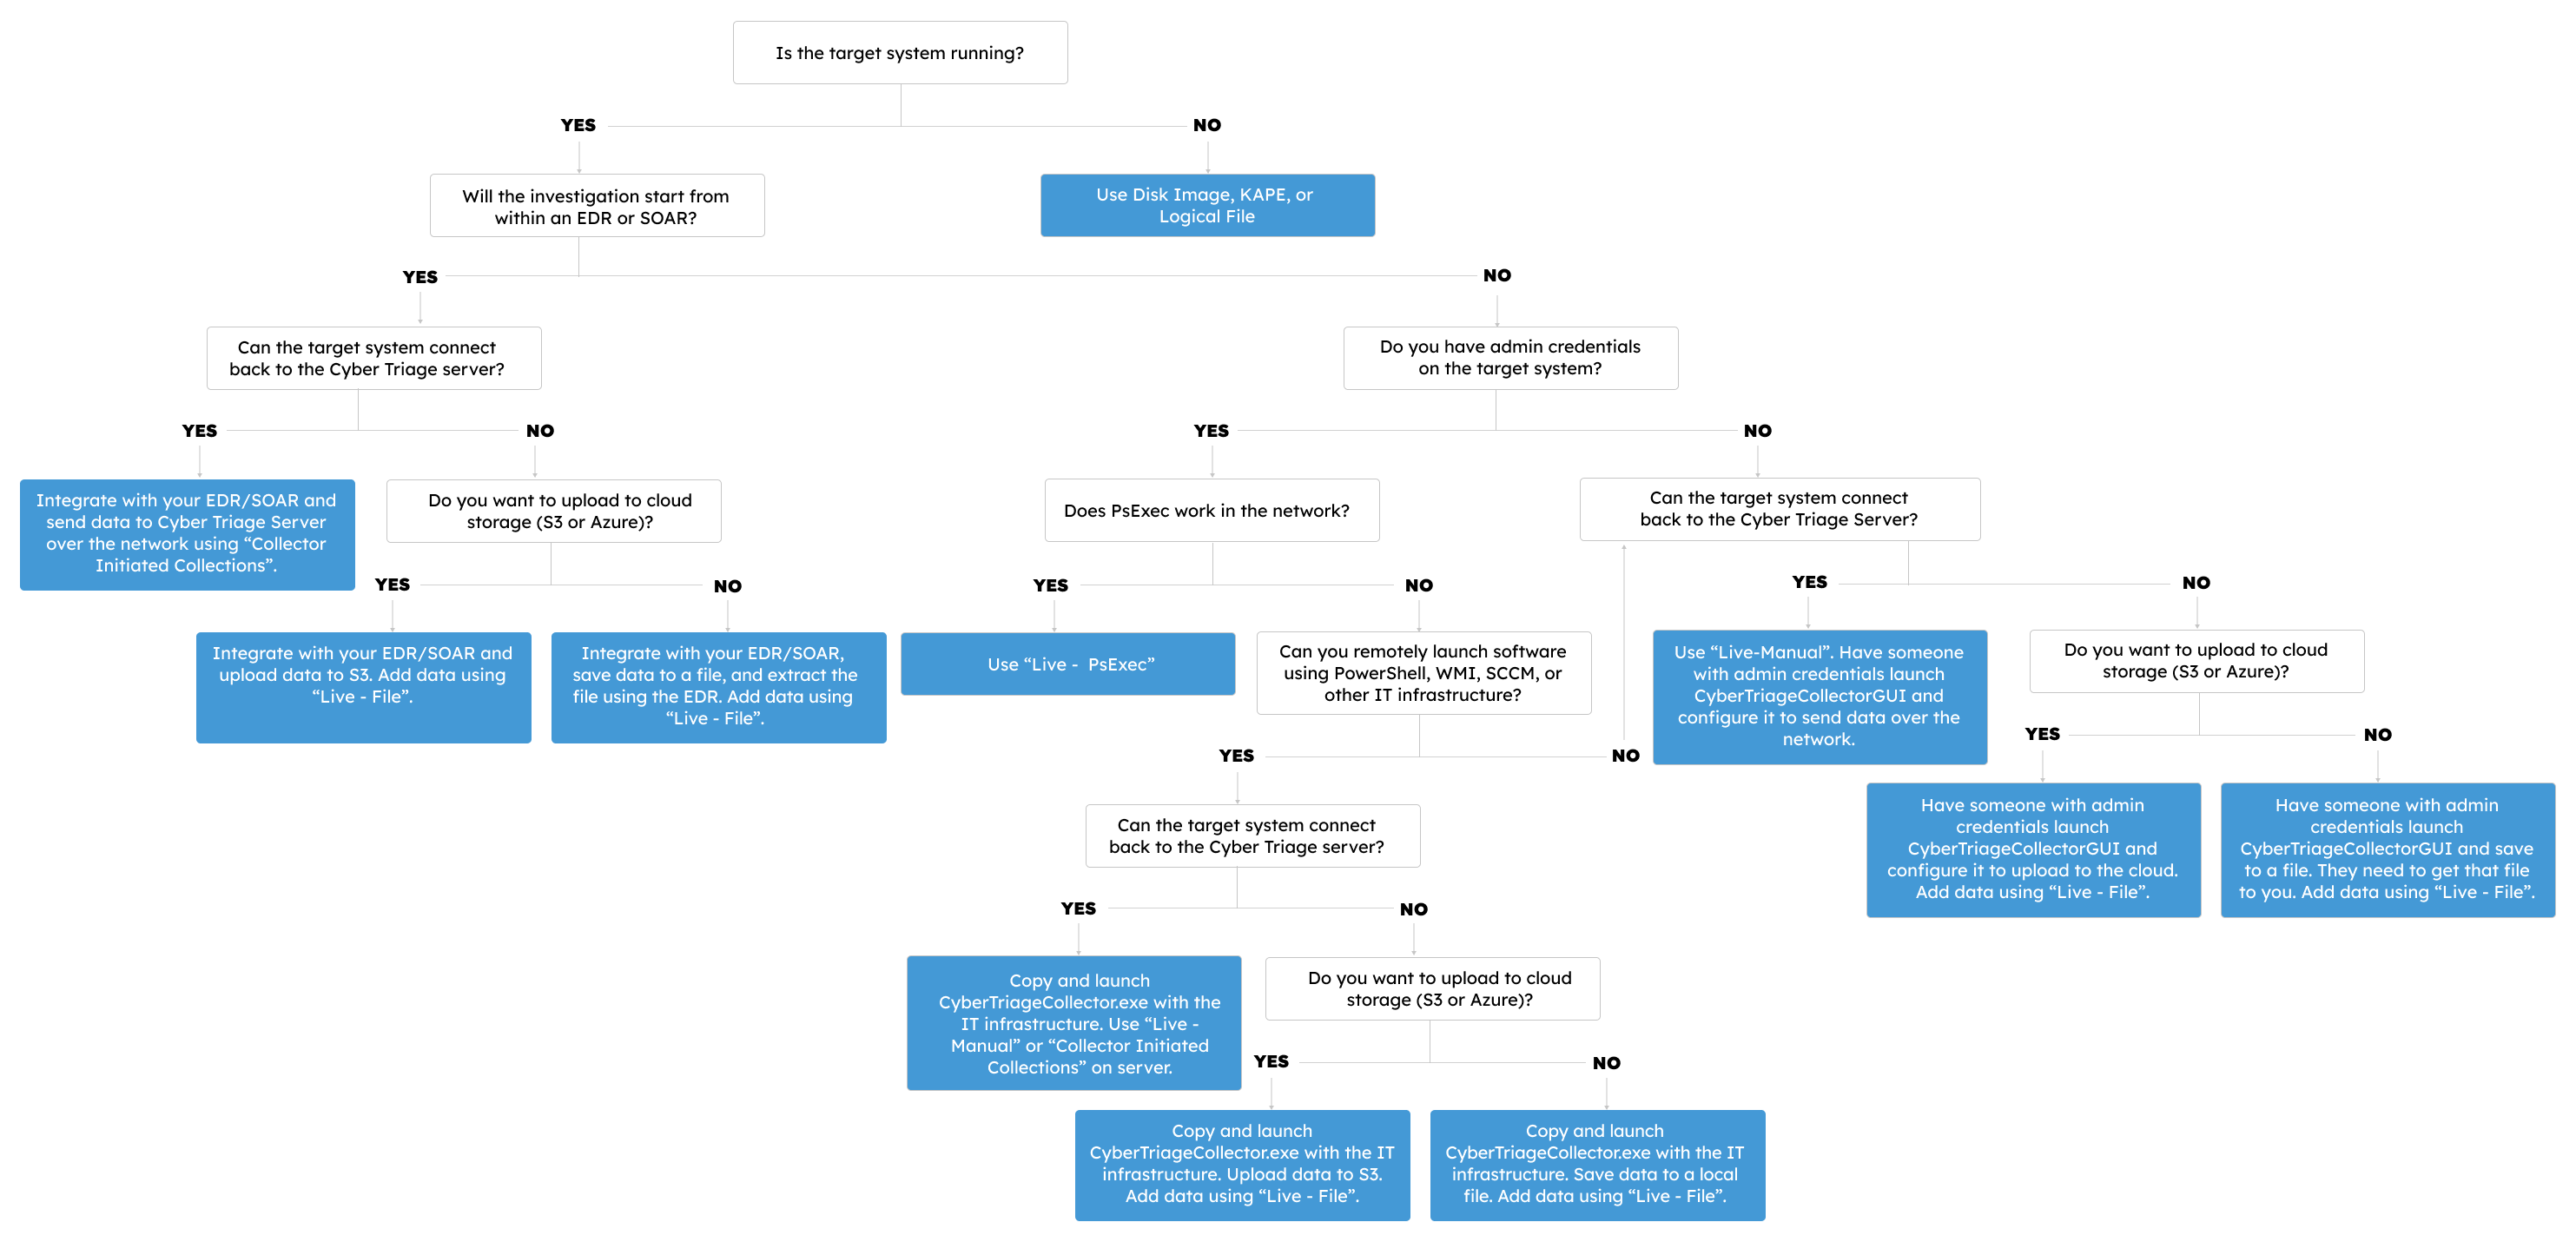
Special notes about the questions in this decision tree:
Is the target computer still running? If not, you need to have either already collected from it or will need to somehow get data from it (bootable USB, remove drive, etc.).
Can the target connect to Cyber Triage? If it can, it can send data directly to Cyber Triage over port 443.
Each box directs to you to an approach.
If it refers to integrating with an EDR or SOAR, refer to Integrations.
If it refers to launching the Collector, refer to Cyber Triage Collector Tool.
Otherwise, refer to the “Add Host” methods in Adding a Host.